- Page 1:
Tivoli® Storage Manager for UNIX a
- Page 4 and 5:
NoteBefore using this information a
- Page 6 and 7:
Chapter 3. Getting started . . . .
- Page 9 and 10:
Snapshotroot . . . . . . . . . . .
- Page 11 and 12:
Figures1. Sample classic query sche
- Page 14 and 15:
86. Query Image command: Related op
- Page 16 and 17:
PublicationsTivoli Storage Manager
- Page 18 and 19:
Table 4. Tivoli Storage Manager Dat
- Page 20 and 21:
v- Online: Go to the Passport Advan
- Page 22 and 23:
xxIBM Tivoli Storage Manager for UN
- Page 24 and 25:
In the graphical user interface, me
- Page 26 and 27:
Refer to “Cluster environment con
- Page 28 and 29:
- Web client: 32 MB- Non-English la
- Page 30 and 31:
Communications methodsThis topic li
- Page 32 and 33:
Hardware requirementsThis section l
- Page 34 and 35:
equired or it is not available, ima
- Page 36 and 37:
Software requirementsThis topic lis
- Page 38 and 39:
IBM Tivoli Storage Manager Solaris
- Page 40 and 41:
If you are upgrading from a previou
- Page 42 and 43:
Table 7. AIX client: Language codes
- Page 44 and 45:
TIVsm.CLIENTContains the backup-arc
- Page 46 and 47:
Related conceptsChapter 2, “Confi
- Page 48 and 49:
Table 9. Linux on POWER client: Lan
- Page 50 and 51:
To install this languageNLS Polish
- Page 52 and 53:
4. To install the 64 Bit API and Ba
- Page 54 and 55:
Installing from the command line is
- Page 56 and 57:
Table 15. Mac OS X installation pac
- Page 58 and 59:
Table 15. Mac OS X installation pac
- Page 60 and 61:
Table 16. Installation package name
- Page 62 and 63:
Table 16. Installation package name
- Page 64 and 65:
Related conceptsChapter 2, “Confi
- Page 66 and 67:
Table 17. Root user, Authorized Use
- Page 68 and 69:
Creating and modifying the client s
- Page 70 and 71:
vor place it in a different directo
- Page 72 and 73:
v Enter one or more blank spaces be
- Page 74 and 75:
HP-UX, all Linux clients, and Solar
- Page 76 and 77:
Configuring the Web clientThere are
- Page 78 and 79:
Important: Running the client sched
- Page 80 and 81:
dsmc scheduleIf the Tivoli Storage
- Page 82 and 83:
Related tasks“Configuring the cli
- Page 84 and 85:
key is set, you can use server-init
- Page 86 and 87:
The Tivoli Storage Manager Server c
- Page 88 and 89:
Syntax for JournalSettings stanza:[
- Page 90 and 91:
NotifyBufferSize=0x00200000Preserve
- Page 92 and 93:
Cluster environment configuration a
- Page 94 and 95:
vvvvvThe tcpclientaddress option mu
- Page 96 and 97:
v Associate the schedule with the a
- Page 98 and 99:
Note: Ensure that you define the do
- Page 100 and 101:
Enabling Tivoli Storage Manager Web
- Page 102 and 103:
v Remove the clusternode option.v S
- Page 104 and 105:
If necessary, your Tivoli Storage M
- Page 106 and 107:
excludes system files, a list of su
- Page 108 and 109: Table 20. Options for controlling p
- Page 110 and 111: Table 21. Wildcard and other specia
- Page 112 and 113: Table 23. Options for controlling s
- Page 114 and 115: emaining include-exclude list from
- Page 116 and 117: The current file being processed is
- Page 118 and 119: Starting a GUI sessionClient access
- Page 120 and 121: Related concepts“Options handling
- Page 122 and 123: 2. In the Preferences dialog under
- Page 124 and 125: For Mac OS X clients, enter this co
- Page 126 and 127: vEnding a sessionFrom the dsmc comm
- Page 128 and 129: 104 IBM Tivoli Storage Manager for
- Page 130 and 131: Table 26. Planning your backups (co
- Page 132 and 133: lanfreeshmportSpecifies the unique
- Page 134 and 135: Related reference“Exclude options
- Page 136 and 137: Related reference“Encryptiontype
- Page 138 and 139: up from a VxFS file system will be
- Page 140 and 141: In each of these cases, when you ne
- Page 142 and 143: Tivoli Storage Manager can restore
- Page 144 and 145: To perform a full or partial increm
- Page 146 and 147: If you install the journal daemon a
- Page 148 and 149: For NAS and N-Series filers running
- Page 150 and 151: Related reference“Virtualmountpoi
- Page 152 and 153: Table 29. Command line backup examp
- Page 154 and 155: Important: When you delete backup f
- Page 156 and 157: Related concepts“Restoring data f
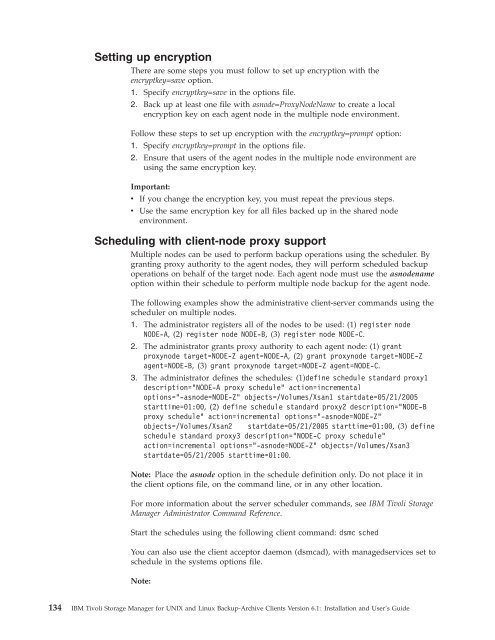
- Page 160 and 161: 4. The administrator defines a dsm.
- Page 162 and 163: You must be a root user to perform
- Page 164 and 165: mounted name. For example, if /dev/
- Page 166 and 167: Method 1: Using image backup with f
- Page 168 and 169: Table 31. Comparing incremental ima
- Page 170 and 171: If you want to specify snapshot-bas
- Page 172 and 173: Related concepts“NDMP support req
- Page 174 and 175: Table 33. NAS options and commands
- Page 176 and 177: Related reference“Snapdiff” on
- Page 178 and 179: PasswordAccessDomaingenerate/wpars/
- Page 180 and 181: Backing up AIX JFS2 extended attrib
- Page 182 and 183: Stored filesWhen you back up and ar
- Page 184 and 185: estore depends on how the symbolic
- Page 186 and 187: vvThe symbolic link is defined as a
- Page 188 and 189: Manager client detects sparse files
- Page 190 and 191: Related concepts“Displaying infor
- Page 192 and 193: 168 IBM Tivoli Storage Manager for
- Page 194 and 195: vvvvvvRestoring the image of a volu
- Page 196 and 197: Related reference“Imagetofile”
- Page 198 and 199: Table 38. Backup set command-line r
- Page 200 and 201: Restoring an entire or partial back
- Page 202 and 203: Restoring an image to fileRelated r
- Page 204 and 205: The GPFS RESTORE rule allows you to
- Page 206 and 207: Related conceptsChapter 9, “Under
- Page 208 and 209:
Table 39. Sample WPAR restore comma
- Page 210 and 211:
Table 40. NAS options and commands
- Page 212 and 213:
Table 41. Command line restore exam
- Page 214 and 215:
4. The client tells the server to r
- Page 216 and 217:
Related concepts“Restoring data t
- Page 218 and 219:
Related reference“Fromnode” on
- Page 220 and 221:
Related reference“Class” on pag
- Page 222 and 223:
Related tasks“Setting the client
- Page 224 and 225:
Related reference“Archive” on p
- Page 226 and 227:
2. Expand the Directory tree by cli
- Page 228 and 229:
In this example, the client backs u
- Page 230 and 231:
10. Click Retrieve. The Retrieve De
- Page 232 and 233:
208 IBM Tivoli Storage Manager for
- Page 234 and 235:
schedule action is required to star
- Page 236 and 237:
for all clients. By default, the cl
- Page 238 and 239:
Setting the client scheduler proces
- Page 240 and 241:
Displaying information about schedu
- Page 242 and 243:
If the scheduled event does not com
- Page 244 and 245:
Suppose that most of the file syste
- Page 246 and 247:
# If necessary, the following varia
- Page 248 and 249:
Table 45. Scheduled client event st
- Page 250 and 251:
Output from scheduled commands is s
- Page 252 and 253:
Table 47. Client return codes and t
- Page 254 and 255:
Using management classes and copy g
- Page 256 and 257:
Copy typeCopy type is the type of t
- Page 258 and 259:
The value for this parameter can be
- Page 260 and 261:
To specify your own default managem
- Page 262 and 263:
vvYour administrator deletes the ma
- Page 264 and 265:
240 IBM Tivoli Storage Manager for
- Page 266 and 267:
v TCP/IP (Mac OS X)v Shared memory
- Page 268 and 269:
Server optionsUse the servername op
- Page 270 and 271:
Table 52. Backup and archive proces
- Page 272 and 273:
Table 52. Backup and archive proces
- Page 274 and 275:
Table 52. Backup and archive proces
- Page 276 and 277:
Table 53. Restore and retrieve proc
- Page 278 and 279:
Table 54. Scheduling options (conti
- Page 280 and 281:
Table 58. Error processing optionsO
- Page 282 and 283:
5. Options received from the server
- Page 284 and 285:
Table 62. Client command options (c
- Page 286 and 287:
Table 62. Client command options (c
- Page 288 and 289:
Table 62. Client command options (c
- Page 290 and 291:
and examples of using the option on
- Page 292 and 293:
You can also use the asnodename opt
- Page 294 and 295:
The auditlogging command is not sup
- Page 296 and 297:
Successful incremental backup of '/
- Page 298 and 299:
Options FilePlace this option in th
- Page 300 and 301:
You can use backupsetname option wi
- Page 302 and 303:
Syntax►►CLASS =clientnas►◄P
- Page 304 and 305:
SHAREdmemUse the shared memory comm
- Page 306 and 307:
Syntax►► COMMRESTARTInterval se
- Page 308 and 309:
Options FilePlace this option in th
- Page 310 and 311:
You can use the dateformat option w
- Page 312 and 313:
Options FilePlace this option at th
- Page 314 and 315:
ExamplesCommand line:dsmc archive "
- Page 316 and 317:
DirmcThe dirmc option specifies the
- Page 318 and 319:
Options FilePlace this option in th
- Page 320 and 321:
Options FilePlace this option in th
- Page 322 and 323:
►►DOMain▼all-localdomain-doma
- Page 324 and 325:
Domain.imageThe domain.image option
- Page 326 and 327:
DynamicimageUse the dynamicimage op
- Page 328 and 329:
that efsdecrypt is specified as no.
- Page 330 and 331:
workstation. For more information,
- Page 332 and 333:
The encryption key password is case
- Page 334 and 335:
Restriction: You cannot specify a n
- Page 336 and 337:
Options FilePlace this option in th
- Page 338 and 339:
Note: Avoid performing a selective
- Page 340 and 341:
vTivoli Storage Manager processes e
- Page 342 and 343:
The entries in the list are process
- Page 344 and 345:
Supported ClientsThis option is val
- Page 346 and 347:
vvrestore groupretrieveSupported Cl
- Page 348 and 349:
ParametersownerName of an alternate
- Page 350 and 351:
ParametersgroupnameSpecifies the na
- Page 352 and 353:
Syntax►► IFNewer ►◄Paramete
- Page 354 and 355:
ExamplesCommand line:dsmc restore i
- Page 356 and 357:
vFile names and directories from an
- Page 358 and 359:
Options file or include/exclude fil
- Page 360 and 361:
Controlling symbolic link and alias
- Page 362 and 363:
The last incremental backup time re
- Page 364 and 365:
Lanfreeshmportservice lookup. The o
- Page 366 and 367:
Note: The client lanfreetcport valu
- Page 368 and 369:
Note: The restore backupset command
- Page 370 and 371:
1. If you set the schedmode option
- Page 372 and 373:
Options FilePlace this option in th
- Page 374 and 375:
ModeUse the mode option with the ba
- Page 376 and 377:
MonitorThe monitor option specifies
- Page 378 and 379:
You can use this option to mitigate
- Page 380 and 381:
ExamplesOptions file:nodename couga
- Page 382 and 383:
Options FilePlace this option in th
- Page 384 and 385:
PasswordThe password option specifi
- Page 386 and 387:
To keep your client node password s
- Page 388 and 389:
ParametersThere are no parameters f
- Page 390 and 391:
Note:1. If the postschedulecmd comm
- Page 392 and 393:
"resume database myDb"If you placed
- Page 394 and 395:
If you have enabled open file suppo
- Page 396 and 397:
fs/h1/m1/file.a/fs/h1/m1/file.b/fs/
- Page 398 and 399:
QueryschedperiodParameters″cmdstr
- Page 400 and 401:
[root@kaveri:/home/cpark] $ dsmc q
- Page 402 and 403:
ExamplesCommand line:-removeoperand
- Page 404 and 405:
Regulating backup and archive sessi
- Page 406 and 407:
Options FilePlace this option in th
- Page 408 and 409:
ExamplesSchedcmdexceptionOptions fi
- Page 410 and 411:
SchedlognameParameterssizeSpecifies
- Page 412 and 413:
Options FilePlace this option in th
- Page 414 and 415:
SchedrestretrdisabledThe schedrestr
- Page 416 and 417:
Supported ClientsThis option is val
- Page 418 and 419:
SessioninitiationThis option is val
- Page 420 and 421:
Options FilePlace this option in th
- Page 422 and 423:
Syntax►►SKIPACLUPdatecheckNoYes
- Page 424 and 425:
Table 66. Incremental command: Rela
- Page 426 and 427:
Snapshotcachesizeincremental -snapd
- Page 428 and 429:
JFS2Specifies that you want to perf
- Page 430 and 431:
However, you might want to associat
- Page 432 and 433:
noTivoli Storage Managerclient proc
- Page 434 and 435:
the client system, when performing
- Page 436 and 437:
ExamplesOptions file:subdir noComma
- Page 438 and 439:
TcpadminportUse the tcpadminport op
- Page 440 and 441:
TcpclientaddressParameterscad_addre
- Page 442 and 443:
ExamplesOptions file:tcpclientp 150
- Page 444 and 445:
Syntax►► TCPServeraddress serve
- Page 446 and 447:
Options FilePlace this option in th
- Page 448 and 449:
performs a full image backup and cr
- Page 450 and 451:
TxnbytelimitThe txnbytelimit option
- Page 452 and 453:
Options FilePlace this option in th
- Page 454 and 455:
Supported ClientsThis option is val
- Page 456 and 457:
incremental command to include it f
- Page 458 and 459:
WebportsThe webports option enables
- Page 460 and 461:
Table 67. Commands (continued)Comma
- Page 462 and 463:
accepted and it does name the error
- Page 464 and 465:
Related concepts“Client options r
- Page 466 and 467:
vvrestore /home/mydir /away/yourdir
- Page 468 and 469:
Client commands referenceArchiveImp
- Page 470 and 471:
TaskTaskTaskArchive all files in th
- Page 472 and 473:
ackup group -filelist=/home/dir1/fi
- Page 474 and 475:
Table 72. Backup Image command: Rel
- Page 476 and 477:
Utilizing image backup to perform f
- Page 478 and 479:
Specifying MODE =differential on th
- Page 480 and 481:
Supported ClientsThis command is va
- Page 482 and 483:
ParametersoptionsTable 74. Delete A
- Page 484 and 485:
Table 75. Delete Backup command: Re
- Page 486 and 487:
Delete FilespaceThe delete filespac
- Page 488 and 489:
optionsTable 77. Delete Group comma
- Page 490 and 491:
HelpUse this command to display inf
- Page 492 and 493:
vvvshared static: If data in the fi
- Page 494 and 495:
means the file or directory might b
- Page 496 and 497:
journal-based backup. Add an exclud
- Page 498 and 499:
v The device class MOUNTRETENTION l
- Page 500 and 501:
ExamplesTask Monitor current NAS im
- Page 502 and 503:
Syntax►►Query ARchiveoptionsfil
- Page 504 and 505:
Syntax►►Query Backupoptionsfile
- Page 506 and 507:
Query BackupsetID, Tivoli Storage M
- Page 508 and 509:
“Restoring data from a backupset
- Page 510 and 511:
Syntax►►Query Filespacefilespac
- Page 512 and 513:
tsm> q group {/neetavfs}/neetagSize
- Page 514 and 515:
Table 86. Query Image command: Rela
- Page 516 and 517:
Query MgmtclassThe query mgmtclass
- Page 518 and 519:
Syntax►►Query Optionsoptionspat
- Page 520 and 521:
ParametersThere are no parameters f
- Page 522 and 523:
Restart RestoreCommand: query syste
- Page 524 and 525:
►LOCation=serverfiletape►◄Par
- Page 526 and 527:
BACKUPSETName=Specifies the name of
- Page 528 and 529:
Syntax►►REStore Backupset{files
- Page 530 and 531:
TaskTaskTaskTaskTaskTaskTaskCommand
- Page 532 and 533:
Restoring backup sets in a SAN envi
- Page 534 and 535:
serverfiletapeSpecifies that the ba
- Page 536 and 537:
Table 93. Restore Group command: Re
- Page 538 and 539:
Syntax►►REStore Imageoptionssou
- Page 540 and 541:
Use the nasnodename option to speci
- Page 542 and 543:
Retrieve the files to the same dire
- Page 544 and 545:
Command: ret "/user/project/*" -pic
- Page 546 and 547:
Table 97. Schedule command: Related
- Page 548 and 549:
Table 98. Selective command: Relate
- Page 550 and 551:
command set access backup ″*″ n
- Page 552 and 553:
► -filelist= -description= -pick
- Page 554 and 555:
ParametersoldpwSpecifies the curren
- Page 556 and 557:
532 IBM Tivoli Storage Manager for
- Page 558 and 559:
534 IBM Tivoli Storage Manager for
- Page 560 and 561:
IBM may use or distribute any of th
- Page 562 and 563:
538 IBM Tivoli Storage Manager for
- Page 564 and 565:
command during a specific time peri
- Page 566 and 567:
client A software program or comput
- Page 568 and 569:
agent over the local area network.
- Page 570 and 571:
file access timeOn AIX, UNIX, or Li
- Page 572 and 573:
Jjob fileA generated file that cont
- Page 574 and 575:
is optional. See also stub file and
- Page 576 and 577:
packet In data communication, a seq
- Page 578 and 579:
written to the database. The log ca
- Page 580 and 581:
stabilized file spaceA file space t
- Page 582 and 583:
UnicodeA character encoding standar
- Page 584 and 585:
560 IBM Tivoli Storage Manager for
- Page 586 and 587:
ackup (continued)enabling communica
- Page 588 and 589:
commands (continued)preview 476quer
- Page 590 and 591:
filesonly option 319filespacedelete
- Page 592 and 593:
management classes (continued)overr
- Page 594 and 595:
problem determination (continued)de
- Page 596 and 597:
server (continued)TCP/IP port addre
- Page 598:
574 IBM Tivoli Storage Manager for


