Prisma II High Density EDFA Modules Installation Guide
Prisma II High Density EDFA Modules Installation Guide
Prisma II High Density EDFA Modules Installation Guide
- No tags were found...

Create successful ePaper yourself
Turn your PDF publications into a flip-book with our unique Google optimized e-Paper software.
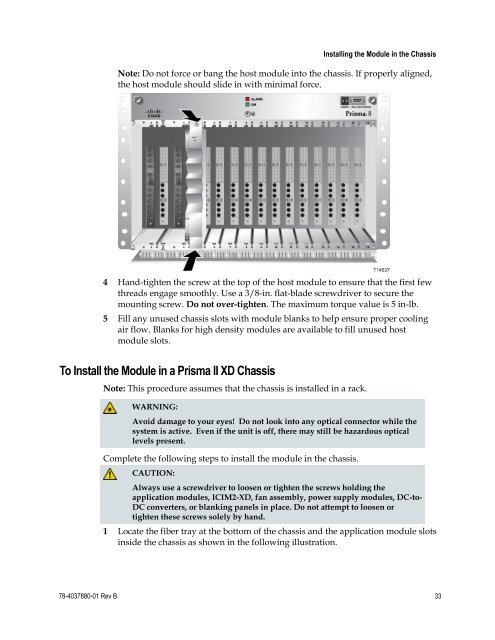
Installing the Module in the ChassisNote: Do not force or bang the host module into the chassis. If properly aligned,the host module should slide in with minimal force.4 Hand-tighten the screw at the top of the host module to ensure that the first fewthreads engage smoothly. Use a 3/8-in. flat-blade screwdriver to secure themounting screw. Do not over-tighten. The maximum torque value is 5 in-lb.5 Fill any unused chassis slots with module blanks to help ensure proper coolingair flow. Blanks for high density modules are available to fill unused hostmodule slots.To Install the Module in a <strong>Prisma</strong> <strong>II</strong> XD ChassisNote: This procedure assumes that the chassis is installed in a rack.WARNING:Avoid damage to your eyes! Do not look into any optical connector while thesystem is active. Even if the unit is off, there may still be hazardous opticallevels present.Complete the following steps to install the module in the chassis.CAUTION:Always use a screwdriver to loosen or tighten the screws holding theapplication modules, ICIM2-XD, fan assembly, power supply modules, DC-to-DC converters, or blanking panels in place. Do not attempt to loosen ortighten these screws solely by hand.1 Locate the fiber tray at the bottom of the chassis and the application module slotsinside the chassis as shown in the following illustration.78-4037880-01 Rev B 33