
Create successful ePaper yourself
Turn your PDF publications into a flip-book with our unique Google optimized e-Paper software.
How to: Build your own Windows app with App Studio<br />
are two types available: App or Content. The first is used to create<br />
web apps, which are a redirect to an existing web page or site.<br />
Alternatively, Content apps are actual mobile apps, that draw data<br />
from various sources and display it in a manner that you specify.<br />
Within Content there are two three options to choose between:<br />
Empty App, My Favourite Band and My App. Empty is just as<br />
it says, a blank shell into which you add sections and sources,<br />
then determine the general look and feel of the app. If this<br />
sounds a little too much like hard work then the two others are<br />
Predefined templates that still give you control over the content,<br />
but use previously generated apps as a starting point. Select one<br />
of these to begin.<br />
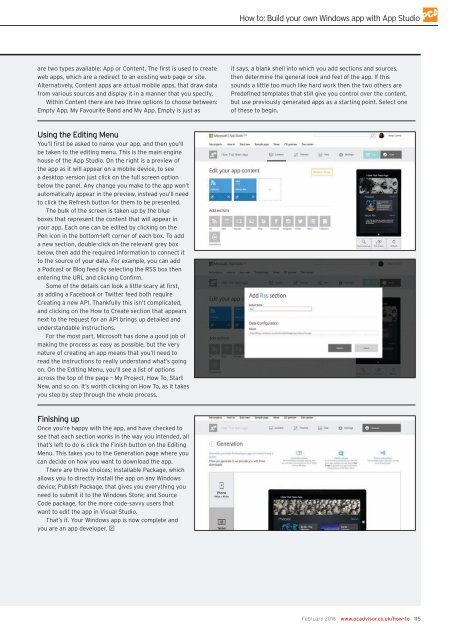
Using the Editing Menu<br />
You’ll first be asked to name your app, and then you’ll<br />
be taken to the editing menu. This is the main engine<br />
house of the App Studio. On the right is a preview of<br />
the app as it will appear on a mobile device, to see<br />
a desktop version just click on the full screen option<br />
below the panel. Any change you make to the app won’t<br />
automatically appear in the preview, instead you’ll need<br />
to click the Refresh button for them to be presented.<br />
The bulk of the screen is taken up by the blue<br />
boxes that represent the content that will appear in<br />
your app. Each one can be edited by clicking on the<br />
Pen icon in the bottom-left corner of each box. To add<br />
a new section, double-click on the relevant grey box<br />
below, then add the required information to connect it<br />
to the source of your data. For example, you can add<br />
a Podcast or Blog feed by selecting the RSS box then<br />
entering the URL and clicking Confirm.<br />
Some of the details can look a little scary at first,<br />
as adding a Facebook or Twitter feed both require<br />
Creating a new API. Thankfully this isn’t complicated,<br />
and clicking on the How to Create section that appears<br />
next to the request for an API brings up detailed and<br />
understandable instructions.<br />
For the most part, Microsoft has done a good job of<br />
making the process as easy as possible, but the very<br />
nature of creating an app means that you’ll need to<br />
read the instructions to really understand what’s going<br />
on. On the Editing Menu, you’ll see a list of options<br />
across the top of the page – My Project, How To, Start<br />
New, and so on. It’s worth clicking on How To, as it takes<br />
you step by step through the whole process.<br />
Finishing up<br />
Once you’re happy with the app, and have checked to<br />
see that each section works in the way you intended, all<br />
that’s left to do is click the Finish button on the Editing<br />
Menu. This takes you to the Generation page where you<br />
can decide on how you want to download the app.<br />
There are three choices; Installable Package, which<br />
allows you to directly install the app on any Windows<br />
device; Publish Package, that gives you everything you<br />
need to submit it to the Windows Store; and Source<br />
Code package, for the more code-savvy users that<br />
want to edit the app in Visual Studio.<br />
That’s it. Your Windows app is now complete and<br />
you are an app developer. J<br />
February 2016 www.pcadvisor.co.uk/how-to 115