
You also want an ePaper? Increase the reach of your titles
YUMPU automatically turns print PDFs into web optimized ePapers that Google loves.
Group test: Home security cameras<br />
Setup can’t be done from your phone,<br />
but it’s easy via a web browser<br />
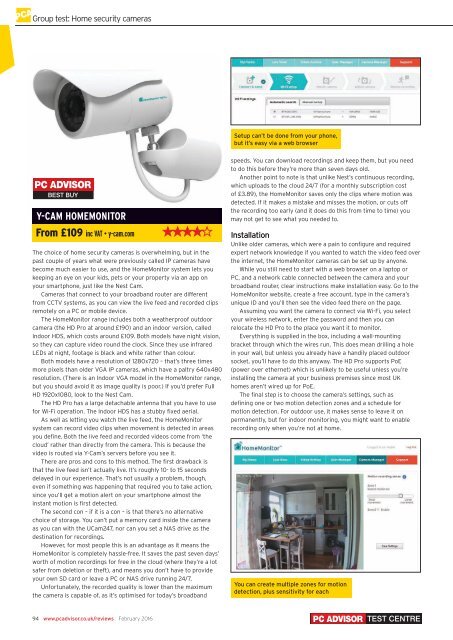
Y-CAM HOMEMONITOR<br />
From £109 inc VAT • y-cam.com<br />
The choice of home security cameras is overwhelming, but in the<br />
past couple of years what were previously called IP cameras have<br />
become much easier to use, and the HomeMonitor system lets you<br />
keeping an eye on your kids, pets or your property via an app on<br />
your smartphone, just like the Nest Cam.<br />
Cameras that connect to your broadband router are different<br />
from CCTV systems, as you can view the live feed and recorded clips<br />
remotely on a <strong>PC</strong> or mobile device.<br />
The HomeMonitor range includes both a weatherproof outdoor<br />
camera (the HD Pro at around £190) and an indoor version, called<br />
Indoor HDS, which costs around £109. Both models have night vision,<br />
so they can capture video round the clock. Since they use infrared<br />
LEDs at night, footage is black and white rather than colour.<br />
Both models have a resolution of 1280x720 – that’s three times<br />
more pixels than older VGA IP cameras, which have a paltry 640x480<br />
resolution. (There is an Indoor VGA model in the HomeMonitor range,<br />
but you should avoid it as image quality is poor.) If you’d prefer Full<br />
HD 1920x1080, look to the Nest Cam.<br />
The HD Pro has a large detachable antenna that you have to use<br />
for Wi-Fi operation. The Indoor HDS has a stubby fixed aerial.<br />
As well as letting you watch the live feed, the HomeMonitor<br />
system can record video clips when movement is detected in areas<br />
you define. Both the live feed and recorded videos come from ‘the<br />
cloud’ rather than directly from the camera. This is because the<br />
video is routed via Y-Cam’s servers before you see it.<br />
There are pros and cons to this method. The first drawback is<br />
that the live feed isn’t actually live. It’s roughly 10- to 15 seconds<br />
delayed in our experience. That’s not usually a problem, though,<br />
even if something was happening that required you to take action,<br />
since you’ll get a motion alert on your smartphone almost the<br />
instant motion is first detected.<br />
The second con – if it is a con – is that there’s no alternative<br />
choice of storage. You can’t put a memory card inside the camera<br />
as you can with the UCam247, nor can you set a NAS drive as the<br />
destination for recordings.<br />
However, for most people this is an advantage as it means the<br />
HomeMonitor is completely hassle-free. It saves the past seven days’<br />
worth of motion recordings for free in the cloud (where they’re a lot<br />
safer from deletion or theft), and means you don’t have to provide<br />
your own SD card or leave a <strong>PC</strong> or NAS drive running 24/7.<br />
Unfortunately, the recorded quality is lower than the maximum<br />
the camera is capable of, as it’s optimised for today’s broadband<br />
speeds. You can download recordings and keep them, but you need<br />
to do this before they’re more than seven days old.<br />
Another point to note is that unlike Nest’s continuous recording,<br />
which uploads to the cloud 24/7 (for a monthly subscription cost<br />
of £3.89), the HomeMonitor saves only the clips where motion was<br />
detected. If it makes a mistake and misses the motion, or cuts off<br />
the recording too early (and it does do this from time to time) you<br />
may not get to see what you needed to.<br />
Installation<br />
Unlike older cameras, which were a pain to configure and required<br />
expert network knowledge if you wanted to watch the video feed over<br />
the internet, the HomeMonitor cameras can be set up by anyone.<br />
While you still need to start with a web browser on a laptop or<br />
<strong>PC</strong>, and a network cable connected between the camera and your<br />
broadband router, clear instructions make installation easy. Go to the<br />
HomeMonitor website, create a free account, type in the camera’s<br />
unique ID and you’ll then see the video feed there on the page.<br />
Assuming you want the camera to connect via Wi-Fi, you select<br />
your wireless network, enter the password and then you can<br />
relocate the HD Pro to the place you want it to monitor.<br />
Everything is supplied in the box, including a wall-mounting<br />
bracket through which the wires run. This does mean drilling a hole<br />
in your wall, but unless you already have a handily placed outdoor<br />
socket, you’ll have to do this anyway. The HD Pro supports PoE<br />
(power over ethernet) which is unlikely to be useful unless you’re<br />
installing the camera at your business premises since most UK<br />
homes aren’t wired up for PoE.<br />
The final step is to choose the camera’s settings, such as<br />
defining one or two motion detection zones and a schedule for<br />
motion detection. For outdoor use, it makes sense to leave it on<br />
permanently, but for indoor monitoring, you might want to enable<br />
recording only when you’re not at home.<br />
You can create multiple zones for motion<br />
detection, plus sensitivity for each<br />
94 www.pcadvisor.co.uk/reviews February 2016<br />
TEST CENTRE