Erfolgreiche ePaper selbst erstellen
Machen Sie aus Ihren PDF Publikationen ein blätterbares Flipbook mit unserer einzigartigen Google optimierten e-Paper Software.
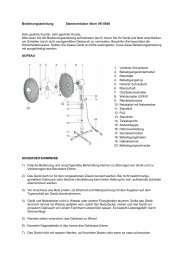
• Fit the grubscrews 7.13 into the collets 7.12.<br />
• Slip the tiller and the collets onto the connecting sleeve.<br />
• Slide the depth vanes into the tubular rivets on both sides, fitting the connecting sleeve over the<br />
vanes in the centre.<br />
• Set the depth vanes to the same angle on both sides.<br />
• Rotate the collets until the grubscrews are located over the filed slots, and tighten them.<br />
• Align the tiller as shown in the side elevation, and tighten the screw 7.9.<br />
Stage 8: the automatic diving system, parts 8.1 - 8.27<br />
• Drill 3.2 mm holes where punched in the vertical conning tower bulkheads 8.1 and 8.2. Press the<br />
rivet nuts 8.3 into the holes and secure them with a drop of instant glue.<br />
• Screw the jig screw „HS“ through both rivet nuts and set a spacing of 26 mm between the bulkheads.<br />
• Place this assembly inside the conning tower and position it centrally under the slot. Fix the bulkheads<br />
in the conning tower with instant glue.<br />
• Remove the jig screw.<br />
52<br />
The screw is accessible through one of the adjustor holes.<br />
• Fit the two screws 8.4.<br />
• Fit the nuts 8.5 on the tip of the screws 8.4 and secure each with a drop of instant glue.<br />
• Mount the <strong>hu</strong>ll nose on the model again. Fit the conning tower, align it accurately, and glue it to the<br />
front conning tower bulkhead 7.2 and the <strong>hu</strong>ll nose only, using Stabilit Express.<br />
• Glue the doublers 8.6 to the centre conning tower bulkhead 7.3, keeping the outside edges flush.<br />
• Drill 2 mm holes through the vertical plates 8.7 where punched, and fit the jig screw „HS“ through<br />
the holes.<br />
• Glue the vertical plates in the angle between the conning tower bulkhead 7.3 and the doublers 8.6.<br />
• Remove the jig screw, and open up the holes to 4 mm diameter.<br />
• Fit the grubscrew 8.9 into the collet 8.8 and slip it onto the radar mast 8.10. Position the collet in the<br />
exact position shown on the plan, and tighten the grubscrew.<br />
• Push the solder tags 8.11 up against the collet from underneath, rotate the end through 90 degrees,<br />
and bend them down, as shown on the plan.<br />
• Solder the solder tags to each other and to the collet.