Sie wollen auch ein ePaper? Erhöhen Sie die Reichweite Ihrer Titel.
YUMPU macht aus Druck-PDFs automatisch weboptimierte ePaper, die Google liebt.
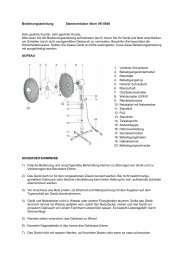
• Slip the depth vane pushrod 4.11 into the guide tube 2.15. Position the servo 4.13 as shown in the<br />
plan view, and fix it on the plate 2.3 with two strips of double-sided foam tape 4.15, with the pushrod<br />
running in a straight and unobstructed path towards the rear.<br />
• With the depth vanes disconnected, adjust the pushrod 4.11 as shown in the plan view, and tighten<br />
the grubscrew 4.9 in the collet 4.10 - detail drawing „Z“.<br />
• Install the rudder pushrod 4.12 and servo 4.14 in the same way, fixing the servo in place with two<br />
further strips of double-sided foam tape 4.15.<br />
• Fix the receiver 4.16 and the motor controller 4.17 in place with strips of double-sided tape 4.15.<br />
• Connect up the radio control system and the battery, referring to the wiring diagram and the<br />
instructions supplied with the units. Keep the leads to the motor, controller and switch tidy by pressing<br />
them onto a further piece of double-sided tape stuck on top of the motor controller.<br />
• Make sure that the charge socket is still accessible. Wrap the rest of the leads in insulating tape or<br />
spiral tubing, and deploy them neatly.<br />
• Set the servos to neutral from the transmitter.<br />
• Fit the flexible boots 4.18 onto the pushrods 4.13 and 4.14 as described earlier, moistening them<br />
with water beforehand. Set each to a length of about 50 mm. Check that the servos are still at neutral.<br />
Apply instant glue to the boots 4.7 and 4.18 where they meet the pushrods and at the stubs on<br />
the buoyancy <strong>hu</strong>ll cap, to ensure a watertight seal at both ends.<br />
• Remove the battery 4.2. Slip the O-ring 4.19 onto the rear buoyancy <strong>hu</strong>ll cap.<br />
• Fit the buoyancy <strong>hu</strong>ll 3.2 and the forward cap 3.3. Screw the self-locking nut 3.4 into place and<br />
tighten it lightly. This will com press the O-ring 4.19 slightly.<br />
Stage 5: the control system, parts 5.1 - 5.19<br />
• Slide the four fixed control panels 5.1 into the slots in the centre section 5.2 from the rear.<br />
• Apply a drop of instant glue to the slots at the front end of each fixed panel.<br />
• De-burr the hole in the front of the centre section, using a drill bit.<br />
• Fit the assembly 5.1 / 5.2 onto the stern tube; the bush must be visible at the rear.<br />
• The next step is to align the fixed control panel assembly. You will need to place the model in the<br />
boatstand for this.<br />
• Position the buoyancy <strong>hu</strong>ll 3.3 so that the right-hand and left hand stubs on the forward cap are the<br />
same distance above the workbench: X right = X left, c.f. detail drawing ”X”.<br />
• Rotate the fixed control panel assembly on the stern tube until the horizontal panels are also the<br />
same height above the workbench: Y right = Y left. As confirmation, check that the vertical fixed<br />
panels are truly vertical.<br />
• Glue the centre section 5.2 to the stern tube at the front end only. Use Stabilit-Express. Do not run<br />
the risk of glue getting inside the stern tube.<br />
46