Sie wollen auch ein ePaper? Erhöhen Sie die Reichweite Ihrer Titel.
YUMPU macht aus Druck-PDFs automatisch weboptimierte ePaper, die Google liebt.
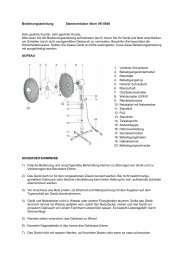
• Drill a 1.5 mm hole through the formed end of the solder tags.<br />
• Slip the machined aluminium sleeve 8.12 onto the bottom end of the radar mast.<br />
• Solder the S-hook 8.13 to the base of the radar mast; the return spring is attached to this later.<br />
• Hold the radar mast between the vertical plates and fix it in place with the screws 8.14 and the<br />
tubular rivets 8.15. Tighten the screws to the point where the mast is clamped firmly, but still rotates<br />
freely.<br />
• Cut the pushrod 8.16 to length, form a double bend in one end, and connect it to the hole in the<br />
solder tags.<br />
• Remove the <strong>hu</strong>ll nose and conning tower from the model.<br />
• Fit the radar mast into the conning tower from underneath. Push the centre conning tower bulkhead,<br />
complete with mechanism, up against the front conning tower bulkhead, as far as it will go.<br />
The bulkhead should end up flush with the bottom edge of the conning tower.<br />
• Mark the position of the four self-tapping screws 8.17. Drill 1.5 mm holes through the conning tower<br />
and into the conning tower bulkhead 7.3. Secure the assembly to the conning tower using the selftapping<br />
screws 8.17.<br />
• Connect the ring bolt 8.19 to the S-hook 8.20, and fit the spring 8.21 between the two S-hooks<br />
8.13 and 8.20.<br />
• Fit the ring bolt through the front hole in the conning tower, screw the rivet nut 8.18 onto it from the<br />
outside, and press the nut into the hole.<br />
• Set up the eye-bolt in its basic position, as shown on the plan.<br />
• Connect the two pushrods 7.10 and 8.16 using the collet 8.22 and the grubscrew 8.23. The front<br />
depth vanes should be set to about 2 degrees „down“.<br />
• Cut out the radar screen 8.24 and glue it to the collet 8.25.<br />
• Slip the radar screen onto the mast and fix it in place by screwing the grubscrew 8.26 into the collet.<br />
• Drill a 1.5 mm hole in the radar screen, as shown on the plan.<br />
• Bend the wire 8.27 to the shape shown on the plan, cut it to length, and glue it into the hole in the<br />
screen.<br />
53