Accutorr Plus Service Manual - Mindray
Accutorr Plus Service Manual - Mindray
Accutorr Plus Service Manual - Mindray
You also want an ePaper? Increase the reach of your titles
YUMPU automatically turns print PDFs into web optimized ePapers that Google loves.
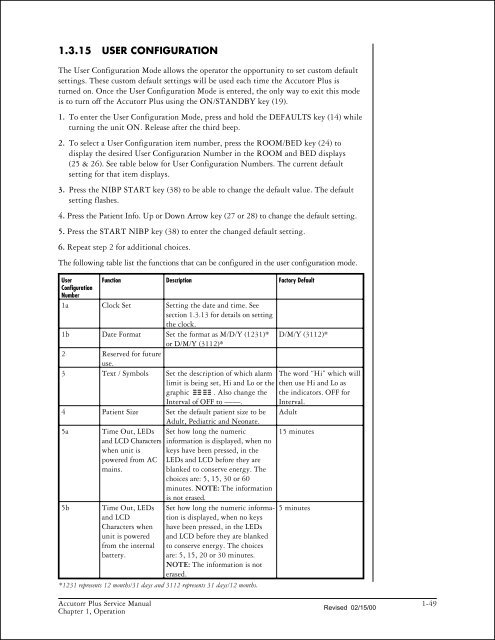
1.3.15 USER CONFIGURATION<br />
The User Configuration Mode allows the operator the opportunity to set custom default<br />
settings. These custom default settings will be used each time the <strong>Accutorr</strong> <strong>Plus</strong> is<br />
turned on. Once the User Configuration Mode is entered, the only way to exit this mode<br />
is to turn off the <strong>Accutorr</strong> <strong>Plus</strong> using the ON/STANDBY key (19).<br />
1. To enter the User Configuration Mode, press and hold the DEFAULTS key (14) while<br />
turning the unit ON. Release after the third beep.<br />
2. To select a User Configuration item number, press the ROOM/BED key (24) to<br />
display the desired User Configuration Number in the ROOM and BED displays<br />
(25 & 26). See table below for User Configuration Numbers. The current default<br />
setting for that item displays.<br />
3. Press the NIBP START key (38) to be able to change the default value. The default<br />
setting flashes.<br />
4. Press the Patient Info. Up or Down Arrow key (27 or 28) to change the default setting.<br />
5. Press the START NIBP key (38) to enter the changed default setting.<br />
6. Repeat step 2 for additional choices.<br />
The following table list the functions that can be configured in the user configuration mode.<br />
User<br />
Configuration<br />
Number<br />
Function Description Factory Default<br />
1a Clock Set Setting the date and time. See<br />
section 1.3.13 for details on setting<br />
the clock.<br />
1b Date Format Set the format as M/D/Y (1231)*<br />
or D/M/Y (3112)*<br />
2 Reserved for future<br />
use.<br />
3 Text / Symbols Set the description of which alarm<br />
limit is being set, Hi and Lo or the<br />
graphic . Also change the<br />
D/M/Y (3112)*<br />
The word “Hi” which will<br />
then use Hi and Lo as<br />
the indicators. OFF for<br />
Interval of OFF to ——. Interval.<br />
4 Patient Size Set the default patient size to be<br />
Adult, Pediatric and Neonate.<br />
Adult<br />
5a Time Out, LEDs Set how long the numeric 15 minutes<br />
and LCD Characters information is displayed, when no<br />
when unit is keys have been pressed, in the<br />
powered from AC LEDs and LCD before they are<br />
mains.<br />
blanked to conserve energy. The<br />
choices are: 5, 15, 30 or 60<br />
minutes. NOTE: The information<br />
is not erased.<br />
5b Time Out, LEDs Set how long the numeric informa- 5 minutes<br />
and LCD tion is displayed, when no keys<br />
Characters when have been pressed, in the LEDs<br />
unit is powered and LCD before they are blanked<br />
from the internal to conserve energy. The choices<br />
battery. are: 5, 15, 20 or 30 minutes.<br />
NOTE: The information is not<br />
erased.<br />
*1231 represents 12 months/31 days and 3112 represents 31 days/12 months.<br />
<strong>Accutorr</strong> <strong>Plus</strong> <strong>Service</strong> <strong>Manual</strong> 1-49<br />
Revised 02/15/00<br />
Chapter 1, Operation


