

e-brick installation and user manual - GEW UV System v1.0
e-brick installation and user manual - GEW UV System v1.0
e-brick installation and user manual - GEW UV System v1.0

Create successful ePaper yourself
Turn your PDF publications into a flip-book with our unique Google optimized e-Paper software.
3.4. Using the HMI<br />
3.4.1. Starting up the <strong>UV</strong> system<br />
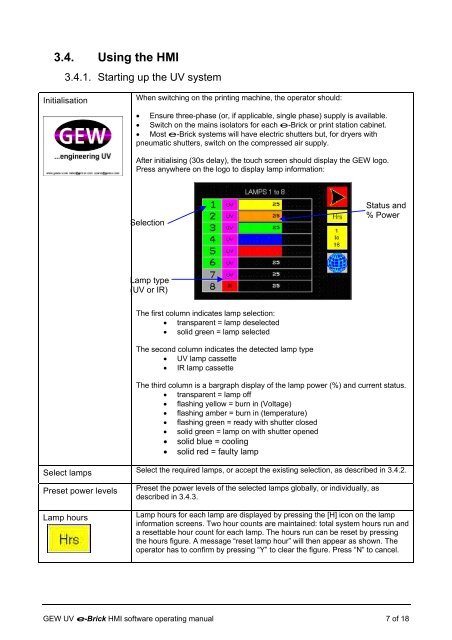
Initialisation<br />
Select lamps<br />
Preset power levels<br />
Lamp hours<br />
When switching on the printing machine, the operator should:<br />
• Ensure three-phase (or, if applicable, single phase) supply is available.<br />
• Switch on the mains isolators for each e-Brick or print station cabinet.<br />
• Most e-Brick systems will have electric shutters but, for dryers with<br />
pneumatic shutters, switch on the compressed air supply.<br />
After initialising (30s delay), the touch screen should display the <strong>GEW</strong> logo.<br />
Press anywhere on the logo to display lamp information:<br />
Selection<br />
Lamp type<br />
(<strong>UV</strong> or IR)<br />
The first column indicates lamp selection:<br />
• transparent = lamp deselected<br />
• solid green = lamp selected<br />
The second column indicates the detected lamp type<br />
• <strong>UV</strong> lamp cassette<br />
• IR lamp cassette<br />
The third column is a bargraph display of the lamp power (%) <strong>and</strong> current status.<br />
• transparent = lamp off<br />
• flashing yellow = burn in (Voltage)<br />
• flashing amber = burn in (temperature)<br />
• flashing green = ready with shutter closed<br />
• solid green = lamp on with shutter opened<br />
• solid blue = cooling<br />
• solid red = faulty lamp<br />
Select the required lamps, or accept the existing selection, as described in 3.4.2.<br />
Preset the power levels of the selected lamps globally, or individually, as<br />
described in 3.4.3.<br />
Status <strong>and</strong><br />
% Power<br />
Lamp hours for each lamp are displayed by pressing the [H] icon on the lamp<br />
information screens. Two hour counts are maintained: total system hours run <strong>and</strong><br />
a resettable hour count for each lamp. The hours run can be reset by pressing<br />
the hours figure. A message “reset lamp hour” will then appear as shown. The<br />
operator has to confirm by pressing “Y” to clear the figure. Press “N” to cancel.<br />
<strong>GEW</strong> <strong>UV</strong> e-Brick HMI software operating <strong>manual</strong> 7 of 18