BK-7m_OM.pdf - Roland
BK-7m_OM.pdf - Roland
BK-7m_OM.pdf - Roland

Create successful ePaper yourself
Turn your PDF publications into a flip-book with our unique Google optimized e-Paper software.
Backing Module <strong>BK</strong>-<strong>7m</strong><br />
Wizard Connection<br />
7. Wizard Connection<br />
Your <strong>BK</strong>-<strong>7m</strong> contains a “Wizard Connection” that tells you step by step how to set up the <strong>BK</strong>-<strong>7m</strong> for MIDI communication.<br />
This wizard saves you a lot of time, which is why we recommend using it each time you connect a different MIDI<br />
device to the <strong>BK</strong>-<strong>7m</strong>.<br />
Generic procedure<br />
Usually, when you connect an external instrument<br />
to the <strong>BK</strong>-<strong>7m</strong>’s MIDI IN socket, a display page<br />
appears to signal that the “Wizard Connection”<br />
function has detected a MIDI instrument and can<br />
be used to make the desired MIDI settings.<br />
If that message is not displayed, the external<br />
instrument probably doesn’t transmit Active Sensing<br />
(FEH) messages. To start the <strong>BK</strong>-<strong>7m</strong>’s “Wizard<br />
Connection” function, simply press any key on the<br />
external instrument’s keyboard. Alternatively, you<br />
can select the “Wizard Connection” function by<br />
hand: [MENU] button ‰ “Wizard Connection”.<br />
1. Perform all required connections, taking<br />
care to also connect a MIDI cable.<br />
See “Connecting the <strong>BK</strong>-<strong>7m</strong> to an amplifier, mixer,<br />
etc.” on p. 15 and “Connecting a MIDI device” on<br />
p. 16.<br />
NOTE<br />
If you want to work with a <strong>Roland</strong> digital piano, we recommend<br />
also connecting the <strong>BK</strong>-<strong>7m</strong>’s MIDI OUT socket to the<br />
digital piano’s MIDI IN socket. That way, your <strong>Roland</strong> piano<br />
is automatically set to “Local Off”, which is usually more<br />
convenient.<br />
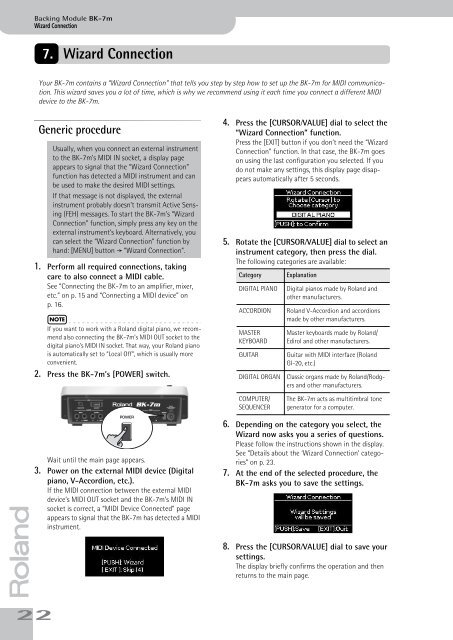
2. Press the <strong>BK</strong>-<strong>7m</strong>’s [POWER] switch.<br />
4. Press the [CURSOR÷VALUE] dial to select the<br />
“Wizard Connection” function.<br />
Press the [EXIT] button if you don’t need the “Wizard<br />
Connection” function. In that case, the <strong>BK</strong>-<strong>7m</strong> goes<br />
on using the last configuration you selected. If you<br />
do not make any settings, this display page disappears<br />
automatically after 5 seconds.<br />
5. Rotate the [CURSOR÷VALUE] dial to select an<br />
instrument category, then press the dial.<br />
The following categories are available:<br />
Category<br />
DIGITAL PIANO<br />
ACCORDION<br />
MASTER<br />
KEYBOARD<br />
GUITAR<br />
DIGITAL ORGAN<br />
Explanation<br />
Digital pianos made by <strong>Roland</strong> and<br />
other manufacturers.<br />
<strong>Roland</strong> V-Accordion and accordions<br />
made by other manufacturers.<br />
Master keyboards made by <strong>Roland</strong>/<br />
Edirol and other manufacturers.<br />
Guitar with MIDI interface (<strong>Roland</strong><br />
GI-20, etc.)<br />
Classic organs made by <strong>Roland</strong>/Rodgers<br />
and other manufacturers.<br />
C<strong>OM</strong>PUTER/<br />
SEQUENCER<br />
The <strong>BK</strong>-<strong>7m</strong> acts as multitimbral tone<br />
generator for a computer.<br />
r<br />
Wait until the main page appears.<br />
3. Power on the external MIDI device (Digital<br />
piano, V-Accordion, etc.).<br />
If the MIDI connection between the external MIDI<br />
device’s MIDI OUT socket and the <strong>BK</strong>-<strong>7m</strong>’s MIDI IN<br />
socket is correct, a “MIDI Device Connected” page<br />
appears to signal that the <strong>BK</strong>-<strong>7m</strong> has detected a MIDI<br />
instrument.<br />
22<br />
6. Depending on the category you select, the<br />
Wizard now asks you a series of questions.<br />
Please follow the instructions shown in the display.<br />
See “Details about the ‘Wizard Connection’ categories”<br />
on p. 23.<br />
7. At the end of the selected procedure, the<br />
<strong>BK</strong>-<strong>7m</strong> asks you to save the settings.<br />
8. Press the [CURSOR÷VALUE] dial to save your<br />
settings.<br />
The display briefly confirms the operation and then<br />
returns to the main page.