BK-7m_OM.pdf - Roland
BK-7m_OM.pdf - Roland
BK-7m_OM.pdf - Roland

Create successful ePaper yourself
Turn your PDF publications into a flip-book with our unique Google optimized e-Paper software.
Backing Module <strong>BK</strong>-<strong>7m</strong> r<br />
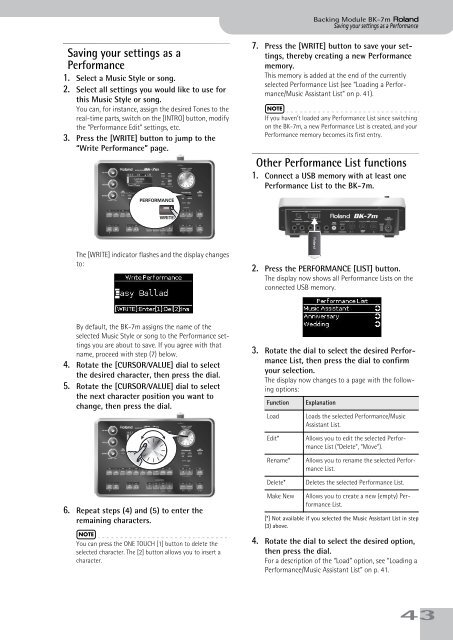
Saving your settings as a Performance<br />
Saving your settings as a<br />
Performance<br />
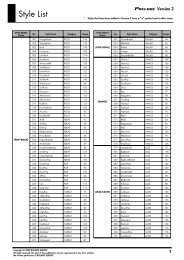
1. Select a Music Style or song.<br />
2. Select all settings you would like to use for<br />
this Music Style or song.<br />
You can, for instance, assign the desired Tones to the<br />
real-time parts, switch on the [INTRO] button, modify<br />
the “Performance Edit” settings, etc.<br />
3. Press the [WRITE] button to jump to the<br />
“Write Performance” page.<br />
7. Press the [WRITE] button to save your settings,<br />
thereby creating a new Performance<br />
memory.<br />
This memory is added at the end of the currently<br />
selected Performance List (see “Loading a Performance/Music<br />
Assistant List” on p. 41).<br />
NOTE<br />
If you haven’t loaded any Performance List since switching<br />
on the <strong>BK</strong>-<strong>7m</strong>, a new Performance List is created, and your<br />
Performance memory becomes its first entry.<br />
Other Performance List functions<br />
1. Connect a USB memory with at least one<br />
Performance List to the <strong>BK</strong>-<strong>7m</strong>.<br />
PERFORMANCE<br />
WRITE<br />
The [WRITE] indicator flashes and the display changes<br />
to:<br />
2. Press the PERFORMANCE [LIST] button.<br />
The display now shows all Performance Lists on the<br />
connected USB memory.<br />
By default, the <strong>BK</strong>-<strong>7m</strong> assigns the name of the<br />
selected Music Style or song to the Performance settings<br />
you are about to save. If you agree with that<br />
name, proceed with step (7) below.<br />
4. Rotate the [CURSOR÷VALUE] dial to select<br />
the desired character, then press the dial.<br />
5. Rotate the [CURSOR÷VALUE] dial to select<br />
the next character position you want to<br />
change, then press the dial.<br />
3. Rotate the dial to select the desired Performance<br />
List, then press the dial to confirm<br />
your selection.<br />
The display now changes to a page with the following<br />
options:<br />
Function<br />
Load<br />
Explanation<br />
Loads the selected Performance/Music<br />
Assistant List.<br />
Edit*<br />
Rename*<br />
Delete*<br />
Allows you to edit the selected Performance<br />
List (“Delete”, “Move”).<br />
Allows you to rename the selected Performance<br />
List.<br />
Deletes the selected Performance List.<br />
6. Repeat steps (4) and (5) to enter the<br />
remaining characters.<br />
NOTE<br />
You can press the ONE TOUCH [1] button to delete the<br />
selected character. The [2] button allows you to insert a<br />
character.<br />
Make New<br />
Allows you to create a new (empty) Performance<br />
List.<br />
[*] Not available if you selected the Music Assistant List in step<br />
(3) above.<br />
4. Rotate the dial to select the desired option,<br />
then press the dial.<br />
For a description of the “Load” option, see “Loading a<br />
Performance/Music Assistant List” on p. 41.<br />
43