BK-7m_OM.pdf - Roland
BK-7m_OM.pdf - Roland
BK-7m_OM.pdf - Roland

You also want an ePaper? Increase the reach of your titles
YUMPU automatically turns print PDFs into web optimized ePapers that Google loves.
Backing Module <strong>BK</strong>-<strong>7m</strong><br />
Menu options<br />
V-LINK function<br />
The <strong>BK</strong>-<strong>7m</strong> has a powerful new interface for realtime<br />
audio-and-video integration. V-LINK ( ) is a<br />
function that allows music and images to be performed<br />
together. When V-Link compatible devices are connected<br />
via MIDI, you’ll be able to easily enjoy a variety<br />
of visual effects that are linked to the expressive elements<br />
of your performance.<br />
For example, if you use the <strong>BK</strong>-<strong>7m</strong> with the EDIROL<br />
P-10, you’ll be able to use the various controls on the<br />
<strong>BK</strong>-<strong>7m</strong>’s front panel to switch and control images on<br />
the EDIROL P-10.<br />
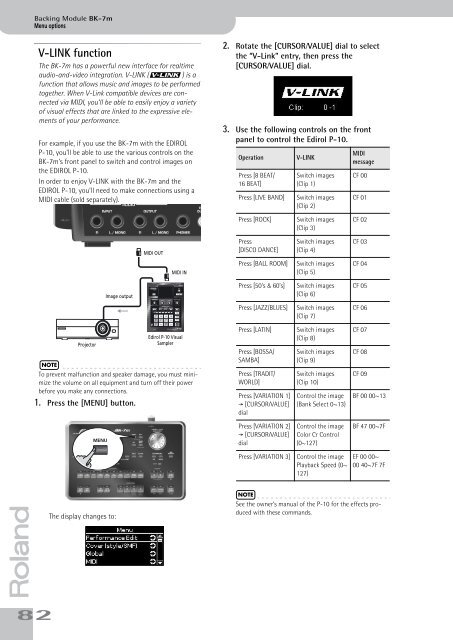
In order to enjoy V-LINK with the <strong>BK</strong>-<strong>7m</strong> and the<br />
EDIROL P-10, you’ll need to make connections using a<br />
MIDI cable (sold separately).<br />
2. Rotate the [CURSOR÷VALUE] dial to select<br />
the “V-Link” entry, then press the<br />
[CURSOR÷VALUE] dial.<br />
3. Use the following controls on the front<br />
panel to control the Edirol P-10.<br />
Operation<br />
Press [8 BEAT/<br />
16 BEAT]<br />
Press [LIVE BAND]<br />
V-LINK<br />
Switch images<br />
(Clip 1)<br />
Switch images<br />
(Clip 2)<br />
MIDI<br />
message<br />
CF 00<br />
CF 01<br />
Press [ROCK]<br />
Switch images<br />
(Clip 3)<br />
CF 02<br />
MIDI OUT<br />
Press<br />
[DISCO DANCE]<br />
Switch images<br />
(Clip 4)<br />
CF 03<br />
MIDI IN<br />
Press [BALL RO<strong>OM</strong>]<br />
Switch images<br />
(Clip 5)<br />
CF 04<br />
Image output<br />
Press [50’s & 60’s]<br />
Switch images<br />
(Clip 6)<br />
CF 05<br />
Press [JAZZ/BLUES]<br />
Switch images<br />
(Clip 7)<br />
CF 06<br />
Projector<br />
Edirol P-10 Visual<br />
Sampler<br />
NOTE<br />
To prevent malfunction and speaker damage, you must minimize<br />
the volume on all equipment and turn off their power<br />
before you make any connections.<br />
1. Press the [MENU] button.<br />
Press [LATIN]<br />
Press [BOSSA/<br />
SAMBA]<br />
Press [TRADIT/<br />
WORLD]<br />
Press [VARIATION 1]<br />
‰ [CURSOR÷VALUE]<br />
dial<br />
Switch images<br />
(Clip 8)<br />
Switch images<br />
(Clip 9)<br />
Switch images<br />
(Clip 10)<br />
Control the image<br />
(Bank Select 0~13)<br />
CF 07<br />
CF 08<br />
CF 09<br />
BF 00 00~13<br />
MENU<br />
Press [VARIATION 2]<br />
‰ [CURSOR÷VALUE]<br />
dial<br />
Control the image<br />
Color Cr Control<br />
(0~127)<br />
BF 47 00~7F<br />
Press [VARIATION 3]<br />
Control the image<br />
Playback Speed (0~<br />
127)<br />
EF 00 00~<br />
00 40~7F 7F<br />
r<br />
82<br />
The display changes to:<br />
NOTE<br />
See the owner’s manual of the P-10 for the effects produced<br />
with these commands.