BK-7m_OM.pdf - Roland
BK-7m_OM.pdf - Roland
BK-7m_OM.pdf - Roland

You also want an ePaper? Increase the reach of your titles
YUMPU automatically turns print PDFs into web optimized ePapers that Google loves.
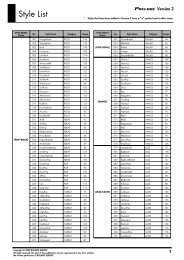
Backing Module <strong>BK</strong>-<strong>7m</strong> r<br />
Other important functions<br />
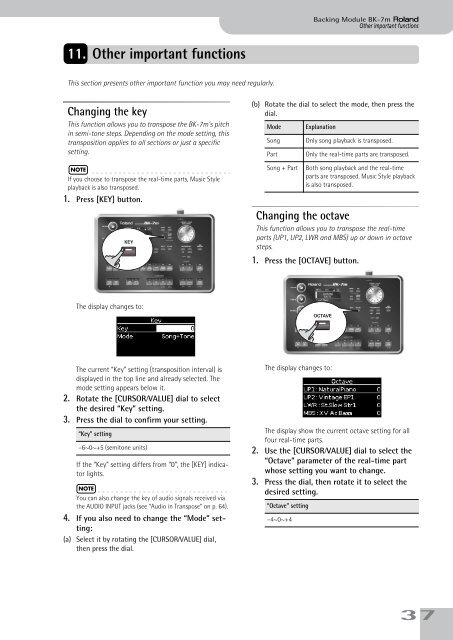
11. Other important functions<br />
This section presents other important function you may need regularly.<br />
Changing the key<br />
This function allows you to transpose the <strong>BK</strong>-<strong>7m</strong>’s pitch<br />
in semi-tone steps. Depending on the mode setting, this<br />
transposition applies to all sections or just a specific<br />
setting.<br />
NOTE<br />
If you choose to transpose the real-time parts, Music Style<br />
playback is also transposed.<br />
1. Press [KEY] button.<br />
KEY<br />
(b) Rotate the dial to select the mode, then press the<br />
dial.<br />
Mode<br />
Song<br />
Part<br />
Song + Part<br />
Explanation<br />
Only song playback is transposed.<br />
Only the real-time parts are transposed.<br />
Both song playback and the real-time<br />
parts are transposed. Music Style playback<br />
is also transposed.<br />
Changing the octave<br />
This function allows you to transpose the real-time<br />
parts (UP1, UP2, LWR and MBS) up or down in octave<br />
steps.<br />
1. Press the [OCTAVE] button.<br />
The display changes to:<br />
OCTAVE<br />
The current “Key” setting (transposition interval) is<br />
displayed in the top line and already selected. The<br />
mode setting appears below it.<br />
2. Rotate the [CURSOR÷VALUE] dial to select<br />
the desired “Key” setting.<br />
3. Press the dial to confirm your setting.<br />
“Key” setting<br />
–6~0~+5 (semitone units)<br />
If the “Key” setting differs from “0”, the [KEY] indicator<br />
lights.<br />
NOTE<br />
You can also change the key of audio signals received via<br />
the AUDIO INPUT jacks (see “Audio in Transpose” on p. 64).<br />
4. If you also need to change the “Mode” setting:<br />
(a) Select it by rotating the [CURSOR÷VALUE] dial,<br />
then press the dial.<br />
The display changes to:<br />
The display show the current octave setting for all<br />
four real-time parts.<br />
2. Use the [CURSOR÷VALUE] dial to select the<br />
“Octave” parameter of the real-time part<br />
whose setting you want to change.<br />
3. Press the dial, then rotate it to select the<br />
desired setting.<br />
“Octave” setting<br />
–4~0~+4<br />
37