BK-7m_OM.pdf - Roland
BK-7m_OM.pdf - Roland
BK-7m_OM.pdf - Roland

Create successful ePaper yourself
Turn your PDF publications into a flip-book with our unique Google optimized e-Paper software.
Backing Module <strong>BK</strong>-<strong>7m</strong><br />
Recording your performance as audio data<br />
13. Recording your performance as audio data<br />
Your <strong>BK</strong>-<strong>7m</strong> allows you to record everything it can transmit to its outputs, i.e. Music Style or song playback, your playing,<br />
your singing, and any audio signal transmitted to the <strong>BK</strong>-<strong>7m</strong>. (The metronome signal is not recorded.)<br />
Feel free to connect the master outputs of an external<br />
mixing console to the <strong>BK</strong>-<strong>7m</strong>’s AUDIO INPUT sockets if<br />
you want to record your band or the signals of an accordion,<br />
additional synthesizers, pianos, drum machines,<br />
etc., as well.<br />
The resulting audio file is stored in the WAV format (not<br />
mp3), which allows you to burn your recordings onto a<br />
CD using your computer.<br />
5. Press the [START/STOP] button.<br />
NOTE<br />
You will need a USB memory to record your performance.<br />
Recording<br />
NOTE<br />
The following is based on the assumption that the “REC Audio<br />
Sync” parameter (page 64) is active.<br />
1. Connect the USB memory to which you wish<br />
to save the audio data.<br />
NOTE<br />
Use USB memory sold by <strong>Roland</strong> (M-UF-series). We cannot<br />
guarantee operation if any other USB memory is used.<br />
2. Prepare everything you want to record:<br />
• Select the Music Style or song you want to use as<br />
accompaniment<br />
• Set the levels and effects, etc.<br />
3. Set the desired balance between the Music<br />
Style/song and the real-time parts using the<br />
[BALANCE] knob.<br />
You may also want to set the [AUDIO IN] knob.<br />
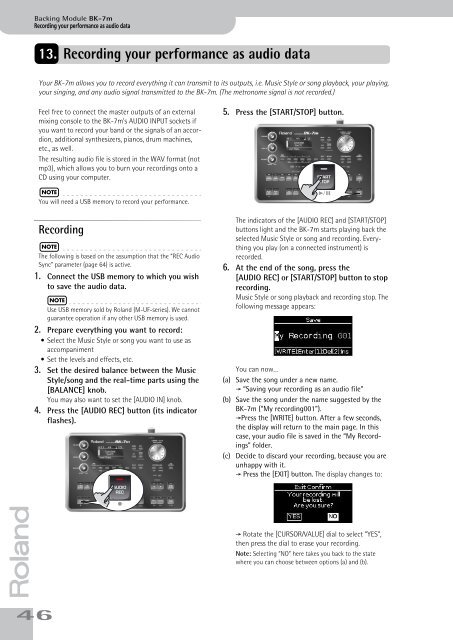
4. Press the [AUDIO REC] button (its indicator<br />
flashes).<br />
The indicators of the [AUDIO REC] and [START/STOP]<br />
buttons light and the <strong>BK</strong>-<strong>7m</strong> starts playing back the<br />
selected Music Style or song and recording. Everything<br />
you play (on a connected instrument) is<br />
recorded.<br />
6. At the end of the song, press the<br />
[AUDIO REC] or [START/STOP] button to stop<br />
recording.<br />
Music Style or song playback and recording stop. The<br />
following message appears:<br />
You can now…<br />
(a) Save the song under a new name.<br />
‰ “Saving your recording as an audio file”<br />
(b) Save the song under the name suggested by the<br />
<strong>BK</strong>-<strong>7m</strong> (“My recording001”).<br />
‰Press the [WRITE] button. After a few seconds,<br />
the display will return to the main page. In this<br />
case, your audio file is saved in the “My Recordings”<br />
folder.<br />
(c) Decide to discard your recording, because you are<br />
unhappy with it.<br />
‰ Press the [EXIT] button. The display changes to:<br />
r<br />
‰ Rotate the [CURSOR÷VALUE] dial to select “YES”,<br />
then press the dial to erase your recording.<br />
Note: Selecting “NO” here takes you back to the state<br />
where you can choose between options (a) and (b).<br />
46