Model SR715 Model SR720 LCR Meters
Model SR715 Model SR720 LCR Meters
Model SR715 Model SR720 LCR Meters
- No tags were found...

You also want an ePaper? Increase the reach of your titles
YUMPU automatically turns print PDFs into web optimized ePapers that Google loves.
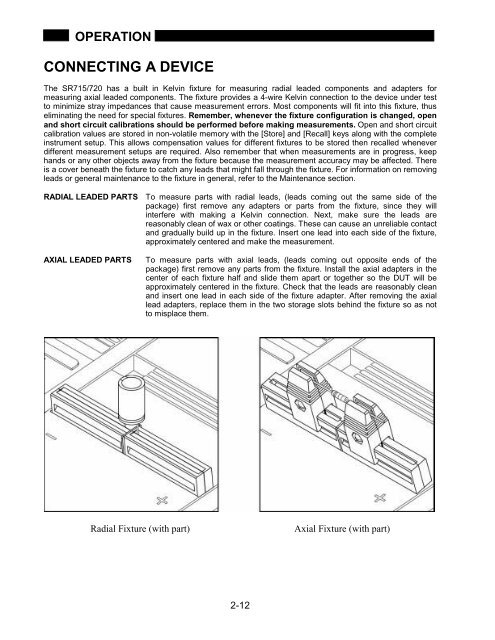
OPERATIONCONNECTING A DEVICEThe <strong>SR715</strong>/720 has a built in Kelvin fixture for measuring radial leaded components and adapters formeasuring axial leaded components. The fixture provides a 4-wire Kelvin connection to the device under testto minimize stray impedances that cause measurement errors. Most components will fit into this fixture, thuseliminating the need for special fixtures. Remember, whenever the fixture configuration is changed, openand short circuit calibrations should be performed before making measurements. Open and short circuitcalibration values are stored in non-volatile memory with the [Store] and [Recall] keys along with the completeinstrument setup. This allows compensation values for different fixtures to be stored then recalled wheneverdifferent measurement setups are required. Also remember that when measurements are in progress, keephands or any other objects away from the fixture because the measurement accuracy may be affected. Thereis a cover beneath the fixture to catch any leads that might fall through the fixture. For information on removingleads or general maintenance to the fixture in general, refer to the Maintenance section.RADIAL LEADED PARTSAXIAL LEADED PARTSTo measure parts with radial leads, (leads coming out the same side of thepackage) first remove any adapters or parts from the fixture, since they willinterfere with making a Kelvin connection. Next, make sure the leads arereasonably clean of wax or other coatings. These can cause an unreliable contactand gradually build up in the fixture. Insert one lead into each side of the fixture,approximately centered and make the measurement.To measure parts with axial leads, (leads coming out opposite ends of thepackage) first remove any parts from the fixture. Install the axial adapters in thecenter of each fixture half and slide them apart or together so the DUT will beapproximately centered in the fixture. Check that the leads are reasonably cleanand insert one lead in each side of the fixture adapter. After removing the axiallead adapters, replace them in the two storage slots behind the fixture so as notto misplace them.Radial Fixture (with part) Axial Fixture (with part)2-12