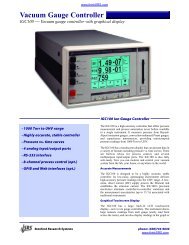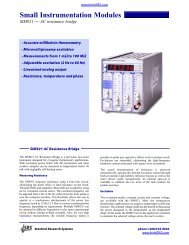
Model SR715 Model SR720 LCR Meters
Model SR715 Model SR720 LCR Meters
Model SR715 Model SR720 LCR Meters
- No tags were found...

Create successful ePaper yourself
Turn your PDF publications into a flip-book with our unique Google optimized e-Paper software.
PERFORMANCE TESTS2. Self TestsThe internal self tests verify the functionality of the <strong>SR715</strong>/720.1) Turn on the unit. The ROM firmware version and serial number will be displayed for about 3 seconds.Next the message 'tESt.....' will be displayed while the unit performs its self tests. After the tests arecompleted the unit should display 'tESt PASS' to indicate that the tests were successful. If not, anerror message will appear. See the TROUBLESHOOTING section for a description of the errormessages.3. Output VoltageThis checks the <strong>SR715</strong>/720 output voltage for the correct frequency and amplitude.1) Set the <strong>SR715</strong>/720 to 1 kHz, 1.0V and constant voltage. Set the scope to 1 V/div vertical and0.5 ms/div horizontal. Connect a X10 probe to the scope.2) Place the tip of the probe into the "+" side of the fixture and connect the ground clip to the centerguard ground.3) The scope should display a sine wave that occupies 2 divisions horizontally and about 5.5 divisionspeak to peak vertically (1.0 VRMS = 2.83 V peak to peak). There should be no irregularities in thewave form.4) Change the amplitude setting of the <strong>SR715</strong>/720 to 0.25 and 0.10 V and verify that the output is within2% of nominal.5) Set the amplitude back to 1.0 V. Change the <strong>SR715</strong>/720 and scope settings to verify that the output at100 Hz, 120 Hz, 10 kHz and 100 kHz (<strong>SR720</strong> only) is within 2% of nominal.4. Resistance MeasurementThis verifies that the <strong>SR715</strong>/720 operates and is able to measure a component in each of its ranges. Thereadings obtained should be within ± (tolerance of the component + tolerance of the <strong>SR715</strong>/720).1) Press [Recall] [0] [ENTER] to put the unit in its default setup.2) Perform open & short circuit cal for the fixture configuration to be used. See the operation section fordetails on this.3) Set the unit to R+Q, series equivalent circuit and 1 kHz test frequency. Install the 24.9 Ω resistor.Verify that it reads within ±0.15% (<strong>SR720</strong>) or ±0.3% (<strong>SR715</strong>). Verify that Q is a small value, about+.0001 or smaller.4) Install the 402 Ω resistor. Verify that it reads within ±0.15% (<strong>SR720</strong>) or ±0.3% (<strong>SR715</strong>). Verify that Qis a small value, about +.0001 or smaller.5) Change the equivalent circuit to parallel. Install the 6.34 kΩ resistor. Verify that it reads within ±0.15%(<strong>SR720</strong>) or ±0.3% (<strong>SR715</strong>). Verify that Q is a small value, about -.0001 or smaller.6) Install the 100 kΩ resistor. Verify that it reads within ±0.15% (<strong>SR720</strong>) or ±0.3% (<strong>SR715</strong>). Verify that Qis a small value, about -.0002 or smaller.5-2