

XE-A102
XE-A102
XE-A102

You also want an ePaper? Increase the reach of your titles
YUMPU automatically turns print PDFs into web optimized ePapers that Google loves.
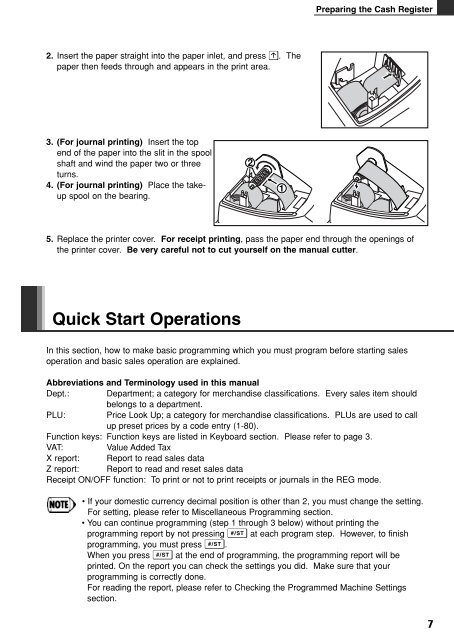
2. Insert the paper straight into the paper inlet, and press o. The<br />
paper then feeds through and appears in the print area.<br />
3. (For journal printing) Insert the top<br />
end of the paper into the slit in the spool<br />
shaft and wind the paper two or three<br />
turns.<br />
4. (For journal printing) Place the takeup<br />
spool on the bearing.<br />
Quick Start Operations<br />
Preparing the Cash Register<br />
5. Replace the printer cover. For receipt printing, pass the paper end through the openings of<br />
the printer cover. Be very careful not to cut yourself on the manual cutter.<br />
In this section, how to make basic programming which you must program before starting sales<br />
operation and basic sales operation are explained.<br />
Abbreviations and Terminology used in this manual<br />
Dept.: Department; a category for merchandise classifications. Every sales item should<br />
belongs to a department.<br />
PLU: Price Look Up; a category for merchandise classifications. PLUs are used to call<br />
up preset prices by a code entry (1-80).<br />
Function keys: Function keys are listed in Keyboard section. Please refer to page 3.<br />
VAT: Value Added Tax<br />
X report: Report to read sales data<br />
Z report: Report to read and reset sales data<br />
Receipt ON/OFF function: To print or not to print receipts or journals in the REG mode.<br />
• If your domestic currency decimal position is other than 2, you must change the setting.<br />
For setting, please refer to Miscellaneous Programming section.<br />
• You can continue programming (step 1 through 3 below) without printing the<br />
programming report by not pressing S at each program step. However, to finish<br />
programming, you must press S.<br />
When you press S at the end of programming, the programming report will be<br />
printed. On the report you can check the settings you did. Make sure that your<br />
programming is correctly done.<br />
For reading the report, please refer to Checking the Programmed Machine Settings<br />
section.<br />
7