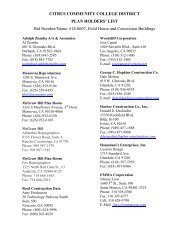
Bid #01-1112 Library and Reprographics Roofing ... - Citrus College
Bid #01-1112 Library and Reprographics Roofing ... - Citrus College
Bid #01-1112 Library and Reprographics Roofing ... - Citrus College

You also want an ePaper? Increase the reach of your titles
YUMPU automatically turns print PDFs into web optimized ePapers that Google loves.
F. Bitumen Consistency: Cutting or alterations of bitumen, primer, <strong>and</strong> sealants will not be<br />
permitted.<br />
G. <strong>Roofing</strong> Application (<strong>Library</strong> Lower Roof <strong>and</strong> <strong>Reprographics</strong>): Apply all layers of<br />
roofing free of wrinkles, creases or fishmouths. Exert sufficient pressure on the roll during<br />
application to ensure prevention of air pockets.<br />
1. Apply all layers of roofing perpendicular to the slope of the deck.<br />
2. Unroll the base ply, <strong>and</strong> set the roll into place utilizing minimum 3 inch side <strong>and</strong> end laps.<br />
Fold one end of the roll back onto itself by 24 inches. Peel the release film off of the<br />
back of the 24 inch end section of the sheet <strong>and</strong> lay into place, pressing the 24 inch end<br />
section of the sheet firmly into place over the substrate. Pull the release film free from<br />
the underside of the remainder of the sheet while pressing the material into place with a<br />
follow tool as the film is being removed, leaving the end laps unadhered. Prior to<br />
adhering the head laps, cut a dog ear angle at the end laps on overlapping selvage<br />
edges. Torch apply end laps, ensuring that the adhesive stripes on the underside of the<br />
overlapping sheet <strong>and</strong> the top surface of the underlying sheet flow into a layer of<br />
continuously bonded or fused asphalt. Using a clean trowel, apply top pressure to top<br />
seal T-laps immediately following sheet application. Stagger end laps a minimum of 3<br />
feet. Laps must not be left exposed overnight. In cases where rapid onset of inclement<br />
weather occurs, all exposed lap edges should be sealed by “buttering” laps with a torch.<br />
3. Prior to application of the finish ply, ensure that the base ply seams are firmly sealed<br />
without wrinkles <strong>and</strong>/or fishmouths. Fully bond the finish ply to the base ply, utilizing<br />
minimum 3 inch side <strong>and</strong> end laps. Apply each sheet directly behind the torch<br />
applicator. Stagger end laps of the finish ply a minimum 3 feet. Cut a dog ear angle at<br />
the end laps on overlapping selvage edges. Using a clean trowel, apply top pressure to<br />
top seal T-laps immediately following sheet application. Stagger side laps of the finish<br />
ply a minimum 12 inches from side laps in the underlying base ply. Stagger end laps of<br />
the finish ply a minimum 3 feet from end laps in the underlying base ply.<br />
4. Maximum sheet lengths <strong>and</strong> special fastening of the specified roof membrane system<br />
may be required at various slope increments where the roof deck slope exceeds 1/2 inch<br />
per foot. The manufacturer shall provide acceptable sheet lengths <strong>and</strong> the required<br />
fastening schedule for all roofing sheet applications to applicable roof slopes.<br />
H. Ply Sheet Application (<strong>Library</strong> – Mechanical Well): Bond the modified bitumen ply sheet<br />
to the prepared substrate, utilizing minimum 3 inch side <strong>and</strong> end laps. Apply each sheet<br />
directly behind the torch applicator. Cut a dog ear angle at the end laps on overlapping<br />
selvage edges. Using a clean trowel, apply pressure to top seal T-laps immediately<br />
following sheet application. Stagger end laps a minimum of 3 feet. Follow manufacturer’s<br />
specifications regarding maximum exposure periods prior to application of the liquid-applied<br />
finish membrane.<br />
I. Synthetic Chip Embedment: Broadcast synthetic chips over bitumen/adhesive overruns<br />
on the finish ply surface.<br />
J. Flashing Application (<strong>Library</strong> Lower Roof <strong>and</strong> <strong>Reprographics</strong>): Cut the cant backing<br />
sheet into 12 inch widths <strong>and</strong> peel the release film from the back of the sheet. Set the sheet<br />
into place over the primed substrate extending 6 inches onto the field of the roof area <strong>and</strong> 6<br />
inches up the vertical surface utilizing minimum 3 inch laps. Set the non-combustible cant<br />
into place dry prior to installation of the roof membrane base ply. Flash walls <strong>and</strong> curbs<br />
using the reinforcing sheet <strong>and</strong> the metal foil flashing membrane. After the base ply has<br />
M-13-135 page - 18 <strong>Citrus</strong> <strong>Library</strong> <strong>Roofing</strong> Specification