Product Manual
Product Manual
Product Manual

You also want an ePaper? Increase the reach of your titles
YUMPU automatically turns print PDFs into web optimized ePapers that Google loves.
DES-3526 / DES-3526DC Fast Ethernet Layer 2 Switch<br />
Network resources such as printers and servers however, can be shared across VLANs. This is<br />
achieved by setting up overlapping VLANs. That is ports can belong to more than one VLAN group.<br />
For example, setting VLAN 1 members to ports 1, 2, 3, and 4 and VLAN 2 members to ports 1, 5, 6,<br />
and 7. Port 1 belongs to two VLAN groups. Ports 8, 9, and 10 are not configured to any VLAN group.<br />
This means ports 8, 9, and 10 are in the same VLAN group.<br />
VLAN and Trunk Groups<br />
The members of a trunk group have the same VLAN setting. Any VLAN setting on the members of a<br />
trunk group will apply to the other member ports.<br />
NOTE: In order to use VLAN segmentation in conjunction with port trunk<br />
groups, you can first set the port trunk group(s), and then you may configure<br />
VLAN settings. If you wish to change the port trunk grouping with VLANs<br />
already in place, you will not need to reconfigure the VLAN settings after<br />
changing the port trunk group settings. VLAN settings will automatically change<br />
in conjunction with the change of the port trunk group settings.<br />
Static VLAN Entry<br />
In the Configuration folder, open the VLAN folder and click the Static VLAN Entry link to open<br />
the following window:<br />
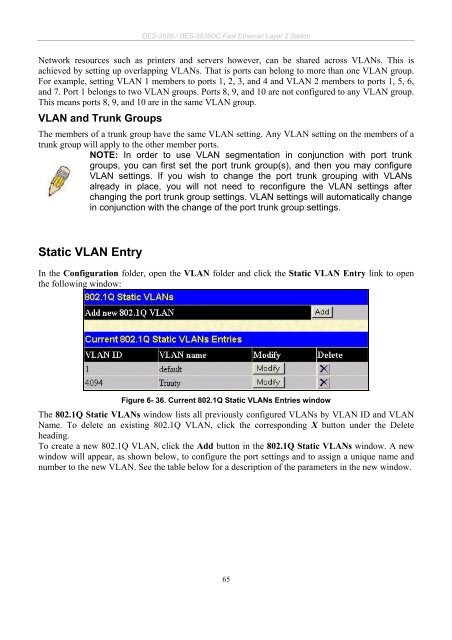
Figure 6- 36. Current 802.1Q Static VLANs Entries window<br />
The 802.1Q Static VLANs window lists all previously configured VLANs by VLAN ID and VLAN<br />
Name. To delete an existing 802.1Q VLAN, click the corresponding X button under the Delete<br />
heading.<br />
To create a new 802.1Q VLAN, click the Add button in the 802.1Q Static VLANs window. A new<br />
window will appear, as shown below, to configure the port settings and to assign a unique name and<br />
number to the new VLAN. See the table below for a description of the parameters in the new window.<br />
65