audio file in the INSERT mode - Fostex
audio file in the INSERT mode - Fostex
audio file in the INSERT mode - Fostex

Create successful ePaper yourself
Turn your PDF publications into a flip-book with our unique Google optimized e-Paper software.
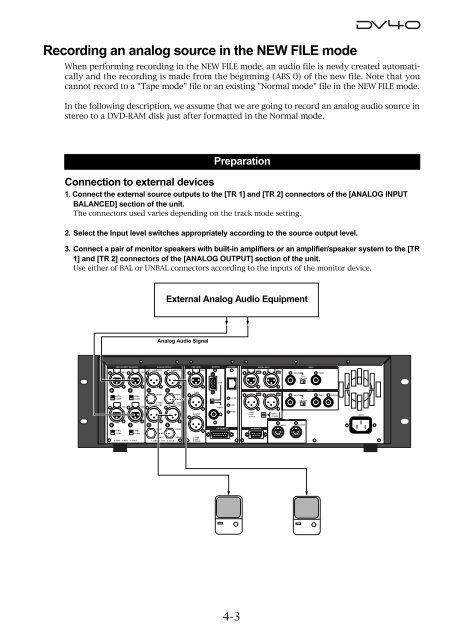
Record<strong>in</strong>g an analog source <strong>in</strong> <strong>the</strong> NEW FILE <strong>mode</strong><br />
When perform<strong>in</strong>g record<strong>in</strong>g <strong>in</strong> <strong>the</strong> NEW FILE <strong>mode</strong>, an <strong>audio</strong> <strong>file</strong> is newly created automatically<br />
and <strong>the</strong> record<strong>in</strong>g is made from <strong>the</strong> beg<strong>in</strong>n<strong>in</strong>g (ABS 0) of <strong>the</strong> new <strong>file</strong>. Note that you<br />
cannot record to a "Tape <strong>mode</strong>" <strong>file</strong> or an exist<strong>in</strong>g "Normal <strong>mode</strong>" <strong>file</strong> <strong>in</strong> <strong>the</strong> NEW FILE <strong>mode</strong>.<br />
In <strong>the</strong> follow<strong>in</strong>g description, we assume that we are go<strong>in</strong>g to record an analog <strong>audio</strong> source <strong>in</strong><br />
stereo to a DVD-RAM disk just after formatted <strong>in</strong> <strong>the</strong> Normal <strong>mode</strong>.<br />
Preparation<br />
Connection to external devices<br />
1. Connect <strong>the</strong> external source outputs to <strong>the</strong> [TR 1] and [TR 2] connectors of <strong>the</strong> [ANALOG INPUT<br />
BALANCED] section of <strong>the</strong> unit.<br />
The connectors used varies depend<strong>in</strong>g on <strong>the</strong> track <strong>mode</strong> sett<strong>in</strong>g.<br />
2. Select <strong>the</strong> Input level switches appropriately accord<strong>in</strong>g to <strong>the</strong> source output level.<br />
3. Connect a pair of monitor speakers with built-<strong>in</strong> amplifiers or an amplifier/speaker system to <strong>the</strong> [TR<br />
1] and [TR 2] connectors of <strong>the</strong> [ANALOG OUTPUT] section of <strong>the</strong> unit.<br />
Use ei<strong>the</strong>r of BAL or UNBAL connectors accord<strong>in</strong>g to <strong>the</strong> <strong>in</strong>puts of <strong>the</strong> monitor device.<br />
External Analog Audio Equipment<br />
Analog Audio Signal<br />
TIME CODE MONITOR ETHERNET<br />
ANALOG INPUT BALANCED ANALOG OUTPUT DIGITAL INPUT VIDEO<br />
TR3<br />
TR1<br />
BAL [+4dBu] TR3<br />
BAL [+4dBu] TR1<br />
INPUT<br />
TR4-3<br />
TR2<br />
TR2-1<br />
TR1<br />
INPUT<br />
THRU<br />
75Ω<br />
ON OFF<br />
VGA<br />
+4dBu<br />
-10dBV<br />
TR4<br />
+4dBu<br />
-10dBV<br />
TR2<br />
UNBAL<br />
[-10dBV]<br />
BAL [+4dBu] TR4<br />
UNBAL<br />
[-10dBV]<br />
BAL [+4dBu] TR2<br />
THRU<br />
VIDEO<br />
10/100<br />
LINK<br />
DIGITAL OUTPUT<br />
TR4-3<br />
TR2<br />
TR2-1<br />
TR1<br />
WORD<br />
INPUT<br />
75Ω<br />
ON OFF<br />
THRU<br />
OUTPUT<br />
OUTPUT<br />
TX/RX<br />
1:GND<br />
2:HOT<br />
3:COLD<br />
TR1<br />
TR2<br />
192kHz<br />
176.4kHz<br />
AC IN<br />
GPI<br />
INPUT<br />
OUTPUT<br />
+4dBu<br />
+4dBu<br />
UNBAL<br />
UNBAL<br />
15P-REMOTE<br />
9P-REMOTE<br />
-10dBV<br />
-10dBV<br />
[-10dBV]<br />
1: GND 2: HOT 3: COLD 1: GND 2: HOT 3: COLD<br />
[-10dBV]<br />
1: GND<br />
2: HOT<br />
3: COLD<br />
4-3