Omega-Voice VMI Technical Manual (5th Edition) (PN 500175)
Omega-Voice VMI Technical Manual (5th Edition) (PN 500175)
Omega-Voice VMI Technical Manual (5th Edition) (PN 500175)

You also want an ePaper? Increase the reach of your titles
YUMPU automatically turns print PDFs into web optimized ePapers that Google loves.
Chapter 11<br />
System Editor Communication<br />
Direct Connection COMM Port<br />
The <strong>Omega</strong>-<strong>Voice</strong> <strong>VMI</strong> System Editor 3.00 enables you to define a unique COMM port for a direct<br />
and a MODEM connection. Therefore, you only define your COMM ports once, and unless you alter<br />
your PC hardware, you never need to change the selections. The COMM ports are defined on the<br />
Communications tab of the Properties form. For instructions on how to define your COMM ports, see<br />
the following page.<br />
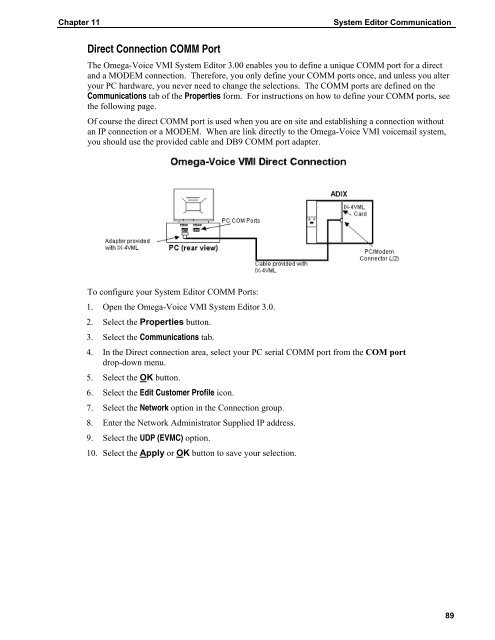
Of course the direct COMM port is used when you are on site and establishing a connection without<br />
an IP connection or a MODEM. When are link directly to the <strong>Omega</strong>-<strong>Voice</strong> <strong>VMI</strong> voicemail system,<br />
you should use the provided cable and DB9 COMM port adapter.<br />
To configure your System Editor COMM Ports:<br />
1. Open the <strong>Omega</strong>-<strong>Voice</strong> <strong>VMI</strong> System Editor 3.0.<br />
2. Select the Properties button.<br />
3. Select the Communications tab.<br />
4. In the Direct connection area, select your PC serial COMM port from the COM port<br />
drop-down menu.<br />
5. Select the OK button.<br />
6. Select the Edit Customer Profile icon.<br />
7. Select the Network option in the Connection group.<br />
8. Enter the Network Administrator Supplied IP address.<br />
9. Select the UDP (EVMC) option.<br />
10. Select the Apply or OK button to save your selection.<br />
89