- Page 1 and 2: Contents Product index DX / GX fast
- Page 3 and 4: Product Index DX/GX Fastener Design
- Page 5 and 6: X-ENP Siding and Decking Nail Produ
- Page 7 and 8: Recommended loads - Aluminum sheeti
- Page 9 and 10: Spacing and edge distances (mm) Ste
- Page 11 and 12: Cartridge selection and tool energy
- Page 13 and 14: X-ENP 2K Siding and Decking Nail Pr
- Page 15 and 16: Thickness of fastened material Shee
- Page 17 and 18: Cartridge selection and tool energy
- Page 19 and 20: SDK2 Sealing Caps for Cladding Fast
- Page 21 and 22: NPH Siding and Decking Nails to Con
- Page 23 and 24: Thickness of fastened material Shee
- Page 25 and 26: Installation Pre-drill with TX-C-5/
- Page 27 and 28: X-HVB Shear Connectors Product data
- Page 29 and 30: Reduction factors for profile metal
- Page 31 and 32: Connector positioning, spacing and
- Page 33 and 34: Recommended setting range Applicati
- Page 35 and 36: X-EDNK 22 THQ 12, X-EDN 19 THQ 12 D
- Page 37 and 38: Application requirements Thickness
- Page 39 and 40: Fastener selection and system recom
- Page 41 and 42: X-EDNI, EDS X-EDNI, EDS General Pur
- Page 43 and 44: Application Requirements Thickness
- Page 45 and 46: Fastener selection Cartridge recomm
- Page 47 and 48: X-BT Stainless Steel Threaded Studs
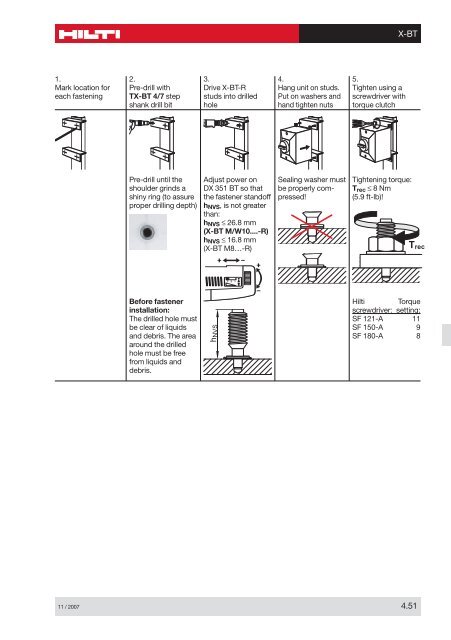
- Page 49: Application requirements Thickness
- Page 53 and 54: M6/W6 o 3.7 o 3.8 o 8 1.7 Lg L Ls X
- Page 55 and 56: Application requirements Thickness
- Page 57 and 58: Fastener selection and system recom
- Page 59 and 60: X-FCM Grating Fastening System Prod
- Page 61 and 62: X-FCM-R mean ultimate Vu,m and char
- Page 63 and 64: X-FCM Fastener selection and system
- Page 65 and 66: Fastening Quality Assurance Fasteni
- Page 67 and 68: X-GR Grating Fastening System Produ
- Page 69 and 70: Spacing and edge distances Edge dis
- Page 71 and 72: X-GR RU Grating Fastening System Pr
- Page 73 and 74: Spacing and edge distances Edge dis
- Page 75 and 76: X-MGR Grating Fastening System Prod
- Page 77 and 78: Grating opening types a b c Fastene
- Page 79 and 80: X-FCP Checker Plate Fastening Syste
- Page 81 and 82: Recommended setting range DX 76 DX
- Page 83 and 84: Installation Installation procedure
- Page 85 and 86: X-U General Purpose Nails for Concr
- Page 87 and 88: Fastenings to steel Design data Fas
- Page 89 and 90: Condition for thick fastened steel
- Page 91 and 92: Fastener program Standard Tools Spe
- Page 93 and 94: Fastening quality assurance Fasteni
- Page 95 and 96: X-AL-H General Purpose Nails Produc
- Page 97 and 98: Application requirements Thickness
- Page 99 and 100: Fastening wood or soft material Woo
- Page 101 and 102:
X-DNI General Purpose Nails for Con
- Page 103 and 104:
Application requirements Thickness
- Page 105 and 106:
Fastener selection and system recom
- Page 107 and 108:
Fasteners Tool Designation Item no
- Page 109 and 110:
X-ZF General Purpose Nails for Conc
- Page 111 and 112:
Application requirements Thickness
- Page 113 and 114:
System recommendation Fasteners Too
- Page 115 and 116:
X-CR Stainless Steel Nails for Conc
- Page 117 and 118:
Test data Important note: Test data
- Page 119 and 120:
Fastener selection Fastener selecti
- Page 121 and 122:
Fastening quality assurance Fasteni
- Page 123 and 124:
DX Drywall Fasteners DX Drywall Fas
- Page 125 and 126:
Spacing and edge distances (mm) Spa
- Page 127 and 128:
Cartridge selection and tool energy
- Page 129 and 130:
GX Drywall Fasteners GX Drywall Fas
- Page 131 and 132:
Application requirements Thickness
- Page 133 and 134:
Fastening quality assurance Fasteni
- Page 135 and 136:
DS Heavy Duty General Purpose Nails
- Page 137 and 138:
Application requirements Thickness
- Page 139 and 140:
Fastening metal profiles Required n
- Page 141 and 142:
SL Nails for Forming or other Tempo
- Page 143 and 144:
Spacing and edge distance (mm) Corr
- Page 145 and 146:
X-M6, X-W6, X-F7, X-M8, X-M10, X-W1
- Page 147 and 148:
X-M6, X-W6, X-F7, X-M8, X-M10, X-W1
- Page 149 and 150:
System recommendation Fasteners Too
- Page 151 and 152:
DX-Kwik X-M 6H, X-M 8H Threaded Stu
- Page 153 and 154:
DX Kwik Nail Characteristic Concret
- Page 155 and 156:
Installation X-M6H, X-M8H DNH 37, X
- Page 157 and 158:
X-CRM X-CR M Stainless Steel Thread
- Page 159 and 160:
Arrangements to reduce or prevent m
- Page 161 and 162:
Recommended setting range X-CRM Cor
- Page 163 and 164:
Fastening quality assurance Fasteni
- Page 165 and 166:
X-IE Wall Insulation Fastener Produ
- Page 167 and 168:
Recommended setting range Concrete:
- Page 169 and 170:
X-SW 30, X-SW 60 X-SW 30, X-SW 60 S
- Page 171 and 172:
Fastener selection and system recom
- Page 173 and 174:
X-FS Form Stop Product data Dimensi
- Page 175 and 176:
Fastener selection and system recom
- Page 177 and 178:
X-HS Threaded Hanger and X-CC Loop
- Page 179 and 180:
DX Standard (without pre-drilling)
- Page 181 and 182:
Fastener selection X-HS, X-CC Progr
- Page 183 and 184:
X-HSMX, X-CCMX Electrical Hanger Sy
- Page 185 and 186:
Application requirements Thickness
- Page 187 and 188:
Fastening quality assurance Install
- Page 189 and 190:
X-EKB, X-ECH X-EKB, X-ECH Electrica
- Page 191 and 192:
X-ECH: Laying cable on ceilings and
- Page 193 and 194:
Fastener selection and system recom
- Page 195 and 196:
Fastener selection: Order informati
- Page 197 and 198:
X-FB, X-DFB, X-EMTC, X-FBMX X-FB (X
- Page 199 and 200:
Application requirements Thickness
- Page 201 and 202:
Material specification: ➀ Polyeth
- Page 203 and 204:
Fastening quality assurance Fasteni
- Page 205 and 206:
X-ECTMX, X-EKSMX, X-EMTSC X-ECT MX
- Page 207 and 208:
Fastenings to steel Average tensile
- Page 209 and 210:
X-EKS Item no. Designation 285719 X
- Page 211 and 212:
X-ET for Fastening Plastic Electric
- Page 213 and 214:
Application requirements Thickness
- Page 215 and 216:
System recommendation Fastening qua
- Page 217 and 218:
Special X-CR Stainless Steel Nails
- Page 219 and 220:
Special X-CR Test data For more det
- Page 221 and 222:
Fastening quality assurance Fasteni
- Page 223 and 224:
DX 460 General Purpose Tool DX 460-
- Page 225 and 226:
Fastener guide: X-460-F8SS S12 fast
- Page 227 and 228:
DX 351 DX 351 with X-MX27 Interior
- Page 229 and 230:
DX E72 DX E72 Fastener: X-U X-EDNI,
- Page 231 and 232:
DX 76 / DX 76 PTR DX 76 PTR (Siding
- Page 233 and 234:
DX 76 F15 (Siding and decking on co
- Page 235 and 236:
DX-860 Tool for Decking DX 860-ENP
- Page 237 and 238:
Tools and equipment GX 120 Gas Tool