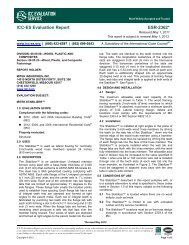
Installation Notes - USP Connectors
Installation Notes - USP Connectors
Installation Notes - USP Connectors

Create successful ePaper yourself
Turn your PDF publications into a flip-book with our unique Google optimized e-Paper software.
Wall Bracing – RWB, WB, WBC, & WBT series<br />
RWB – Flat bracing conveniently packaged in a handy roll out dispenser.<br />
Perfect for unexpected job site shortages. The 35-pound dispenser pack fits<br />
easily into a truck bed for transport. Pre-embossed snap-off points can be<br />
broken off by hand (wear gloves for safety).<br />
WB – A flat style bracing engineered to easily nail to studs. No cutting or fitting<br />
needed.<br />
WBC – The L-shaped design for additional strength and rigidity.<br />
WBT – Rolled edges and T-style design gives the WBT strength, rigidity, and<br />
eliminates sharp, sheared edges.<br />
© Copyright 2013 <strong>USP</strong> Structural <strong>Connectors</strong> ®<br />
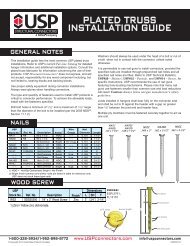
Materials: See chart<br />
Finish: G90 galvanizing<br />
Codes: Load values are derived from data submitted to<br />
various North American building code evaluators.<br />
<strong>Installation</strong>:<br />
• Use all specified fasteners. See Product <strong>Notes</strong>, page 10.<br />
• Bracing is a framing aid, not a substitute for structural shearwall components.<br />
• RWB & WB – Use with 16˝ or 24˝ o.c. studs. Install in pairs forming an “X” or<br />
opposing “V” at each end of a maximum 25-foot long wall panel.<br />
Steps: Square the panel. Straighten any kinks in bracing caused by handling.<br />
Lay bracing on the panel flush to the top of top plate and flush to the<br />
bottom of the bottom plate. Secure bracing to the top plate and bottom<br />
plate using 16d nails (WB) or 8d nails (RWB). Position second bracing at<br />
an angle opposite to the first brace to form an “X” and secure to top and<br />
bottom plate as with the first bracing. Using 8d nails, secure bracing to all<br />
intersecting studs.<br />
• WBC & WBT – Use with 16˝ o.c. studs. Install one brace at each end of wall<br />
section, not exceeding 25 feet, in an opposing “V” pattern. Use a length of the<br />
bracing as a straight web to mark studs. Cut a saw kerf 5⁄8˝ deep (1˝ deep for<br />
WBC). Insert the bracing web into the saw kerf, and drive one nail into the top<br />
plate. Raise the wall section into place and plumb. Finish<br />
fastening according to the nail schedule.<br />
Dimensions (in) Fastener Schedule 2,3<br />
<strong>USP</strong><br />
Steel<br />
Pieces Wall Install<br />
Each Plate Each Stud<br />
Stock No. 1 Ref. No. Gauge W L Per Roll Height Angle Qty Type Qty Type<br />
RWB96 WB106C 16 1-1/4 15 8' 60° 4 8d 1 8d<br />
RWB114 WB126C 16 1-1/4 12 8' 45° 4 8d 1 8d<br />
RWB143 WB143C 16 1-1/4 10 10' 45° 4 8d 1 8d<br />
WBC10 RCWB10 18 15/16 -- -- 8' 60° 2 16d 1 8d<br />
WBC12 RCWB12 18 15/16 -- -- 8' 45° 2 16d 1 8d<br />
WBT10 TWB10 22 1-3/8 -- -- 8' 60° 4 8d 1 8d<br />
WBT12 TWB12 22 1-3/8 -- -- 8' 45° 4 8d 1 8d<br />
WBT14<br />
RCWB14,<br />
TWB14<br />
22 1-3/8 -- -- 10' 45° 4 8d 1 8d<br />
WB106 WB106 16 1-1/4 -- -- 8' 60° 3 16d 1 8d<br />
WB126 WB126 16 1-1/4 -- -- 8' 45° 3 16d 1 8d<br />
1) These products substitute for code prescribed 1 x 4 let-in bracing.<br />
2) Minimum nail embedment shall be 8 nail diameters (typ).<br />
3) NAILS<br />
W 1<br />
Typical RWB, WB<br />
installation<br />
RWB pre-embossed<br />
snap-off points<br />
W 1<br />
L<br />
WB<br />
W 2<br />
Typical WBC / WBT<br />
installation<br />
Miscellaneous<br />
L<br />
W1<br />
L<br />
WBC<br />
WBT<br />
9/16˝<br />
1-800-328-5934 • www.<strong>USP</strong>connectors.com 187<br />
<strong>USP</strong>2240-131