Pano System for Cloud Administrator's Guide - Pano Logic
Pano System for Cloud Administrator's Guide - Pano Logic
Pano System for Cloud Administrator's Guide - Pano Logic

Create successful ePaper yourself
Turn your PDF publications into a flip-book with our unique Google optimized e-Paper software.
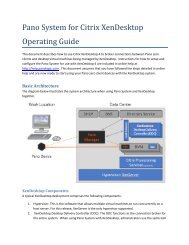
7. To turn on secondary display on <strong>Pano</strong> Virtual Client you need to enable the settings from host<br />
PC’s Windows. To do that, boot up the <strong>Pano</strong> Virtual Client, then select the Logoff button from<br />
the Connection Bar (see below) and login as a user with administrative rights in the host PC’s<br />
Windows. Once you’ve logged in, right-click anywhere on the desktop and select Screen<br />
Resolution, in the Screen Resolution control panel select the secondary display (at “Display:”)<br />
and choose “Extend desktop to this display” (at “Multiple displays:”).<br />
Prepare DVMs<br />
Be<strong>for</strong>e logging into a DVM, you must configure it to work with the <strong>Pano</strong> Virtual Client. For each<br />
DVM, be sure to update the <strong>Pano</strong> Direct Service to version 6.0.0 or later. Once you’ve done that<br />
the DVMs can be used with both <strong>Pano</strong> Virtual Client endpoints and with <strong>Pano</strong> Zero Clients and<br />
<strong>Pano</strong> Remote.<br />
Using <strong>Pano</strong> Virtual Client<br />
Login and Options Dialogs<br />
When using the <strong>Pano</strong> Virtual Client you’ll initially be presented with a login dialog just like on a<br />
<strong>Pano</strong> Zero Client. You can enter a valid user name and password and then select one of two<br />
buttons at the bottom of the login dialog:<br />
• Login – will take you to the last DVM accessed by your user name.<br />
• Options – takes you to the options dialog letting you select a different Desktop (DVM) from<br />
your list of authorized DVMs.<br />
Connection Bar<br />
To control or end a <strong>Pano</strong> Virtual Client session move the mouse pointer to the top center of the<br />
screen and the Connection Bar will appear:<br />
The buttons on the Connection Bar have the following functions:<br />
• Ctrl-Alt-Del - sends a Ctrl+Alt+Del keypress to your <strong>Pano</strong> DVM. Pressing this button may<br />
let you regain control of your DVM if it becomes unresponsive but will have no impact on your<br />
local Windows operating system on the test PC. If you need to send a Ctrl-Alt-Del keypress to<br />
the local Windows operating system on your PC, press the actual Ctrl, Alt, and Del keys on your<br />
keyboard instead<br />
• Status/Disconnect - displays both the connection status (like the hardware <strong>Pano</strong> Button<br />
on <strong>Pano</strong> Zero Clients) and when connected, end your <strong>Pano</strong> DVM session and return to the <strong>Pano</strong><br />
Virtual Client login dialog equivalent to pressing the <strong>Pano</strong> Button on a <strong>Pano</strong> Zero Client to end<br />
your <strong>Pano</strong> session. Doing this will not shutdown or reboot your <strong>Pano</strong> DVM or the host PC's<br />
Windows operating system, nor will it exit the <strong>Pano</strong> Virtual Client shell.<br />
Status indications are by color:<br />
* Red: no IP address (from DHCP) or no network connection found.<br />
* Amber: Awaiting connection from<strong>Pano</strong> Controller or DVM.<br />
* Blue: Connected to <strong>Pano</strong> Controller <strong>for</strong> <strong>Cloud</strong> or DVM - can press to Disconnect session.<br />
42 � <strong>Pano</strong> <strong>System</strong> <strong>for</strong> <strong>Cloud</strong> Administrator’s <strong>Guide</strong>