Pano System for Cloud Administrator's Guide - Pano Logic
Pano System for Cloud Administrator's Guide - Pano Logic
Pano System for Cloud Administrator's Guide - Pano Logic
You also want an ePaper? Increase the reach of your titles
YUMPU automatically turns print PDFs into web optimized ePapers that Google loves.
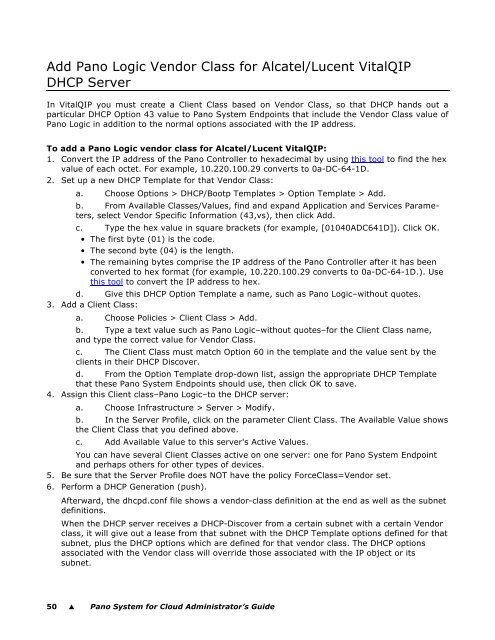
Add <strong>Pano</strong> <strong>Logic</strong> Vendor Class <strong>for</strong> Alcatel/Lucent VitalQIP<br />
DHCP Server<br />
In VitalQIP you must create a Client Class based on Vendor Class, so that DHCP hands out a<br />
particular DHCP Option 43 value to <strong>Pano</strong> <strong>System</strong> Endpoints that include the Vendor Class value of<br />
<strong>Pano</strong> <strong>Logic</strong> in addition to the normal options associated with the IP address.<br />
To add a <strong>Pano</strong> <strong>Logic</strong> vendor class <strong>for</strong> Alcatel/Lucent VitalQIP:<br />
1. Convert the IP address of the <strong>Pano</strong> Controller to hexadecimal by using this tool to find the hex<br />
value of each octet. For example, 10.220.100.29 converts to 0a-DC-64-1D.<br />
2. Set up a new DHCP Template <strong>for</strong> that Vendor Class:<br />
a. Choose Options > DHCP/Bootp Templates > Option Template > Add.<br />
b. From Available Classes/Values, find and expand Application and Services Parameters,<br />
select Vendor Specific In<strong>for</strong>mation (43,vs), then click Add.<br />
c. Type the hex value in square brackets (<strong>for</strong> example, [01040ADC641D]). Click OK.<br />
• The first byte (01) is the code.<br />
• The second byte (04) is the length.<br />
• The remaining bytes comprise the IP address of the <strong>Pano</strong> Controller after it has been<br />
converted to hex <strong>for</strong>mat (<strong>for</strong> example, 10.220.100.29 converts to 0a-DC-64-1D.). Use<br />
this tool to convert the IP address to hex.<br />
d. Give this DHCP Option Template a name, such as <strong>Pano</strong> <strong>Logic</strong>–without quotes.<br />
3. Add a Client Class:<br />
a. Choose Policies > Client Class > Add.<br />
b. Type a text value such as <strong>Pano</strong> <strong>Logic</strong>–without quotes–<strong>for</strong> the Client Class name,<br />
and type the correct value <strong>for</strong> Vendor Class.<br />
c. The Client Class must match Option 60 in the template and the value sent by the<br />
clients in their DHCP Discover.<br />
d. From the Option Template drop-down list, assign the appropriate DHCP Template<br />
that these <strong>Pano</strong> <strong>System</strong> Endpoints should use, then click OK to save.<br />
4. Assign this Client class–<strong>Pano</strong> <strong>Logic</strong>–to the DHCP server:<br />
a. Choose Infrastructure > Server > Modify.<br />
b. In the Server Profile, click on the parameter Client Class. The Available Value shows<br />
the Client Class that you defined above.<br />
c. Add Available Value to this server's Active Values.<br />
You can have several Client Classes active on one server: one <strong>for</strong> <strong>Pano</strong> <strong>System</strong> Endpoint<br />
and perhaps others <strong>for</strong> other types of devices.<br />
5. Be sure that the Server Profile does NOT have the policy ForceClass=Vendor set.<br />
6. Per<strong>for</strong>m a DHCP Generation (push).<br />
Afterward, the dhcpd.conf file shows a vendor-class definition at the end as well as the subnet<br />
definitions.<br />
When the DHCP server receives a DHCP-Discover from a certain subnet with a certain Vendor<br />
class, it will give out a lease from that subnet with the DHCP Template options defined <strong>for</strong> that<br />
subnet, plus the DHCP options which are defined <strong>for</strong> that vendor class. The DHCP options<br />
associated with the Vendor class will override those associated with the IP object or its<br />
subnet.<br />
50 � <strong>Pano</strong> <strong>System</strong> <strong>for</strong> <strong>Cloud</strong> Administrator’s <strong>Guide</strong>


