User Manual - Ajckids.com
User Manual - Ajckids.com
User Manual - Ajckids.com

You also want an ePaper? Increase the reach of your titles
YUMPU automatically turns print PDFs into web optimized ePapers that Google loves.
Wiring details<br />
If you prefer to connect your ECoS directly to a PC without a<br />
Switch or Hub you have to use a so called „cross-over-cable”.<br />
Such cables look like ordinary network cables but internally two<br />
pairs of wires are crossed. The LINK-LED lights up continuously<br />
if the connection is correct.<br />
Connect the network output only with a <strong>com</strong>puter network as<br />
per the Ethernet standard. Telephones for the ISDN standard<br />
and also other model train manufacturers use identical plugsocket-connections,<br />
but they must never be inserted into the<br />
LAN socket of ECoS.<br />
When removing the network cable you must press the retaining<br />
lug on the plug prior to pulling out the plug. On older<br />
versions this is located on the underside of the ECoS. Release<br />
this lug carefully perhaps using a small screwdriver. In all newer<br />
ECoS models and all Central Stations® the socket has been<br />
turned by 180° and can easily be reached.<br />
8.7. Wiring external boosters<br />
Should the power output of the integral booster be insufficient<br />
you may connect more external boosters. For this purpose<br />
you have to divide your layout into several individual electrical<br />
sectors.<br />
8.7.1. Suitable systems<br />
There are 3 different types of boosters which can be used with<br />
the ECoS:<br />
a) DCC <strong>com</strong>patible booster with 3-pole connector for wiring<br />
top the <strong>com</strong>mand station. These boosters can generate<br />
both Motorola® and DCC signals but not Selectrix® signals.<br />
Even though it is possible to generate M4 signals and<br />
thus run M4 lo<strong>com</strong>otives, the <strong>com</strong>mand station cannot detect<br />
such lo<strong>com</strong>otives in districts powered by DCC boosters<br />
(due to the lack of feedback).<br />
b) Booster according to Märklin® 6017 norm. The widely used<br />
Märklin® boosters 6015 and 6017 can generate DCC signals<br />
as well as Motorola® signals but not Selectrix® signals.<br />
Even though it is possible to generate M4 signals and thus<br />
run M4 lo<strong>com</strong>otives, the <strong>com</strong>mand station cannot detect<br />
such lo<strong>com</strong>otives in districts powered by 6017 boosters<br />
(due to the lack of feedback).<br />
c) ECoSlink system booster. ESU offers two options with the<br />
ECoSBoost 4A resp. ECoSBoost 8A. Both boosters can generate<br />
DCC, Motorola®, Selectrix® and M4 data signals.<br />
Thanks to the integral feedback feature M4 lo<strong>com</strong>otives<br />
can be automatically detected ECoSBoost power districts.<br />
The different types of booster have to be connected to the<br />
ECoS in different ways: DCC <strong>com</strong>patible boosters and boosters<br />
<strong>com</strong>pliant to the 6017 standard must be wired to the external<br />
booster interface. ECoSlink boosters are to be connected directly<br />
to one of the ECoSlink sockets.<br />
Since most <strong>com</strong>mercially available boosters have problems with<br />
the Selectrix® data packet, no Selectrix® data are supplied to<br />
the external booster interface. Therefore it is not possible to<br />
run Selectrix® lo<strong>com</strong>otives in districts powered by external<br />
boosters.<br />
The boosters also differ in how they detect a short circuit and<br />
the polarity. The appropriate setting can be configured at the<br />
ECoS and is valid for all boosters connected. Therefore one<br />
should only use one type of booster with the ECoS (e.g.: only<br />
DCC <strong>com</strong>patible boosters or only 6017 <strong>com</strong>patible boosters).<br />
We re<strong>com</strong>mend only using boosters of the same type from one<br />
manufacturer. The time related behaviour of different makes<br />
varies greatly. Therefore it is likely that problems may occur<br />
whenever a lo<strong>com</strong>otive crosses a district boundary.<br />
However, mixing 6017 <strong>com</strong>patible boosters with ESU ECoS-<br />
Boost boosters is permitted. It must be noted that a rocker<br />
contact for separating the centre rail is required at the district<br />
boundaries powered by different boosters.<br />
You can use five 6017-boosters or three 6015-boosters at<br />
most!<br />
8.7.2. External booster interface<br />
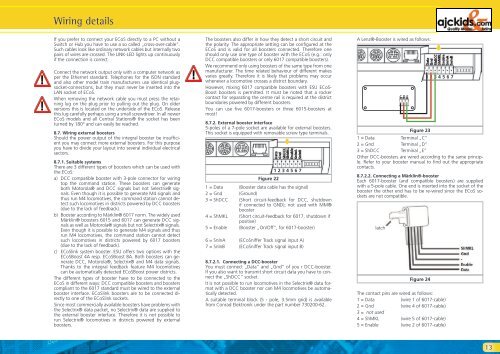
5-poles of a 7-pole socket are available for external boosters.<br />
This socket is equipped with removable screw type terminals.<br />
Figure 22<br />
�<br />
1 2 3 4 5 6 7<br />
1 = Data (Booster data cable has the signal)<br />
2 = Gnd (Ground)<br />
3 = ShDCC (Short circuit-feedback for DCC, shutdown<br />
if connected to GND); not used with MM®<br />
booster<br />
4 = ShMKL (Short circuit-feedback for 6017, shutdown if<br />
positive)<br />
5 = Enable (Booster „On/Off“, for 6017-booster)<br />
6 = SnInA (ECoSniffer Track signal input A)<br />
7 = SnInB (ECoSniffer Track signal input B)<br />
8.7.2.1. Connecting a DCC-booster<br />
You must connect „Data” and „Gnd” of you r DCC-booster.<br />
If you also want to transmit short circuit data you have to connect<br />
the „ShDCC” socket.<br />
It is not possible to run lo<strong>com</strong>otives in the Selectrix® data format<br />
with a DCC booster nor can M4 lo<strong>com</strong>otives be automatically<br />
detected.<br />
A suitable terminal block (5 - pole, 3.5mm grid) is available<br />
from Conrad Elektronik under the part number 730200-62.<br />
A Lenz®-Booster is wired as follows:<br />
CDE<br />
Figure 23<br />
�<br />
1 2 3 4 5 6 7<br />
1 = Data Terminal „C”<br />
2 = Gnd Terminal „D”<br />
3 = ShDCC Terminal „E”<br />
Other DCC-boosters are wired according to the same principle.<br />
Refer to your booster manual to find out the appropriate<br />
contacts.<br />
8.7.2.2. Connecting a Märklin®-booster<br />
Each 6017-booster (and <strong>com</strong>patible boosters) are supplied<br />
with a 5-pole cable. One end is inserted into the socket of the<br />
booster the other end has to be re-wired since the ECoS sockets<br />
are not <strong>com</strong>patible.<br />
latch<br />
Figure 24<br />
The contact pins are wired as follows:<br />
1 = Data (wire 1 of 6017-cable)<br />
2 = Gnd (wire 4 of 6017-cable)<br />
3 = not used<br />
4 = ShMKL (wire 5 of 6017-cable)<br />
5 = Enable (wire 2 of 6017-cable)<br />
13