User Manual - Ajckids.com
User Manual - Ajckids.com
User Manual - Ajckids.com

You also want an ePaper? Increase the reach of your titles
YUMPU automatically turns print PDFs into web optimized ePapers that Google loves.
Run lo<strong>com</strong>otives<br />
11.1.3.6. Favourite lists<br />
In order to quickly find certain lo<strong>com</strong>otives in a large number<br />
of rolling stock there are 3 lo<strong>com</strong>otive choice lists in which you<br />
may store your lo<strong>com</strong>otives.<br />
In order to add a lo<strong>com</strong>otive to one of these lists simply tick the<br />
field for the desired list.<br />
As an example the following classification of lo<strong>com</strong>otives<br />
would be useful:<br />
Freight train lo<strong>com</strong>otives List 1<br />
Passenger train lo<strong>com</strong>otives List 2<br />
MUs List 3<br />
Later you can first select the appropriate lo<strong>com</strong>otive list when<br />
searching a particular lo<strong>com</strong>otive.<br />
11.1.3.7. Function mapping<br />
The ECoS enables you to freely assign symbols to each function<br />
button. Besides assigning a symbol you can also determine for<br />
each function if it should operate as a momentary or a continuous<br />
output.<br />
• Select „properties“ in the lo<strong>com</strong>otive menue and choose the<br />
symbol on the left in order to call up function mapping.<br />
Figure 41<br />
• Select the desired symbol for each function from the list.<br />
• Set the function to momentary or a continuous output. Momentary<br />
functions remain on as long as you press the corresponding<br />
function button. Continuous outputs remain on until<br />
you touch the function button once more.<br />
• If you do not want to use a certain function screen button simply<br />
remove the tick next to the field “Utilising this function”.<br />
The ECoS does not check if a symbol matches the type of lo<strong>com</strong>otive.<br />
The pictogram only serves for easier identification<br />
on the display.<br />
In order to transmit changes to M4 lo<strong>com</strong>otives they must be<br />
connected to the ECoS during this process.<br />
DCC lo<strong>com</strong>otives can switch up to 20 functions; M4 decoders<br />
up to 16 and Selectrix® decoders regrettably only two.<br />
Lo<strong>com</strong>otives operating in “Motorola®14“ and „Motorola®28“<br />
mode offer up to 9 functions. The ECoS automatically assigns<br />
functions 5 - 8 onto the second Motorola® address. This feature<br />
is offered by all LokSound decoders. In order to work it has<br />
to be activated first. Refer to the decoder manual to find out<br />
how to ac<strong>com</strong>plish this.<br />
11.1.3.8. Assigning functions with the ECoSControl Radio<br />
You can assign a symbol for each lo<strong>com</strong>otive which then will<br />
be displayed on the ECoSControl Radio. Since the display of<br />
the handheld controller can only handle a limited number of lo<strong>com</strong>otive<br />
symbols you may have to make some <strong>com</strong>promises.<br />
• Select this symbol on the left in order to call up the menu for<br />
assigning symbols on the handheld controller.<br />
• Choose the desired symbol.<br />
Figure 42<br />
11.1.3.9. Speed steps / max speed display<br />
Select this symbol in order to call up the settings of the speedometer.<br />
There you can select if you want to display speed steps<br />
or speed (in km/h) on the speedometer.<br />
Figure 43<br />
• In the „Speed Step“-mode ECoS shows the currently set speed<br />
step. This is represented in the following ranges: 0 – 14, 0 – 27,<br />
0 – 31 resp. 0 – 126. This is subject to the protocol used.<br />
• In the „Speed”-mode ECoS calculates a speed in km/h that is<br />
then displayed on the screen.<br />
In order to be able to display the correct speed you have to enter<br />
the desired maximum speed of the particular loco in km/h.<br />
This should be the maximum speed of the prototype and not<br />
of the model.<br />
The value that you select with the slide controller will be displayed<br />
at the highest speed step. All values in between will be<br />
interpolated accordingly.<br />
The value entered here only serves for the display and has no<br />
influence on the actual speed of the loco. No parameters of the<br />
loco will be changed by this!<br />
Setting the maximum speed has to be done via CVs in DCC<br />
decoders; in Märklin® locos this generally has to be adjusted<br />
within the loco.<br />
11.1.3.10. Direct changing of address and speed step settings<br />
Whenever you enter a new loco the data is only entered in<br />
ECoS without any changes to the decoder in the loco.<br />
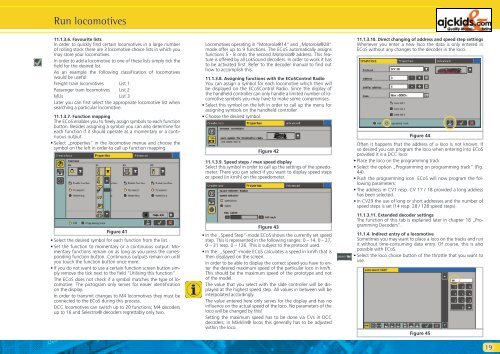
Figure 44<br />
Often it happens that the address of a loco is not known. If<br />
so desired you can program the loco when entering into ECoS<br />
provided it is a DCC loco:<br />
• Place the loco on the programming track<br />
• Select the option „Programming on programming track” (Fig.<br />
44).<br />
• Push the programming icon. ECoS will now program the following<br />
parameters:<br />
• The address in CV1 resp. CV 17 / 18 provided a long address<br />
has been selected.<br />
• In CV29 the use of long or short addresses and the number of<br />
speed steps is set (14 resp. 28 / 128 speed steps).<br />
11.1.3.11. Extended decoder settings<br />
The function of this tab is explained later in chapter 18 „Programming<br />
Decoders”.<br />
11.1.4. Indirect entry of a lo<strong>com</strong>otive<br />
Sometimes you may want to place a loco on the tracks and run<br />
it without time-consuming data entry. Of course, this is also<br />
possible with ECoS.<br />
• Select the loco choice button of the throttle that you want to<br />
use.<br />
Figure 45<br />
19