User Manual - Ajckids.com
User Manual - Ajckids.com
User Manual - Ajckids.com

Create successful ePaper yourself
Turn your PDF publications into a flip-book with our unique Google optimized e-Paper software.
16<br />
Introduction to operations<br />
top to bottom: At the top is the lighting button (F0) followed<br />
by F1 through F8. These buttons control the functions of the<br />
lo<strong>com</strong>otive currently controlled by this cab. The integral LED of<br />
each button indicates the current status.<br />
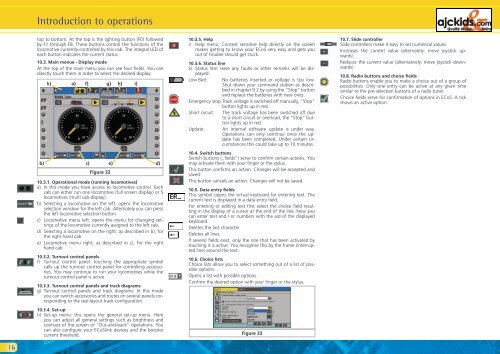
10.3. Main menue - Display mode<br />
At the top of the main menu you can see four fields. You can<br />
directly touch them in order to select the desired display:<br />
k)<br />
a) f) g) h) i)<br />
b) c) e) d)<br />
Figure 32<br />
10.3.1. Operational mode (running lo<strong>com</strong>otives)<br />
a) In this mode you have access to lo<strong>com</strong>otive control. Each<br />
cab can either run one lo<strong>com</strong>otive (full screen display) or 5<br />
lo<strong>com</strong>otives (multi cab display).<br />
b) Selecting a lo<strong>com</strong>otive on the left: opens the lo<strong>com</strong>otive<br />
selection window for the left cab. Alternately you can press<br />
the left lo<strong>com</strong>otive selection button.<br />
c) Lo<strong>com</strong>otive menu left: opens the menu for changing settings<br />
of the lo<strong>com</strong>otive currently assigned to the left cab.<br />
d) Selecting a lo<strong>com</strong>otive on the right: as described in b), for<br />
the right hand cab<br />
e) Lo<strong>com</strong>otive menu right: as described in c), for the right<br />
hand cab<br />
10.3.2. Turnout control panels<br />
f) Turnout control panel: touching the appropriate symbol<br />
calls up the turnout control panel for controlling accessories.<br />
You may continue to run your lo<strong>com</strong>otives while the<br />
turnout control panel is active.<br />
10.3.3. Turnout control panels and track diagrams<br />
g) Turnout control panels and track diagrams: In this mode<br />
you can switch accessories and routes on several panels corresponding<br />
to the real layout track configuration.<br />
10.3.4. Set-up<br />
h) Set-up menu: this opens the general set-up menu. Here<br />
you can adjust all general settings such as brightness and<br />
contrast of the screen or “Out-and-back” operations. You<br />
can also configure your ECoSlink devices and the booster<br />
current threshold.<br />
10.3.5. Help<br />
i) Help menu: Context sensitive help directly on the screen<br />
makes getting to know your ECoS very easy and gets you<br />
out of trouble should get stuck.<br />
10.3.6. Status line<br />
k) Status line: Here any faults or other remarks will be displayed:<br />
Low Batt: No batteries inserted or voltage is too low.<br />
Shut down your <strong>com</strong>mand station as described<br />
in chapter 9.2 by using the “Stop” button<br />
and replace the batteries with new ones.<br />
Emergency stop: Track voltage is switched off manually, “Stop“<br />
button lights up in red.<br />
Short circuit: The track voltage has been switched off due<br />
to a short circuit or overload, the “Stop“ button<br />
lights up in red.<br />
Update: An internal software update is under way.<br />
Operations can only continue once the update<br />
has been <strong>com</strong>pleted. Under certain circumstances<br />
this could take up to 10 minutes.<br />
10.4. Switch buttons<br />
Switch buttons („fields“) serve to confirm certain actions. You<br />
may activate them with your finger or the stylus.<br />
This button confirms an action. Changes will be accepted and<br />
saved.<br />
This button cancels an action. Changes will not be saved.<br />
10.5. Data entry fields<br />
This symbol opens the virtual keyboard for entering text. The<br />
current text is displayed in a data entry field.<br />
For entering or editing text first select the choice field resulting<br />
in the display of a cursor at the end of the line. Now you<br />
can enter text and / or numbers with the aid of the displayed<br />
keyboard.<br />
Deletes the last character<br />
Deletes all lines<br />
If several fields exist, only the one that has been activated by<br />
touching it is active. You recognise this by the frame (interrupted<br />
line) around the text.<br />
10.6. Choice lists<br />
Choice lists allow you to select something out of a list of possible<br />
options.<br />
Opens a list with possible options.<br />
Confirm the desired option with your finger or the stylus.<br />
Figure 33<br />
10.7. Slide controller<br />
Slide controllers make it easy to set numerical values.<br />
Increases the current value (alternately: move joystick upwards)<br />
Reduces the current value (alternatively: move joystick downwards)<br />
10.8. Radio buttons and choice fields<br />
Radio buttons enable you to make a choice out of a group of<br />
possibilities. Only one entry can be active at any given time<br />
similar to the pre-selection buttons of a radio tuner.<br />
Choice fields serve for confirmation of options in ECoS. A tick<br />
shows an active option.