User Manual - Ajckids.com
User Manual - Ajckids.com
User Manual - Ajckids.com

Create successful ePaper yourself
Turn your PDF publications into a flip-book with our unique Google optimized e-Paper software.
22<br />
Operating consists<br />
Figure 52<br />
• Locos assigned to a consist cannot be run individually any<br />
more.<br />
12.2. Assigning a consist to a throttle<br />
Selecting a consist is done the same way as selecting a lo<strong>com</strong>otive.<br />
Refer to chapter 11.2. Consists are marked as „Multi” in<br />
the lo<strong>com</strong>otive list.<br />
12.3. Change parameters of consists<br />
You can change any settings in a consist just as easily as with<br />
individual locos, refer to chapter 11.8.<br />
12.4. Deleting a consist<br />
You can delete a consist just as easily as with individual locos,<br />
refer to chapter 11.4.<br />
Any locos that were part of the deleted consist will of course<br />
not be deleted as well. They remain as individual locos in the<br />
list of locos.<br />
12.5. Hints for running consists<br />
• It is re<strong>com</strong>mended only to add locos to a consist that process<br />
the information regarding direction (e.g.: Motorola® II-format;<br />
DCC-format).<br />
• The characteristics of the locos in a consist should be similar<br />
(maximum speed, acceleration and deceleration). There should<br />
not be any big deviations. If necessary reprogram such locos<br />
before adding them to a consist. Also refer to chapter 18.<br />
• Do not couple lightweight vehicles between locos in consists<br />
because of risk of derailment<br />
• Please make sure that any isolated sections ahead of signals<br />
are sufficiently long (at least 36cm to 54cm longer than the<br />
consist) when running consists.<br />
• The first lo<strong>com</strong>otive in the consist determines the mode of<br />
the function buttons. You may adjust this for M4 lo<strong>com</strong>otives.<br />
Thus it is possible to adapt running characteristics and function<br />
mapping.<br />
• Should you wish to run a Märklin® sound car (e.g. 49962<br />
or 49964) together with a lo<strong>com</strong>otive you should locate the<br />
sound car as the first vehicle of the consist. It then determines<br />
the function mapping.<br />
13. Switching accessories<br />
Accessories are listed in a library within ECoS similar to lo<strong>com</strong>otives.<br />
Thus all accessories have to be entered once before they<br />
can be switched. For switching the accessories will be assigned<br />
to one or several control panels. Normally this happens when<br />
you enter the accessory.<br />
Accessories can be switched with the ECoS only if they are wired<br />
to an appropriate decoder. Typical decoders are Märklin®<br />
k83 resp. K84 or ESU SwitchPilot decoders.<br />
13.1. Enter new accessories<br />
• Open the turnout control panel by clicking onto the appropriate<br />
symbol in the main menu.<br />
• Touch the configuration symbol and the configuration window<br />
will be displayed. There are pictograms at the bottom of the<br />
screen for all important functions.<br />
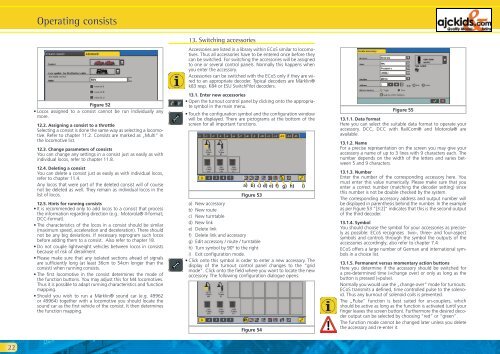
a) b) c) d) e) f) g) h) i)<br />
Figure 53<br />
a) New accessory<br />
b) New route<br />
c) New turntable<br />
d) New link<br />
e) Delete link<br />
f) Delete link and accessory<br />
g) Edit accessory / route / turntable<br />
h) Turn symbol by 90º to the right<br />
i) Exit configuration mode.<br />
• Click onto this symbol in order to enter a new accessory. The<br />
display of the turnout control panel changes to the “grid<br />
mode”. Click onto the field where you want to locate the new<br />
accessory. The following configuration dialogue opens:<br />
Figure 54<br />
Figure 55<br />
13.1.1. Data format<br />
Here you can select the suitable data format to operate your<br />
accessory. DCC, DCC with RailCom® and Motorola® are<br />
available.<br />
13.1.2. Name<br />
For a precise representation on the screen you may give your<br />
accessory a name of up to 3 lines with 9 characters each. The<br />
number depends on the width of the letters and varies between<br />
5 and 9 characters.<br />
13.1.3. Number<br />
Enter the number of the corresponding accessory here. You<br />
must enter this value numerically. Please make sure that you<br />
enter a correct number (matching the decoder setting) since<br />
this number is not be double checked by the system.<br />
The corresponding accessory address and output number will<br />
be displayed in parenthesis behind the number. In the example<br />
as per Figure 53 “[3:2]“ indicates that this is the second output<br />
of the third decoder.<br />
13.1.4. Symbol<br />
You should choose the symbol for your accessories as precisely<br />
as possible: ECoS recognises two-, three- and four-aspect<br />
symbols and controls through the symbol the outputs of the<br />
accessories accordingly; also refer to chapter 7.4.<br />
ECoS offers a large number of German and international symbols<br />
in a choice list.<br />
13.1.5. Permanent versus momentary action buttons<br />
Here you determine if the accessory should be switched for<br />
a pre-determined time (=change over) or only as long as the<br />
button is pressed (=pulse).<br />
Normally you would use the „change over” mode for turnouts.<br />
ECoS transmits a defined, time controlled pulse to the solenoid.<br />
Thus any burnout of solenoid coils is prevented.<br />
The „Pulse” function is best suited for un-couplers, which<br />
should be active as long as the function is activated (until your<br />
finger leaves the screen button). Furthermore the desired decoder<br />
output can be selected by choosing “red” or “green”.<br />
The function mode cannot be changed later unless you delete<br />
the accessory and re-enter it.