User Manual - Ajckids.com
User Manual - Ajckids.com
User Manual - Ajckids.com

You also want an ePaper? Increase the reach of your titles
YUMPU automatically turns print PDFs into web optimized ePapers that Google loves.
Computer interface<br />
Figure 114<br />
• Search for the used network connection. In most cases this is<br />
called “LAN-Connection”.<br />
• Double click with the mouse on your connection. The following<br />
dialogue window will open (see figure 115).<br />
Figure 115<br />
• Mark “Internet-Protocol” in the list and click on “Properties”.<br />
Figure 116<br />
• Select “Use the following IP-address” and enter the value exactly<br />
as shown in Figure 116.<br />
• Confirm your entry with “OK”.<br />
• Confirm again with “OK” to close the window “Properties”.<br />
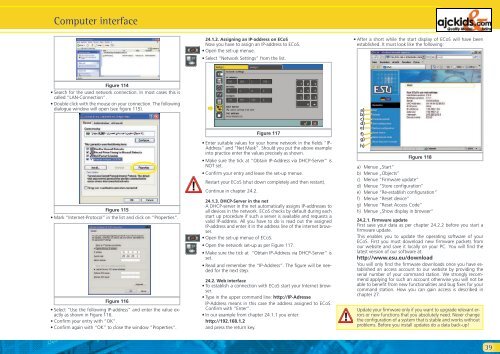
24.1.2. Assigning an IP-address on ECoS<br />
Now you have to assign an IP-address to ECoS.<br />
• Open the set-up menue.<br />
• Select “Network Settings” from the list.<br />
�<br />
Figure 117<br />
• Enter suitable values for your home network in the fields “IP-<br />
Address” and “Net Mask”. Should you put the above example<br />
into practice enter the values precisely as shown.<br />
• Make sure the tick at “Obtain IP-Address via DHCP-Server” is<br />
NOT set.<br />
• Confirm your entry and leave the set-up menue.<br />
Restart your ECoS (shut down <strong>com</strong>pletely and then restart).<br />
Continue in chapter 24.2.<br />
24.1.3. DHCP-Server in the net<br />
A DHCP-server in the net automatically assigns IP-addresses to<br />
all devices in the network. ECoS checks by default during each<br />
start up procedure if such a server is available and requests a<br />
valid IP-address. All you have to do is read out the assigned<br />
IP-address and enter it in the address line of the internet browser.<br />
• Open the set-up menue of ECoS.<br />
• Open the network set-up as per Figure 117.<br />
• Make sure the tick at “Obtain IP-Address via DHCP-Server” is<br />
set.<br />
• Read and remember the “IP-Address”. The figure will be needed<br />
for the next step.<br />
24.2. Web interface<br />
• To establish a connection with ECoS start your Internet browser.<br />
• Type in the upper <strong>com</strong>mand line: http://IP-Adresse<br />
IP-Address means in this case the address assigned to ECoS.<br />
Confirm with “Enter”.<br />
• In our example from chapter 24.1.1 you enter:<br />
http://192.168.1.2<br />
and press the return key.<br />
• After a short while the start display of ECoS will have been<br />
established. It must look like the following:<br />
a)<br />
b)<br />
c)<br />
d)<br />
e)<br />
f)<br />
g)<br />
h)<br />
Figure 118<br />
a) Menue „Start“<br />
b) Menue „Objects“<br />
c) Menue “Firmware update”<br />
d) Menue “Store configuration”<br />
e) Menue “Re-establish configuration”<br />
f) Menue “Reset device”<br />
g) Menue “Reset Access Code”<br />
h) Menue „Show display in browser“<br />
24.2.1. Firmware update<br />
First save your data as per chapter 24.2.2 before you start a<br />
firmware update.<br />
This enables you to update the operating software of your<br />
ECoS. First you must download new firmware packets from<br />
our website and save it locally on your PC. You will find the<br />
latest version of our software at:<br />
http://www.esu.eu/download<br />
You will only find the firmware downloads once you have established<br />
an access account to our website by providing the<br />
serial number of your <strong>com</strong>mand station. We strongly re<strong>com</strong>mend<br />
applying for such an account otherwise you will not be<br />
able to benefit from new functionalities and bug fixes for your<br />
<strong>com</strong>mand station. How you can gain access is described in<br />
chapter 27.<br />
Update your firmware only if you want to upgrade relevant errors<br />
or new functions that you absolutely need. Never change<br />
the configuration of a system that is stable and works without<br />
problems. Before you install updates do a data back-up!<br />
39