User Manual - Ajckids.com
User Manual - Ajckids.com
User Manual - Ajckids.com

Create successful ePaper yourself
Turn your PDF publications into a flip-book with our unique Google optimized e-Paper software.
Track Diagram Switching Panel<br />
15.3. Create a link to a route in the turnout control panel<br />
You can create a link to the same route on several panels of<br />
the turnout control panel. Thus you can better organise your<br />
turnout control panel.<br />
Linking routes happens in the same way as linking accessories.<br />
Chapter 13.3 explains how. Routes are marked with „FW” behind<br />
the name in the accessory library.<br />
Figure 72<br />
15.4. Switching a route<br />
In principle a route is switched in the same way as an individual<br />
accessory as described in chapter 13.4. However, there are two<br />
differences:<br />
This pictogram indicates that the route is currently not <strong>com</strong>pleted.<br />
At least one accessory did not switch as it was supposed<br />
to.<br />
The route is <strong>com</strong>pleted; all accessories are switched to the desired<br />
status.<br />
Routes can only be switched. Switching another route that<br />
contains at least one accessory of the previous route does releasing<br />
routes.<br />
It is always possible to switch an accessory belonging to a route<br />
individually, for instance through another link to a screen<br />
button in a control panel. As soon as the status of at least one<br />
accessory does not correspond to the appropriate status of this<br />
route the displayed symbol changes. Thus you keep control at<br />
any time and have certainty that all accessories of one route are<br />
switched correctly.<br />
15.5. Deleting a route<br />
Deleting a route is just as simple as deleting an accessory:<br />
• Call up the turnout control panel and go into the configuration<br />
mode.<br />
• Select this symbol. Frames around all accessories and routes<br />
will appear.<br />
• Select the desired route and confirm your choice.<br />
16. Track diagram switching panel<br />
With software version 3.0.0. an important feature has been<br />
added. By “drawing” a track diagram on the screen you can<br />
represent the topology of your layout graphically. You can<br />
switch any turnouts or signals simply by touching the appropriate<br />
symbol.<br />
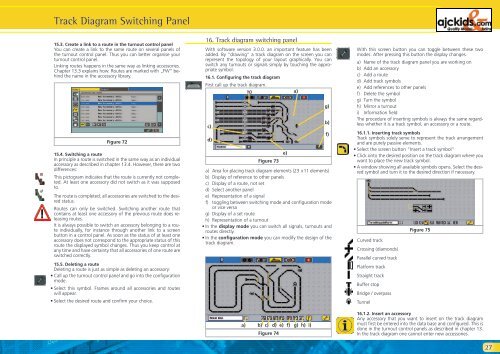
16.1. Configuring the track diagram<br />
First call up the track diagram.<br />
c)<br />
d)<br />
h)<br />
Figure 73<br />
a) Area for placing track diagram elements (23 x 11 elements)<br />
b) Display of reference to other panels<br />
c) Display of a route, not set<br />
d) Select another panel<br />
e) Representation of a signal<br />
f) toggling between switching mode and configuration mode<br />
or vice versa<br />
g) Display of a set route<br />
h) Representation of a turnout<br />
• In the display mode you can switch all signals, turnouts and<br />
routes directly.<br />
• In the configuration mode you can modify the design of the<br />
track diagram.<br />
a) b) c) d) e) f) g) h) i)<br />
Figure 74<br />
e)<br />
a)<br />
g)<br />
b)<br />
f)<br />
With this screen button you can toggle between these two<br />
modes. After pressing this button the display changes.<br />
a) Name of the track diagram panel you are working on<br />
b) Add an accessory<br />
c) Add a route<br />
d) Add track symbols<br />
e) Add references to other panels<br />
f) Delete the symbol<br />
g) Turn the symbol<br />
h) Mirror a turnout<br />
i) Information field<br />
The procedure of inserting symbols is always the same regardless<br />
whether it is a track symbol, an accessory or a route.<br />
16.1.1. Inserting track symbols<br />
Track symbols solely serve to represent the track arrangement<br />
and are purely passive elements.<br />
• Select the screen button “Insert a track symbol”<br />
• Click onto the desired position on the track diagram where you<br />
want to place the new track symbol.<br />
• A window showing all available symbols opens. Select the desired<br />
symbol and turn it to the desired direction if necessary.<br />
Curved track<br />
Crossing (diamonds)<br />
Parallel curved track<br />
Platform track<br />
Straight track<br />
Buffer stop<br />
Bridge / overpass<br />
Tunnel<br />
Figure 75<br />
16.1.2. Insert an accessory<br />
Any accessory that you want to insert on the track diagram<br />
must first be entered into the data base and configured. This is<br />
done in the turnout control panels as described in chapter 13.<br />
In the track diagram one cannot enter new accessories.<br />
27