User Manual - Ajckids.com
User Manual - Ajckids.com
User Manual - Ajckids.com

Create successful ePaper yourself
Turn your PDF publications into a flip-book with our unique Google optimized e-Paper software.
6<br />
Starting up quickly<br />
6. Starting up quickly<br />
After working through this you will be able to carry out a quick<br />
test of your ECoS <strong>com</strong>mand station and to do the „first laps”<br />
with one lo<strong>com</strong>otive.<br />
Please read the entire manual before you wire your ECoS permanently<br />
to your layout.<br />
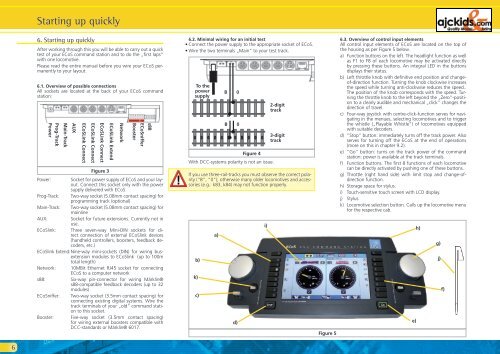
6.1. Overview of possible connections<br />
All sockets are located at the back of your ECoS <strong>com</strong>mand<br />
station:<br />
Prog-Track<br />
Power<br />
Main-Track<br />
AUX<br />
ECoSLink Connect<br />
ECoSLink Connect<br />
ECoSLink Connect<br />
Figure 3<br />
ECoSLink Extend<br />
Network<br />
ECoSniffer<br />
Booster<br />
s88<br />
Power: Socket for power supply of ECoS and your layout.<br />
Connect this socket only with the power<br />
supply delivered with ECoS.<br />
Prog-Track: Two-way socket (5.08mm contact spacing) for<br />
programming track (optional)<br />
Main-Track: Two-way socket (5.08mm contact spacing) for<br />
mainline<br />
AUX: Socket for future extensions. Currently not in<br />
use.<br />
ECoSlink: Three seven-way Mini-DIN sockets for direct<br />
connection of external ECoSlink devices<br />
(handheld controllers, boosters, feedback decoders,<br />
etc.)<br />
ECoSlink Extend: Nine-way mini-sockets (DIN) for wiring busextension<br />
modules to ECoSlink (up to 100m<br />
total length)<br />
Network: 10MBit Ethernet RJ45 socket for connecting<br />
ECoS to a <strong>com</strong>puter network<br />
s88: Six-way pin-connector for wiring Märklin®<br />
s88-<strong>com</strong>patible feedback decoders (up to 32<br />
modules)<br />
ECoSniffer: Two-way socket (3.5mm contact spacing) for<br />
connecting existing digital systems. Wire the<br />
track terminals of your „old” <strong>com</strong>mand station<br />
to this socket.<br />
Booster: Five-way socket (3.5mm contact spacing)<br />
for wiring external boosters <strong>com</strong>patible with<br />
DCC-standards or Märklin® 6017.<br />
6.2. Minimal wiring for an initial test<br />
• Connect the power supply to the appropriate socket of ECoS.<br />
• Wire the two terminals „Main” to your test track.<br />
To the<br />
power<br />
supply<br />
B 0<br />
B 0<br />
Figure 4<br />
With DCC-systems polarity is not an issue.<br />
2-digit<br />
track<br />
3-digit<br />
track<br />
If you use three-rail-tracks you must observe the correct polarity<br />
(“B”, “0”); otherwise many older lo<strong>com</strong>otives and accessories<br />
(e.g.: k83, k84) may not function properly.<br />
b)<br />
k)<br />
c)<br />
a)<br />
d)<br />
i)<br />
Figure 5<br />
6.3. Overview of control input elements<br />
All control input elements of ECoS are located on the top of<br />
the housing as per Figure 5 below.<br />
a) Function buttons on the left. The headlight function as well<br />
as F1 to F8 of each lo<strong>com</strong>otive may be activated directly<br />
by pressing these buttons. An integral LED in the buttons<br />
displays their status.<br />
b) Left throttle knob with definitive end position and changeof-direction<br />
function. Turning the knob clockwise increases<br />
the speed while turning anti-clockwise reduces the speed..<br />
The position of the knob corresponds with the speed. Turning<br />
the throttle knob to the left beyond the „Zero”-position<br />
to a clearly audible and mechanical „click” changes the<br />
direction of travel.<br />
c) Four-way joystick with centre-click-function serves for navigating<br />
in the menues, selecting lo<strong>com</strong>otives and to trigger<br />
the whistle („Playable Whistle“) of lo<strong>com</strong>otives equipped<br />
with suitable decoders.<br />
d) “Stop” button: immediately turns off the track power. Also<br />
serves for turning off the ECoS at the end of operations<br />
(more on this in chapter 9.2).<br />
e) “Go” button: turns on the track power of the <strong>com</strong>mand<br />
station: power is available at the track terminals.<br />
f) Function buttons. The first 8 functions of each lo<strong>com</strong>otive<br />
can be directly activated by pushing one of these buttons.<br />
g) Throttle (right hand side) with limit stop and change-ofdirection<br />
function.<br />
h) Storage space for stylus.<br />
i) Touch-sensitive touch screen with LCD display.<br />
j) Stylus<br />
k) Lo<strong>com</strong>otive selection button. Calls up the lo<strong>com</strong>otive menu<br />
for the respective cab.<br />
e)<br />
h)<br />
g)<br />
j)<br />
f)