User Manual - Ajckids.com
User Manual - Ajckids.com
User Manual - Ajckids.com
Create successful ePaper yourself
Turn your PDF publications into a flip-book with our unique Google optimized e-Paper software.
Unpacking & Set-Up<br />
• Controlling accessories. You can assign names and symbols to<br />
up to 2048 turnouts, signals and other accessories with solenoid<br />
drives and <strong>com</strong>fortably control them with the integral switch<br />
panels.<br />
• Multi-traction (consists) are a basic function for ECoS: Assemble<br />
any lo<strong>com</strong>otives to a consist and control them simultaneously.<br />
• Routes are really no problem for ECoS. Group your accessories<br />
and then switch them together; either manually or triggered by<br />
an s88-feedback contact.<br />
• The integral switch panels (turnout control panels) enable you<br />
to graphically display the topology of your layout and to switch<br />
accessories or routes directly on the panel(s). Several panels<br />
and an extensive choice of symbols allow you to display even<br />
<strong>com</strong>plex layouts.<br />
• The shuttle train mode caters for up to 8 different “out and<br />
back” lines with two each s88 contacts. This enables you to run<br />
shuttle trains between two points in a simple manner.<br />
• The integral turntable control feature displays the Märklin®<br />
turntable on the monitor and enables you to directly select the<br />
desired track position.<br />
• Programming decoders: Due to the monitor programming<br />
be<strong>com</strong>es as easy as never before: All parameters are shown<br />
in plain text and avoid mistakes. Set your lo<strong>com</strong>otives onto<br />
the programming track or use P.O.M. (Programming On the<br />
Main).<br />
• In most cases you can continue to use your „old” digital system:<br />
Provided it „speaks” DCC or Motorola®, you may connect<br />
it to the ECoSniffer port and thus use all your present<br />
handheld throttles.<br />
5. Unpacking & Set-up<br />
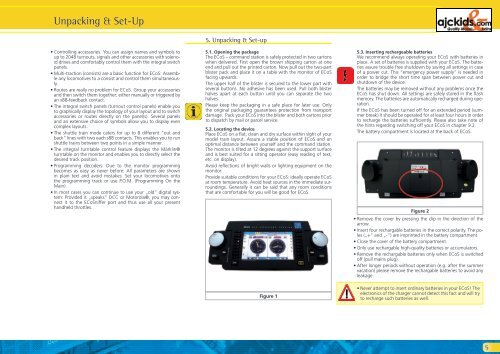
5.1. Opening the package<br />
The ECoS – <strong>com</strong>mand station is safely protected in two cartons<br />
when delivered. First open the brown shipping carton at one<br />
end and pull out the printed carton. Now pull out the two-part<br />
blister pack and place it on a table with the monitor of ECoS<br />
facing upwards.<br />
The upper half of the blister is secured to the lower part with<br />
several buttons. No adhesive has been used. Pull both blister<br />
halves apart at each button until you can separate the two<br />
halves.<br />
Please keep the packaging in a safe place for later use. Only<br />
the original packaging guarantees protection from transport<br />
damage. Pack your ECoS into the blister and both cartons prior<br />
to dispatch by mail or parcel service.<br />
5.2. Locating the device<br />
Place ECoS on a flat, clean and dry surface within sight of your<br />
model train layout. Assure a stable position of ECoS and an<br />
optimal distance between yourself and the <strong>com</strong>mand station.<br />
The monitor is tilted at 12 degrees against the support surface<br />
and is best suited for a sitting operator (easy reading of text,<br />
etc. on display).<br />
Avoid reflections of bright walls or lighting equipment on the<br />
monitor.<br />
Provide suitable conditions for your ECoS: ideally operate ECoS<br />
at room temperature. Avoid heat sources in the immediate surroundings.<br />
Generally it can be said that any room conditions<br />
that are <strong>com</strong>fortable for you will be good for ECoS.<br />
Figure 1<br />
5.3. Inserting rechargeable batteries<br />
We re<strong>com</strong>mend always operating your ECoS with batteries in<br />
place. A set of batteries is supplied with your ECoS. The batteries<br />
assure trouble free shutdown by saving all settings in case<br />
of a power cut. This “emergency power supply” is needed in<br />
order to bridge the short time span between power cut and<br />
shutdown of the device.<br />
The batteries may be removed without any problems once the<br />
ECoS has shut down. All settings are safely stored in the flash<br />
memory. The batteries are automatically recharged during operation.<br />
If the ECoS has been turned off for an extended period (summer<br />
break) it should be operated for at least four hours in order<br />
to recharge the batteries sufficiently. Please also take note of<br />
the hints regarding switching off your ECoS in chapter 9.2.<br />
The battery <strong>com</strong>partment is located at the back of ECoS.<br />
Figure 2<br />
• Remove the cover by pressing the clip in the direction of the<br />
arrow.<br />
• Insert four rechargable batteries in the correct polarity. The poles<br />
(„+“ and „-“) are imprinted in the battery <strong>com</strong>partment.<br />
• Close the cover of the battery <strong>com</strong>partment.<br />
• Only use rechargable high-quality batteries or accumulators.<br />
• Remove the rechargable batteries only when ECoS is switched<br />
off (pull mains plug).<br />
• After longer periods without operation (e.g. after the summer<br />
vacation) please remove the rechargable batteries to avoid any<br />
leakage.<br />
• Never attempt to insert ordinary batteries in your ECoS! The<br />
electronics of the charger cannot detect this fact and will try<br />
to recharge such batteries as well.<br />
5


