User Manual - Ajckids.com
User Manual - Ajckids.com
User Manual - Ajckids.com

You also want an ePaper? Increase the reach of your titles
YUMPU automatically turns print PDFs into web optimized ePapers that Google loves.
Programming Decoders<br />
18.4.3. Programming on the Main (POM)<br />
Only for DCC. When you select this mode you must enter<br />
the current address in field i). Reading is not permitted in this<br />
mode.<br />
18.5. <strong>Manual</strong> programming (Motorola®)<br />
• Call up the set-up menu. Then open “Set-up 2“ at the top of<br />
the screen.<br />
• Select this pictogram at the left in order to open the Motorola®<br />
programming dialogue. The following window will open:<br />
a)<br />
b)<br />
c)<br />
Figure 84<br />
a) CV number to be programmed<br />
c) New value to be entered (data entry in decimal format e.g.:<br />
as a number)<br />
d) Binary representation of the current value in c)<br />
f) Screen button “Write data“<br />
g) Number block for data entry<br />
Please bear in mind that a pure Motorola® decoder does not<br />
support CVs. Some decoders particularly the ones from ESU or<br />
Märklin® offer this feature. This feature enables you to write<br />
new values in the CVs but not to get a readout. It cannot be<br />
assured that the decoder actually supports these <strong>com</strong>mands<br />
since there is no standard specifying the programming method<br />
for decoders in the Motorola® mode. However, the programming<br />
method introduced by ESU in 2001 gains more and more<br />
market penetration.<br />
If the decoder also supports DCC you should program it in DCC<br />
mode (also refer to chapter 18.4).<br />
You should program M4 decoders solely via the graphic interface<br />
and the decoder profile.<br />
18.6. Searching the address<br />
A useful function particularly for finding the Motorola® address<br />
of older decoders. ECoS tests all 255 possible addresses and<br />
checks if the loco responds.<br />
This search mode only works if the acceleration has been set<br />
to a low value.<br />
d)<br />
e)<br />
• Call up the set-up menu and select “Set-up 2“.<br />
• Select the third pictogram from the top and an address menu<br />
will open.<br />
Figure 85<br />
• Place the lo<strong>com</strong>otive on the programming track and press<br />
“Start”. The loco will move for a moment. Make sure it cannot<br />
fall off the layout. Please always use buffer stops to secure the<br />
programming track.<br />
18.7. Graphic programming<br />
Besides the sometimes cumbersome method of direct CV programming<br />
– after all, who knows all CV numbers by memory<br />
– ECoS offers a <strong>com</strong>fortable alternative method:<br />
All ESU decoders and many others can be programmed easily<br />
without having to know CV numbers.<br />
Märklin® mfx® lo<strong>com</strong>otives and those with ESU M4 decoders<br />
can also be programmed with the graphic interface. Since M4<br />
decoders do not have any CV numbers this is in fact the only<br />
useful method.<br />
This is possible due to decoder profiles.<br />
18.7.1. Decoder profile for ESU and mfx® decoders<br />
A decoder profile is a description of the parameters of a decoder.<br />
All CV numbers, their value ranges and their purpose,<br />
as well as the layout of the elements on the ECoS monitor are<br />
summarised here. Every decoder that has a graphic profile can<br />
be programmed by this method.<br />
The ECoS has profiles for all ESU decoders, M4 decoders (with<br />
or without sound) as well as two generic DCC profiles for decoders<br />
by other manufacturers.<br />
18.7.2. <strong>Manual</strong> configuration of decoder profiles (DCC)<br />
The only exceptions are lo<strong>com</strong>otives with M4 decoders: Here<br />
the suitable profile is automatically set and cannot be modified.<br />
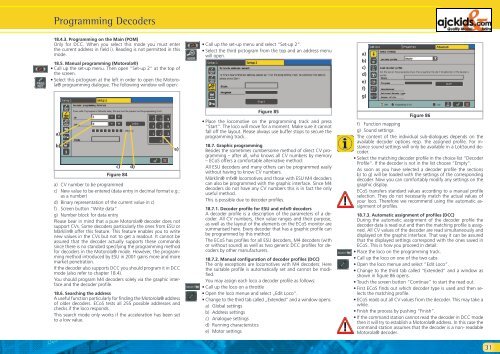
You may assign each loco a decoder profile as follows:<br />
• Call up the loco on a throttle<br />
• Open the loco menue and select „Edit Loco“.<br />
• Change to the third tab called „Extended” and a window opens.<br />
a) Global settings<br />
b) Address settings<br />
c) Analogue settings<br />
d) Running characteristics<br />
e) Motor settings<br />
a)<br />
b)<br />
c)<br />
d)<br />
e)<br />
f)<br />
g)<br />
Figure 86<br />
f) Function mapping<br />
g) Sound settings<br />
The content of the individual sub-dialogues depends on the<br />
available decoder options resp. the assigned profile. For instance<br />
sound settings will only be available in a LokSound decoder.<br />
• Select the matching decoder profile in the choice list “Decoder<br />
Profile”. If the decoder is not in the list choose “Empty”.<br />
As soon as you have selected a decoder profile the sections<br />
b) to g) will be loaded with the settings of the corresponding<br />
decoder. Now you can <strong>com</strong>fortably modify any settings on the<br />
graphic display.<br />
ECoS transfers standard values according to a manual profile<br />
selection. They do not necessarily match the actual values of<br />
your loco. Therefore we re<strong>com</strong>mend using the automatic assignment<br />
of profiles.<br />
18.7.3. Automatic assignment of profiles (DCC)<br />
During the automatic assignment of the decoder profile the<br />
decoder data is read out and then the matching profile is assigned.<br />
All CV values of the decoder are read simultaneously and<br />
displayed on the graphic interface. That way it can be assured<br />
that the displayed settings correspond with the ones saved in<br />
ECoS. This is how you proceed in detail:<br />
• Place the loco on the programming track.<br />
• Call up the loco on one of the two cabs<br />
• Open the loco menue and select “Edit Loco”.<br />
• Change to the third tab called “Extended” and a window as<br />
shown in figure 86 opens.<br />
• Touch the screen button “Continue” to start the read out.<br />
• First ECoS finds out which decoder type is used and then selects<br />
the matching profile.<br />
• ECoS reads out all CV values from the decoder. This may take a<br />
while.<br />
• Finish the process by pushing “Finish”.<br />
• If the <strong>com</strong>mand station cannot read the decoder in DCC mode<br />
then it will try to establish a Motorola® address. In this case the<br />
<strong>com</strong>mand station assumes that the decoder is a non- readable<br />
Motorola® decoder.<br />
31