User Manual - Ajckids.com
User Manual - Ajckids.com
User Manual - Ajckids.com

You also want an ePaper? Increase the reach of your titles
YUMPU automatically turns print PDFs into web optimized ePapers that Google loves.
Initialisation & Control<br />
9. Initialisation & Control<br />
9.1. Start up<br />
There is no dedicated switch-on button. As soon as you connect<br />
the power pack (transformer) to the mains, the ECoS will<br />
start initialisation.<br />
Depending on the software version and the number of lo<strong>com</strong>otives<br />
and accessories this process – also known as booting –<br />
may take up to two minutes. During this time the ECoS displays<br />
different images while the background illumination may flicker<br />
occasionally or even vanish altogether. This is quite normal and<br />
no reason for concern.<br />
At the end of this process the “Go” button lights up in green.<br />
9.2. Switching off<br />
There are two possibilities to switch off the ECoS:<br />
• Simply pull the mains plug from the power outlet. Provided<br />
batteries are inserted and charged to a reasonable level the<br />
ECoS will save the stored data and then turn itself off. As long<br />
as the “Stop” button is lit (red) the ECoS has not been fully<br />
turned off. This simple method has the disadvantage that if<br />
there are no batteries or if they have been incorrectly inserted<br />
or simply have been discharged to a low level then data may<br />
get lost. Therefore we do not re<strong>com</strong>mend this method.<br />
• When you press the “Stop“ button and keep it held down then<br />
a controlled shutdown process will start after about 3 seconds.<br />
The <strong>com</strong>mand station saves the current operating status and<br />
signals the end of operations to all boosters and other external<br />
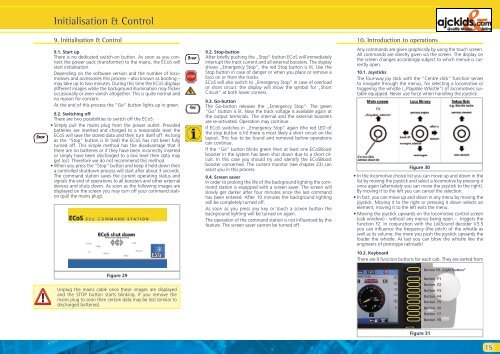
devices and shuts down. As soon as the following images are<br />
displayed on the screen you may turn off your <strong>com</strong>mand station<br />
(pull the mains plug).<br />
Figure 29<br />
Unplug the mains cable once these images are displayed<br />
and the STOP button starts blinking. If you remove the<br />
mains plug to soon then certain data may be lost (similar to<br />
discharged batteries).<br />
9.2. Stop-button<br />
After briefly pushing the „Stop” button ECoS will immediately<br />
interrupt the track current and all external boosters. The display<br />
shows „Emergency Stop”, the red Stop button is lit. Use the<br />
Stop button in case of danger or when you place or remove a<br />
loco on or from the tracks.<br />
ECoS will also switch to „Emergency Stop” in case of overload<br />
or short circuit: the display will show the symbol for „Short<br />
Circuit” at both lower corners.<br />
9.3. Go-button<br />
The Go-button releases the „Emergency Stop“. The green<br />
“Go” button is lit. Now the track voltage is available again at<br />
the output terminals. The internal and the external boosters<br />
are re-activated. Operation may continue.<br />
If ECoS switches in „Emergency Stop“ again (the red LED of<br />
the stop button is lit) there is most likely a short circuit on the<br />
layout. This has to be found and removed before operations<br />
can continue.<br />
If the “Go” button blinks green then at least one ECoSBoost<br />
booster in the system has been shut down due to a short circuit.<br />
In this case you should try and identify the ECoSBoost<br />
booster concerned. The current monitor (see chapter 23) can<br />
assist you in this process.<br />
9.4. Screen saver<br />
In order to prolong the life of the background lighting the <strong>com</strong>mand<br />
station is equipped with a screen saver. The screen will<br />
slowly get darker after four minutes since the last <strong>com</strong>mand<br />
has been entered. After 10 minutes the background lighting<br />
will be <strong>com</strong>pletely turned off.<br />
As soon as you press any key or touch a screen button the<br />
background lighting will be turned on again.<br />
The operation of the <strong>com</strong>mand station is not influenced by this<br />
feature. The screen saver cannot be turned off.<br />
10. Introduction to operations<br />
Any <strong>com</strong>mands are given graphically by using the touch screen.<br />
All <strong>com</strong>mands are directly given via the screen. The display on<br />
the screen changes accordingly subject to which menue is currently<br />
open.<br />
10.1. Joysticks<br />
The four-way joy stick with the “Centre click” function serves<br />
to navigate through the menus, for selecting a lo<strong>com</strong>otive or<br />
triggering the whistle („Playable Whistle“) of lo<strong>com</strong>otives suitable<br />
equipped. Never use force when handling the joystick.<br />
Figure 30<br />
• In the lo<strong>com</strong>otive choice list you can move up and down in the<br />
list by moving the joystick and select a lo<strong>com</strong>otive by pressing it<br />
once again (alternately you can move the joystick to the right).<br />
By moving it to the left you can cancel the selection.<br />
• In fact, you can move up and down in any menu by moving the<br />
joystick. Moving it to the right or pressing it down selects an<br />
element, moving it to the left exits the menu.<br />
• Moving the joystick upwards on the lo<strong>com</strong>otive control screen<br />
(cab window) - without any menus being open – triggers the<br />
function F2. In conjunction with the LokSound decoder V3.5<br />
you can influence the frequency (the pitch) of the whistle as<br />
well as its volume: the more you push the joystick upwards the<br />
louder the whistle. At last you can blow the whistle like the<br />
engineers of prototype railroads!<br />
10.2. Keyboard<br />
There are 9 function buttons for each cab. They are sorted from<br />
Figure 31<br />
Button F0 „Light button“<br />
Button F1<br />
Button F2<br />
Button F3<br />
Button F4<br />
Button F5<br />
Button F6<br />
Button F7<br />
Button F8<br />
15