User Manual - Ajckids.com
User Manual - Ajckids.com
User Manual - Ajckids.com

You also want an ePaper? Increase the reach of your titles
YUMPU automatically turns print PDFs into web optimized ePapers that Google loves.
18<br />
Run lo<strong>com</strong>otives<br />
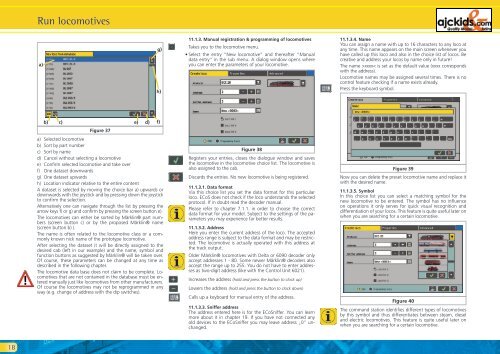
a)<br />
b) c)<br />
e) d)<br />
Figure 37<br />
g)<br />
a) Selected lo<strong>com</strong>otive<br />
b) Sort by part number<br />
c) Sort by name<br />
d) Cancel without selecting a lo<strong>com</strong>otive<br />
e) Confirm selected lo<strong>com</strong>otive and take over<br />
f) One dataset downwards<br />
g) One dataset upwards<br />
h) Location indicator relative to the entire content<br />
A dataset is selected by moving the choice bar a) upwards or<br />
downwards with the joystick and by pressing down the joystick<br />
to confirm the selection.<br />
Alternatively one can navigate through the list by pressing the<br />
arrow keys f) or g) and confirm by pressing the screen button e).<br />
The lo<strong>com</strong>otives can either be sorted by Märklin® part numbers<br />
(screen button c) or by the proposed Märklin® name<br />
(screen button b) ).<br />
The name is often related to the lo<strong>com</strong>otive class or a <strong>com</strong>monly<br />
known nick name of the prototype lo<strong>com</strong>otive.<br />
After selecting the dataset it will be directly assigned to the<br />
desired cab (left in our example) and the name, symbol and<br />
function buttons as suggested by Märklin® will be taken over.<br />
Of course, these parameters can be changed at any time as<br />
described in the following chapter.<br />
The lo<strong>com</strong>otive data base does not claim to be <strong>com</strong>plete. Lo<strong>com</strong>otives<br />
that are not contained in the database must be entered<br />
manually just like lo<strong>com</strong>otives from other manufacturers.<br />
Of course the lo<strong>com</strong>otives may not be reprogrammed in any<br />
way (e.g. change of address with the dip switches).<br />
h)<br />
f)<br />
11.1.3. <strong>Manual</strong> registration & programming of lo<strong>com</strong>otives<br />
Takes you to the lo<strong>com</strong>otive menu.<br />
• Select the entry “New lo<strong>com</strong>otive” and thereafter “<strong>Manual</strong><br />
data entry” in the sub menu. A dialog window opens where<br />
you can enter the parameters of your lo<strong>com</strong>otive.<br />
Figure 38<br />
Registers your entries, closes the dialogue window and saves<br />
the lo<strong>com</strong>otive in the lo<strong>com</strong>otive choice list. The lo<strong>com</strong>otive is<br />
also assigned to the cab.<br />
Discards the entries. No new lo<strong>com</strong>otive is being registered.<br />
11.1.3.1. Data format<br />
Via this choice list you set the data format for this particular<br />
loco. ECoS does not check if the loco understands the selected<br />
protocol. If in doubt read the decoder manual.<br />
Please refer to chapter 7.1.1. in order to choose the correct<br />
data format for your model. Subject to the settings of the parameters<br />
you may experience far better results.<br />
11.1.3.2. Address<br />
Here you enter the current address of the loco. The accepted<br />
address range is subject to the data format and may be restricted.<br />
The lo<strong>com</strong>otive is actually operated with this address at<br />
the track output.<br />
Older Märklin® lo<strong>com</strong>otives with Delta or 6090 decoder only<br />
accept addresses 1 - 80. Some newer Märklin® decoders also<br />
accept the range up to 255. You do not have to enter addresses<br />
as two-digit address (like with the Control Unit 6021).<br />
Increases the address (hold and press the button to clock up)<br />
Lowers the address (hold and press the button to clock down)<br />
Calls up a keyboard for manual entry of the address.<br />
11.1.3.3. Sniffer address<br />
The address entered here is for the ECoSniffer. You can learn<br />
more about it in chapter 19. If you have not connected any<br />
old devices to the ECoSniffer you may leave address „0” unchanged.<br />
11.1.3.4. Name<br />
You can assign a name with up to 16 characters to any loco at<br />
any time. This name appears on the main screen whenever you<br />
have called up this loco and also in the choice list of locos. Be<br />
creative and address your locos by name only in future!<br />
The name >xxxx< is set as the default value (xxxx corresponds<br />
with the address).<br />
Lo<strong>com</strong>otive names may be assigned several times. There is no<br />
control feature checking if a name exists already.<br />
Press the keyboard symbol.<br />
Figure 39<br />
Now you can delete the preset lo<strong>com</strong>otive name and replace it<br />
with the desired name.<br />
11.1.3.5. Symbol<br />
In this choice list you can select a matching symbol for the<br />
new lo<strong>com</strong>otive to be entered. The symbol has no influence<br />
on operations it only serves for quick visual recognition and<br />
differentiation of your locos. This feature is quite useful later on<br />
when you are searching for a certain lo<strong>com</strong>otive.<br />
Figure 40<br />
The <strong>com</strong>mand station identifies different types of lo<strong>com</strong>otives<br />
by this symbol and thus differentiates between steam, diesel<br />
and electric lo<strong>com</strong>otives. This feature is quite useful later on<br />
when you are searching for a certain lo<strong>com</strong>otive.