User Manual - Ajckids.com
User Manual - Ajckids.com
User Manual - Ajckids.com

Create successful ePaper yourself
Turn your PDF publications into a flip-book with our unique Google optimized e-Paper software.
Switching accessories<br />
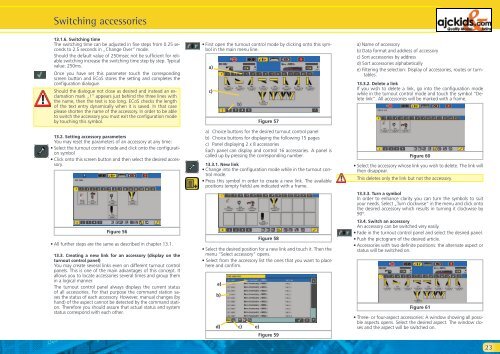
13.1.6. Switching time<br />
The switching time can be adjusted in five steps from 0.25 seconds<br />
to 2.5 seconds in „Change Over” mode.<br />
Should the default value of 250msec not be sufficient for reliable<br />
switching increase the switching time step by step. Typical<br />
value: 250ms.<br />
Once you have set this parameter touch the corresponding<br />
screen button and ECoS stores the setting and <strong>com</strong>pletes the<br />
configuration dialogue.<br />
Should the dialogue not close as desired and instead an exclamation<br />
mark „!” appears just behind the three lines with<br />
the name, then the text is too long. ECoS checks the length<br />
of the text entry dynamically when it is saved. In that case<br />
please shorten the name of the accessory. In order to be able<br />
to switch the accessory you must exit the configuration mode<br />
by touching this symbol.<br />
13.2. Setting accessory parameters<br />
You may reset the parameters of an accessory at any time:<br />
• Select the turnout control mode and click onto the configuration<br />
symbol<br />
• Click onto this screen button and then select the desired accessory.<br />
Figure 56<br />
• All further steps are the same as described in chapter 13.1.<br />
13.3. Creating a new link for an accessory (display on the<br />
turnout control panel)<br />
You may create several links even on different turnout control<br />
panels. This is one of the main advantages of this concept. It<br />
allows you to locate accessories several times and group them<br />
in a logical manner.<br />
The turnout control panel always displays the current status<br />
of all accessories. For that purpose the <strong>com</strong>mand station saves<br />
the status of each accessory. However, manual changes (by<br />
hand) of the aspect cannot be detected by the <strong>com</strong>mand station.<br />
Therefore you should assure that actual status and system<br />
status correspond with each other.<br />
• First open the turnout control mode by clicking onto this symbol<br />
in the main menu line.<br />
a)<br />
c)<br />
a) Choice buttons for the desired turnout control panel<br />
b) Choice buttons for displaying the following 15 pages<br />
c) Panel displaying 2 x 8 accessories<br />
Each panel can display and control 16 accessories. A panel is<br />
called up by pressing the corresponding number.<br />
13.3.1. New link<br />
• Change into the configuration mode while in the turnout control<br />
mode.<br />
• Press this symbol in order to create a new link. The available<br />
positions (empty fields) are indicated with a frame.<br />
• Select the desired position for a new link and touch it. Then the<br />
menu “Select accessory” opens.<br />
• Select from the accessory list the ones that you want to place<br />
here and confirm.<br />
a)<br />
b)<br />
b)<br />
d) c)<br />
e)<br />
Figure 57<br />
Figure 58<br />
Figure 59<br />
a) Name of accessory<br />
b) Data format and address of accessory<br />
c) Sort accessories by address<br />
d) Sort accessories alphabetically<br />
e) Filtering the selection: Display of accessories, routes or turntables.<br />
13.3.2. Delete a link<br />
If you wish to delete a link, go into the configuration mode<br />
while in the turnout control mode and touch the symbol “Delete<br />
link”. All accessories will be marked with a frame.<br />
Figure 60<br />
• Select the accessory whose link you wish to delete. The link will<br />
then disappear.<br />
This deletes only the link but not the accessory.<br />
13.3.3. Turn a symbol<br />
In order to enhance clarity you can turn the symbols to suit<br />
your needs. Select „Turn clockwise“ in the menu and click onto<br />
the desired accessory which results in turning it clockwise by<br />
90º.<br />
13.4. Switch an accessory<br />
An accessory can be switched very easily.<br />
• Fade in the turnout control panel and select the desired panel.<br />
• Push the pictogram of the desired article.<br />
• Accessories with two definite positions: the alternate aspect or<br />
status will be switched on.<br />
Figure 61<br />
• Three- or four-aspect accessories: A window showing all possible<br />
aspects opens. Select the desired aspect. The window closes<br />
and the aspect will be switched on.<br />
23