User Manual - Ajckids.com
User Manual - Ajckids.com
User Manual - Ajckids.com

Create successful ePaper yourself
Turn your PDF publications into a flip-book with our unique Google optimized e-Paper software.
32<br />
Programming Decoders<br />
18.7.4. Profiles of M4 decoders<br />
The <strong>com</strong>mand station will automatically detect and preset the<br />
decoder profile for all M4 decoders it recognises. This profile<br />
cannot be changed. The procedure for adjusting decoder parameters<br />
is done in the same manner as with DCC decoders.<br />
This similarity of the procedure should not mislead you: M4<br />
decoders do not have CVs that can be directly accessed.<br />
18.7.5. Editing decoder settings<br />
After assigning a decoder profile you can edit any decoder parameters<br />
<strong>com</strong>fortably on the graphic display. Initially all changes<br />
are set in ECoS only and not transferred to the decoder. Of<br />
course, you can transfer (program) the data set locally on ECoS<br />
to the decoder at any time.<br />
b)<br />
c)<br />
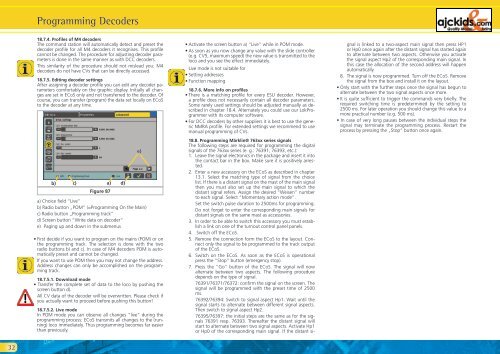
Figure 87<br />
a) Choice field “Live”<br />
b) Radio button „POM“ (=Programming On the Main)<br />
c) Radio button „Programming track“<br />
d) Screen button “Write data on decoder“<br />
e) Paging up and down in the submenus<br />
• First decide if you want to program on the mains (POM) or on<br />
the programming track. The selection is done with the two<br />
radio buttons b) and c). In case of M4 decoders POM is automatically<br />
preset and cannot be changed.<br />
If you want to use POM then you may not change the address.<br />
Address changes can only be ac<strong>com</strong>plished on the programming<br />
track.<br />
18.7.5.1. Download mode<br />
• Transfer the <strong>com</strong>plete set of data to the loco by pushing the<br />
screen button d).<br />
All CV data of the decoder will be overwritten. Please check if<br />
you actually want to proceed before pushing this button!<br />
18.7.5.2. Live mode<br />
In POM mode you can observe all changes “live” during the<br />
programming process: ECoS transmits all changes to the (running)<br />
loco immediately. Thus programming be<strong>com</strong>es far easier<br />
than previously.<br />
a)<br />
d)<br />
e)<br />
• Activate the screen button a) “Live” while in POM mode.<br />
• As soon as you now change any value with the slide controller<br />
(e.g. CV5, maximum speed) the new value is transmitted to the<br />
loco and you see the effect immediately.<br />
Live mode is not suitable for<br />
• Setting addresses<br />
• Function mapping<br />
18.7.6. More info on profiles<br />
• There is a matching profile for every ESU decoder. However,<br />
a profile does not necessarily contain all decoder parameters.<br />
Some rarely used settings should be adjusted manually as described<br />
in chapter 18.4. Alternately you could use our LokProgrammer<br />
with its <strong>com</strong>puter software.<br />
• For DCC decoders by other suppliers it is best to use the generic<br />
NMRA profile. For extended settings we re<strong>com</strong>mend to use<br />
manual programming of CVs.<br />
18.8. Programming Märklin® 763xx series signals<br />
The following steps are required for programming the digital<br />
signals of the 763xx series (e. g.: 76391, 76393, etc.):<br />
1. Leave the signal electronics in the package and insert it into<br />
the contact bar in the box. Make sure it is positively arrested.<br />
2. Enter a new accessory on the ECoS as described in chapter<br />
13.1. Select the matching type of signal from the choice<br />
list. If there is a distant signal on the mast of the main signal<br />
then you must also set up the main signal to which the<br />
distant signal refers. Assign the desired “Weisen” number<br />
to each signal. Select “Momentary action mode”.<br />
Set the switch pulse duration to 2500ms for programming.<br />
Do not forget to enter the corresponding main signals for<br />
distant signals on the same mast as accessories.<br />
3. In order to be able to switch this accessory you must establish<br />
a link on one of the turnout control panel panels.<br />
4. Switch off the ECoS.<br />
5. Remove the connection form the ECoS to the layout. Connect<br />
only the signal to be programmed to the track output<br />
of the ECoS.<br />
6. Switch on the ECoS. As soon as the ECoS is operational<br />
press the “Stop“ button (emergency stop).<br />
7. Press the “Go” button of the ECoS. The signal will now<br />
alternate between two aspects. The following procedure<br />
depends on the type of signal.<br />
76391/76371/76372: confirm the signal on the screen. The<br />
signal will be programmed with the preset time of 2500<br />
ms.<br />
76392/76394: Switch to signal aspect Hp1. Wait until the<br />
signal starts to alternate between different signal aspects.<br />
Then switch to signal aspect Hp2.<br />
76395/76397: the initial steps are the same as for the signals<br />
76391 resp. 76393. Thereafter the distant signal will<br />
start to alternate between two signal aspects. Activate Hp1<br />
or Hp0 of the corresponding main signal. If the distant si-<br />
gnal is linked to a two-aspect main signal then press HP1<br />
or Hp0 once again after the distant signal has started again<br />
to alternate between two aspects. Otherwise you activate<br />
the signal aspect Hp2 of the corresponding main signal. In<br />
this case the allocation of the second address will happen<br />
automatically.<br />
8. The signal is now programmed. Turn off the ECoS. Remove<br />
the signal from the box and install it on the layout.<br />
• Only start with the further steps once the signal has begun to<br />
alternate between the two signal aspects once more.<br />
• It is quite sufficient to trigger the <strong>com</strong>mands very briefly. The<br />
required switching time is predetermined by the setting to<br />
2500 ms. For later operation you should change this value to a<br />
more practical number (e.g. 500 ms).<br />
• In case of very long pauses between the individual steps the<br />
signal may terminate the programming process. Restart the<br />
process by pressing the „Stop“ button once again.