User Manual - Ajckids.com
User Manual - Ajckids.com
User Manual - Ajckids.com

You also want an ePaper? Increase the reach of your titles
YUMPU automatically turns print PDFs into web optimized ePapers that Google loves.
36<br />
Configuration Menue<br />
21.3.4. Change of direction<br />
21.3.4.1. Immediate stop of DCC lo<strong>com</strong>otives<br />
If this feature is active then all M4 decoders and DCC decoders<br />
will not only receive a change-of-direction <strong>com</strong>mand whenever<br />
the throttle knob is pressed down but an emergency stop<br />
<strong>com</strong>mand as well. This leads to a rapid stop of the lo<strong>com</strong>otive<br />
which may lead to derailments in some instances.<br />
Motorola® lo<strong>com</strong>otives always receive this emergency stop<br />
<strong>com</strong>mand.<br />
21.3.4.2. Deactivating change-of-direction feature of the throttle<br />
knob<br />
Should you not wish to utilise the feature of changing direction<br />
by pushing the throttle far left (until you hear the “click”) because<br />
you prefer to use the joystick or the touch panel for this<br />
purpose, simply place a tick in front of this <strong>com</strong>mand.<br />
21.3.4.3. Delayed change of direction<br />
If this feature is active then you must turn the throttle knob to<br />
the far left (until you hear the “click”) and keep it in that position<br />
for a certain time until the lo<strong>com</strong>otive changes direction.<br />
This option serves to avoid operator errors.<br />
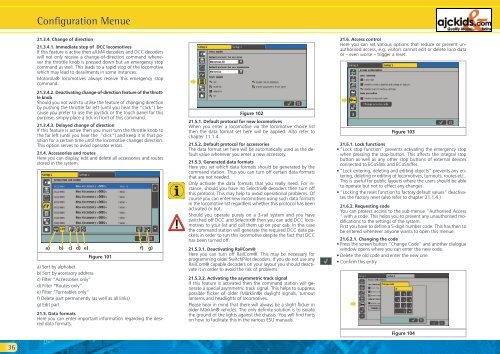
21.4. Accessories and routes<br />
Here you can display, edit and delete all accessories and routes<br />
stored in the system.<br />
a) b) c) d) e) f) g)<br />
Figure 101<br />
a) Sort by alphabet<br />
b) Sort by accessory address<br />
c) Filter “Accessories only“<br />
d) Filter “Routes only“<br />
e) Filter “Turntables only“<br />
f) Delete part permanently (as well as all links)<br />
g) Edit part<br />
21.5. Data formats<br />
Here you can enter important information regarding the desired<br />
data formats.<br />
�<br />
Figure 102<br />
21.5.1. Default protocol for new lo<strong>com</strong>otives<br />
When you enter a lo<strong>com</strong>otive via the lo<strong>com</strong>otive choice list<br />
then the data format set here will be applied. Also refer to<br />
chapter 11.1.4.<br />
21.5.2. Default protocol for accessories<br />
The data format set here will be automatically used as the default<br />
value whenever you enter a new accessory.<br />
21.5.3. Generated data formats<br />
Here you set which data formats should be generated by the<br />
<strong>com</strong>mand station. Thus you can turn off certain data formats<br />
that are not needed.<br />
Only activate the data formats that you really need. For instance,<br />
should you have no Selectrix® decoders then turn off<br />
this protocol. This may help to avoid operational problems. Of<br />
course you can enter new lo<strong>com</strong>otives using such data formats<br />
in the lo<strong>com</strong>otive list regardless whether this protocol has been<br />
activated or not.<br />
Should you operate purely on a 3-rail system and you have<br />
switched off DCC and Selectrix® then you can add DCC lo<strong>com</strong>otives<br />
to your list and call them up on your cab. In this case<br />
the <strong>com</strong>mand station will generate the required DCC data packets<br />
in order to run this lo<strong>com</strong>otive despite the fact that DCC<br />
has been turned off.<br />
21.5.3.1. Deactivating RailCom®<br />
Here you can turn off RailCom®. This may be necessary for<br />
programming older SwitchPilot decoders. If you do not use any<br />
RailCom® capable decoders on your layout you should deactivate<br />
it in order to avoid the risk of problems.<br />
21.5.3.2. Activating the asymmetric track signal<br />
If this feature is activated then the <strong>com</strong>mand station will generate<br />
a special asymmetric track signal. This helps to suppress<br />
possible flicker of older (Märklin®) daylight signals, turnout<br />
lanterns and headlights of lo<strong>com</strong>otives.<br />
Please bear in mind that there will always be a slight flicker in<br />
older Märklin® vehicles. The only definite solution is to isolate<br />
the ground of the lights against the chassis. You will find hints<br />
on how to facilitate this in the various ESU manuals.<br />
21.6. Access control<br />
Here you can set various options that reduce or prevent unauthorised<br />
access, e.g. visitors cannot edit or delete loco data<br />
or – even worse – trigger a reset.<br />
�<br />
Figure 103<br />
21.6.1. Lock functions<br />
• “Lock stop function” prevents activating the emergency stop<br />
when pressing the stop button. This affects the integral stop<br />
button as well as any other stop buttons of external devices<br />
connected to ECoSlink and ECoSniffer.<br />
• “Lock entering, deleting and editing objects“ prevents any entering,<br />
deleting or editing of lo<strong>com</strong>otives, turnouts, routes etc..<br />
This is useful for public layouts where the users should be able<br />
to operate but not to effect any changes.<br />
• “Locking the reset function to factory default values” deactivates<br />
the factory reset (also refer to chapter 21.1.4.)<br />
21.6.2. Requesting code<br />
You can protect access to the sub-menue “Authorised Access<br />
“ with a code. This helps you to prevent any unauthorised modifications<br />
to the settings of the system.<br />
First you have to define a 5-digit number code. This has then to<br />
be entered whenever anyone wants to open this menue.<br />
21.6.2.1. Changing the code<br />
• Press the screen button “Change Code” and another dialogue<br />
window opens where you can enter the new code.<br />
• Delete the old code and enter the new one.<br />
• Confirm this entry<br />
�<br />
Figure 104