workshop manual rear axles rf17n/h r17n/h - Marmon-Herrington
workshop manual rear axles rf17n/h r17n/h - Marmon-Herrington
workshop manual rear axles rf17n/h r17n/h - Marmon-Herrington

You also want an ePaper? Increase the reach of your titles
YUMPU automatically turns print PDFs into web optimized ePapers that Google loves.
SECTION 285.<br />
80-100°C-ra és vállig ütközésig üssük fel az áthajtó<br />
tengelyre, a 2. A ábra BEHAJTÓTENGELY látható szerszámmal. Várjuk ÉS A meg, HAJhogy<br />
a csapágy TÓM�HÁZ leh�ljön. III. LESZERELÉSE<br />
REINSTALLING A kapcsolóagy THE THRU-DRIVE I. (3) és SHAFT a fedél (5) leszerelése után<br />
Heat up the hajtsuk deep-groove ki a hajtóm�ház ball bearing III. to (45) 80-100°C küls� pereméb�l a<br />
and by means<br />
hatlapfej�<br />
of tool shown<br />
peremes<br />
in Fig.<br />
csavarokat<br />
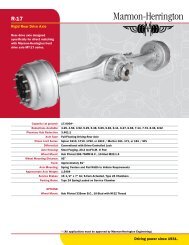
2. install<br />
(14).<br />
to the<br />
Üssük ki az<br />
thru-drive shaft<br />
illeszt�szegeket<br />
to bottom out<br />
és válasszuk<br />
against the<br />
szét<br />
shoulder<br />
a hajtóm�ház III.-at<br />
Az el�szerelt áthajtó tengelyt helyezzük<br />
be a hídházba, bordázatát illesszük a nagy<br />
kiegyenlít� kúpkerék I.-be (91) és az<br />
el�bb használt a hajtóm�ház szerszámmal II.-tól. üssük be a<br />
mélyhornyú ring. Wait for golyóscsapágyat the bearing cool down. a tengellyel<br />
együtt a csapágyfészekbe, ütközésig (2.<br />
ábra). együttmunkáltak!<br />
Position the subassembled thru-drive<br />
shaft to the axle housing, the aligning its<br />
splines tool as to above those (see of Fig. the differential 2.). gear I.<br />
(91) drive the deep-groove ball bearing<br />
together with the shaft to place until the<br />
bearing bottoms out against its seat. For<br />
II.-t (85)<br />
driving in use the same tool as above<br />
(see Fig. 2.).<br />
78<br />
SECTION 285.<br />
by means of tool shown in Fig. 2. install to the thr<br />
drive REMOVING shaft to bottom THE out INPUT against SHAFT the shoulder AND rin<br />
Wait DIFFERENTIAL for the bearing CARRIER cool down. III.<br />
After removing the companion flange I. (3) and the<br />
cover (5) remove the hex. flanged bolts (14) from the<br />
outer flange of the differential carrier III. (45).Drive<br />
4970-00485<br />
out the dowel pins and separate the differential carrier<br />
III. from the differential carrier II.<br />
A hajtóm�ház II.-t és III.-at számozzuk össze, mivel<br />
Position the subassembled thru-drive shaft to the axle<br />
housing, the aligning its splines to those of the differ-<br />
Match-mark the differential carriers II. and III. since<br />
they are matched parts.<br />
ential gear I. (91)<br />
Emeljük<br />
drive the<br />
ki<br />
deep-groove<br />
a hajtóm�ház<br />
ball bearing<br />
III.-at (45) a<br />
together with behajtótengellyel the shaft to place (68) until és a the fogazott bearing aggyal bot(69)<br />
együtt.<br />
toms out against its seat. For driving in use the same<br />
Withdraw the differential carrier III. (45) together with<br />
the input shaft (68) and the toothed hub (69).<br />
Vegyük le a 32014 kúpgörg�s csapágy (92) bels� Remove the differential side gear I. (91) assembled<br />
részével szerelt nagy kiegyenlít� kúpkerék I.-et (91), a<br />
Position the snap kiegyenlít�m�vet ring (100). By (89) the above és vegyük tool drive le a hajtó<br />
with the 32014 taper roller bearing (92) cone, then the<br />
differential (89) and remove the 842.02-16 differential side gear<br />
in the inner sealing fogaskerékkel ring, position (82) szerelt the nagy distance kiegyenlít� ring kúpkerék<br />
(99) and also drive in the outer sealing ring by the<br />
II (85) mounted with the drive gear (82).<br />
drive sleeve shown in Fig. 2. to flush with outer edge Fig. 2.: REINSTALLING THE THRU-DRIVE SHAFT<br />
of the bearing A cage. hosszirányú kiegyenlít�m�zár m�ködtet� légkamrát After backing out the 2 off M8x15 bolts remove the<br />
szereljük le a 2 db M8x15-ös csavarok kicsavarása 2. ábra: AZ inter-axle ÁTHAJTÓ differential TENGELY lock BESZERELÉSE<br />
actuating pneumatic<br />
Apply specified után grease és a to tolórúdat between (79) the hajtsuk sealing ki lip a and tolóvilla As (78) described chamber in the and Section unscrew 283. the install shift bar the (79) compan- from threaded<br />
Fig. 2.: REINSTALLING THE THRU-DRIVE SHAFT<br />
the dust protection menetes edge furatából. of the outer sealing rings, ion flange bore II. (105) of the to shift the yoke shaft (78). end, position washer<br />
and thin coat of grease the inner one.<br />
(2) and flanged castle nut tightened to 850 - 1050 Nm<br />
Tegyük be a rögzít�gy�r�t (100). Üssük be a bels� Position the snap ring (100). By the above tool drive<br />
(AMBLYGON Húzzuk TA 15/2) le a behajtó tengelyr�l (68) a fogazott torque agyat and Pull secure the toothed with cotter. hub (69) Rotate together the with thru-drive shift yoke (78)<br />
tömít�gy�r�t (69) a fenti a tolóvillával szerszámmal, (78) együtt tegyük és vegyük be a ki távtaró a szabaddá shaft and the from check inner the for sealing input even shaft run, ring, (68) free position and of also jamming remove the distance and the spring ring (9<br />
gy�r�t (99), vált és rugót a küls� (80) is. tömít�gy�r�t is üssük be jerks. a and (80) also set free. drive in the outer sealing ring by the driv<br />
csapágyhüvely küls� éléig a 2. ábrán ábrázolt felüt� sleeve shown in Fig. 2. to flush with outer edge of th<br />
hüvellyel.<br />
A hajtóm�ház III.-at megfelel�en alátámasztva üssük<br />
bearing<br />
Properly<br />
cage.<br />
backing up the differential carrier III. tap the<br />
ki a behajtó tengelyt a kúpgörg�s csapágy SECTION (51) bels� 285. input shaft out of the inner race of taper roller bearing<br />
A küls� tömít�gy�r�k részéb�l. tömít�éle és porvéd� ajkai Apply specified grease to between the sealing lip an<br />
közötti teret<br />
REMOVING<br />
az el�írt zsírral<br />
THE<br />
kell<br />
INPUT<br />
kitölteni,<br />
SHAFT<br />
a bels�t<br />
AND DIFFERENTIAL (51).<br />
the dust protection<br />
CARRIER<br />
edge of<br />
III.<br />
the outer sealing rings, an<br />
zsírral vékonyan A hajtóm�ház bekenni. (AMBLYGON III.-ból a bentmaradt TA 15/2) thin coat of grease the inner on<br />
After removing kúpgörg�s the companion csapágyat flange az I. (3) ábrázolt and the<br />
Szereljük cover (5) remove szerszámokkal<br />
fel a 283. the hex. fejezet flanged üssük ki<br />
szerint bolts (1. ábra).<br />
a (14) kapcsolóagy from the II.-t<br />
(105) outer flange a tengelyvégre, of the differential tegyük carrier fel III. az (45). alátétet Drive (2), a<br />
out the dowel From pins and differential separate carrier the differential III. remove carrier the<br />
peremes koronás anyát 850 - 1050 Nm nyomatékkal<br />
III. from the differential<br />
remained taper<br />
carrier<br />
roller<br />
II.<br />
bearing by means of<br />
húzzuk meg the és tools sasszeggel shown (see biztosítsuk. Fig. 1.). Elforgatáskor<br />
(AMBLYGON TA 15/2)<br />
As described in the 4970-00486 Section 283. install the companio<br />
flange II. (105) to the shaft end, position washer (<br />
and flanged castle RA-1039 nut tightened to 850 - 1050 N<br />
torque and secure with cotter. Rotate the thru-driv<br />
akadás, Match-mark szorulás, the differential szaggatott carriers elfordulás II. and nem III. since engedhet�<br />
meg. they are matched parts. Withdraw the differential car-<br />
shaft and check for even run, free of jamming an<br />
jerks.<br />
rier III. (45) together with the input shaft (68) and the<br />
toothed hub (69).<br />
Remove the differential side gear I. (91) assembled<br />
with the 32014 1. taper ábra: roller A KÚPGÖRG�S bearing (92) cone, CSAPÁGY then the<br />
differential (89) KIÜTÉSE and remove the differential side gear<br />
II (85) mounted Fig. with 1.: DRIVING the drive gear OUT (82). THE TAPER<br />
ROLLER BEARING<br />
After backing out the 2 off M8x15 bolts remove the inter-axle<br />
differential lock actuating pneumatic chamber<br />
and unscrew the shift bar (79) from threaded bore of<br />
the shift yoke (78).<br />
Pull the toothed hub (69) together with shift yoke (78)<br />
from the input shaft (68) and also remove the spring<br />
(80) set free.<br />
32212<br />
842.02-17<br />
Fig. 1.: DRIVING OUT THE TAPER ROLLER BEARING<br />
Properly backing up the differential carrier III. tap the<br />
input shaft out of the inner race of taper roller bearing<br />
(51).<br />
From differential carrier III. remove the<br />
remained taper roller bearing by means of<br />
the tools shown (see Fig. 1.).<br />
53<br />
79