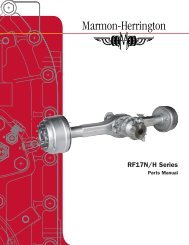
workshop manual rear axles rf17n/h r17n/h - Marmon-Herrington
workshop manual rear axles rf17n/h r17n/h - Marmon-Herrington
workshop manual rear axles rf17n/h r17n/h - Marmon-Herrington

You also want an ePaper? Increase the reach of your titles
YUMPU automatically turns print PDFs into web optimized ePapers that Google loves.
DISASSEMBLING THE OIL PUMP<br />
Remove the hex. bolts with lock washer (54) clamping<br />
the oil pump covers (64 and 65) and the oil pump<br />
case (55), then remove the pump covers from the<br />
pump case.<br />
After removing the cover pull the drive (61) and driven<br />
gears out of the oil pump case.<br />
Tap or pull the used bushes (58) out of the covers.<br />
After backing out the flanged screw plug (56) the oil<br />
pressure control spring (59) and the steel ball (62)<br />
can be removed from the pump cover II.<br />
REASSEMBLING THE OIL PUMP<br />
Press the bushes into the covers the flush with the<br />
sides surface.<br />
Tap the lock pin into both sides of the pump case.<br />
Insert the gear into relevant bores pump case, then<br />
SECTION 295.<br />
DISASSEMBLING AND REASSEMBLING THE OIL PUMP<br />
fitting the covers to the gears and the lock pins attach<br />
them to both sides of the pump case.<br />
For reassembling the case and the cover use the<br />
matching sleeve Drw. No. 4905-00025.<br />
Make sure the gears are installed to the relevant<br />
bores.<br />
From the oil pump cover I. side screw the hex. bolts<br />
with lock washer (54) thru the oil pump case (55) and<br />
tighten to 13 Nm torque.<br />
Punch secure the lock pin on the oil pump cover I.<br />
(65) side against loosening.<br />
Insert the steel ball (62) into the seat, position the oil<br />
pressure control spring (59) and secure by flanged<br />
screw plug with sealing ring (56).<br />
Install the other flanged screw plug with sealing ring<br />
(63), as well.<br />
71