AS9N010B.STB AS-93plus Service Manual.fm - LIQUID-scan GmbH ...
AS9N010B.STB AS-93plus Service Manual.fm - LIQUID-scan GmbH ...
AS9N010B.STB AS-93plus Service Manual.fm - LIQUID-scan GmbH ...

Create successful ePaper yourself
Turn your PDF publications into a flip-book with our unique Google optimized e-Paper software.
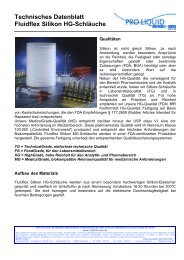
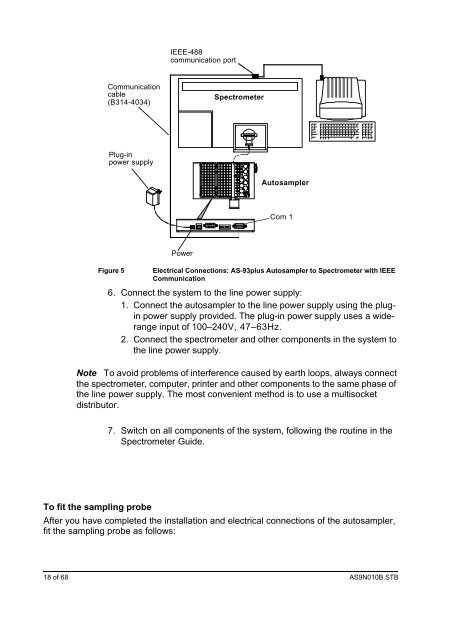
Communication<br />
cable<br />
(B314-4034)<br />
Plug-in<br />
power supply<br />
Figure 5 Electrical Connections: <strong>AS</strong>-<strong>93plus</strong> Autosampler to Spectrometer with IEEE<br />
Communication<br />
6. Connect the system to the line power supply:<br />
1. Connect the autosampler to the line power supply using the plugin<br />
power supply provided. The plug-in power supply uses a widerange<br />
input of 100–240V, 47–63Hz.<br />
2. Connect the spectrometer and other components in the system to<br />
the line power supply.<br />
Note To avoid problems of interference caused by earth loops, always connect<br />
the spectrometer, computer, printer and other components to the same phase of<br />
the line power supply. The most convenient method is to use a multisocket<br />
distributor.<br />
To fit the sampling probe<br />
IEEE-488<br />
communication port<br />
Power<br />
Spectrometer<br />
Autosampler<br />
Com 1<br />
7. Switch on all components of the system, following the routine in the<br />
Spectrometer Guide.<br />
After you have completed the installation and electrical connections of the autosampler,<br />
fit the sampling probe as follows:<br />
18 of 68 <strong><strong>AS</strong>9N010B</strong>.<strong>STB</strong>