AS9N010B.STB AS-93plus Service Manual.fm - LIQUID-scan GmbH ...
AS9N010B.STB AS-93plus Service Manual.fm - LIQUID-scan GmbH ...
AS9N010B.STB AS-93plus Service Manual.fm - LIQUID-scan GmbH ...

Create successful ePaper yourself
Turn your PDF publications into a flip-book with our unique Google optimized e-Paper software.
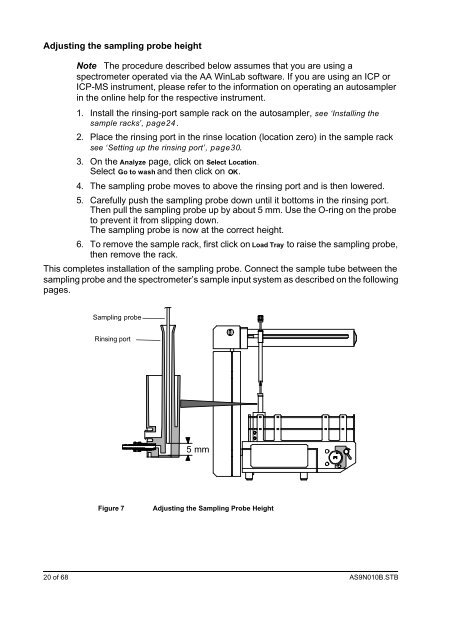
Adjusting the sampling probe height<br />
Note The procedure described below assumes that you are using a<br />
spectrometer operated via the AA WinLab software. If you are using an ICP or<br />
ICP-MS instrument, please refer to the information on operating an autosampler<br />
in the online help for the respective instrument.<br />
1. Install the rinsing-port sample rack on the autosampler, see ‘Installing the<br />
sample racks’, page24.<br />
2. Place the rinsing port in the rinse location (location zero) in the sample rack<br />
see ‘Setting up the rinsing port’, page30.<br />
3. On the Analyze page, click on Select Location.<br />
Select Go to wash and then click on OK.<br />
4. The sampling probe moves to above the rinsing port and is then lowered.<br />
5. Carefully push the sampling probe down until it bottoms in the rinsing port.<br />
Then pull the sampling probe up by about 5mm. Use the O-ring on the probe<br />
to prevent it from slipping down.<br />
The sampling probe is now at the correct height.<br />
6. To remove the sample rack, first click on Load Tray to raise the sampling probe,<br />
then remove the rack.<br />
This completes installation of the sampling probe. Connect the sample tube between the<br />
sampling probe and the spectrometer’s sample input system as described on the following<br />
pages.<br />
Sampling probe<br />
Rinsing port<br />
5 mm<br />
Figure 7 Adjusting the Sampling Probe Height<br />
20 of 68 <strong><strong>AS</strong>9N010B</strong>.<strong>STB</strong><br />
.