AS9N010B.STB AS-93plus Service Manual.fm - LIQUID-scan GmbH ...
AS9N010B.STB AS-93plus Service Manual.fm - LIQUID-scan GmbH ...
AS9N010B.STB AS-93plus Service Manual.fm - LIQUID-scan GmbH ...

Create successful ePaper yourself
Turn your PDF publications into a flip-book with our unique Google optimized e-Paper software.
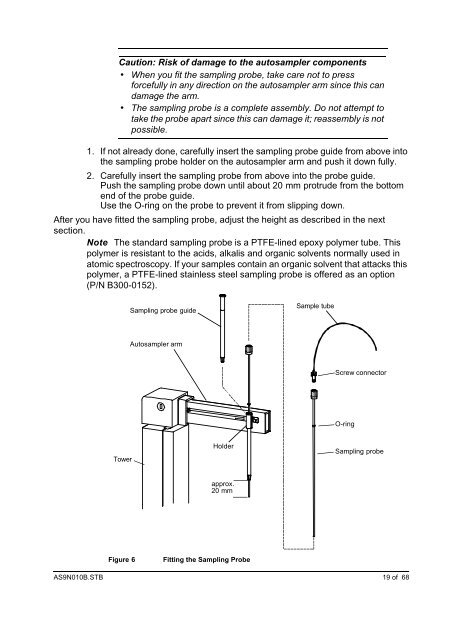
Caution: Risk of damage to the autosampler components<br />
• When you fit the sampling probe, take care not to press<br />
forcefully in any direction on the autosampler arm since this can<br />
damage the arm.<br />
• The sampling probe is a complete assembly. Do not attempt to<br />
take the probe apart since this can damage it; reassembly is not<br />
possible.<br />
1. If not already done, carefully insert the sampling probe guide from above into<br />
the sampling probe holder on the autosampler arm and push it down fully.<br />
2. Carefully insert the sampling probe from above into the probe guide.<br />
Push the sampling probe down until about 20 mm protrude from the bottom<br />
end of the probe guide.<br />
Use the O-ring on the probe to prevent it from slipping down.<br />
After you have fitted the sampling probe, adjust the height as described in the next<br />
section.<br />
Note The standard sampling probe is a PTFE-lined epoxy polymer tube. This<br />
polymer is resistant to the acids, alkalis and organic solvents normally used in<br />
atomic spectroscopy. If your samples contain an organic solvent that attacks this<br />
polymer, a PTFE-lined stainless steel sampling probe is offered as an option<br />
(P/N B300-0152).<br />
Tower<br />
Sampling probe guide<br />
Autosampler arm<br />
.<br />
Holder<br />
approx.<br />
20 mm<br />
Figure 6 Fitting the Sampling Probe<br />
Sample tube<br />
Screw connector<br />
O-ring<br />
Sampling probe<br />
<strong><strong>AS</strong>9N010B</strong>.<strong>STB</strong> 19 of 68