LTQ Orbitrap XL Hardware Manual
LTQ Orbitrap XL Hardware Manual
LTQ Orbitrap XL Hardware Manual

Create successful ePaper yourself
Turn your PDF publications into a flip-book with our unique Google optimized e-Paper software.
Figures<br />
<strong>LTQ</strong> <strong>Orbitrap</strong> <strong>XL</strong> front view ................................................................ 1-2<br />
Schematic view of the <strong>LTQ</strong> <strong>Orbitrap</strong> <strong>XL</strong> .............................................. 1-3<br />
Top lid opened ...................................................................................... 1-4<br />
System status LEDs ............................................................................... 1-6<br />
Right side of the <strong>LTQ</strong> <strong>Orbitrap</strong> <strong>XL</strong> ...................................................... 1-7<br />
Upper control panel .............................................................................. 1-8<br />
Power control panel with power control LEDs and switches ................. 1-9<br />
Main power switch .............................................................................. 1-10<br />
External connections to the <strong>LTQ</strong> <strong>Orbitrap</strong> <strong>XL</strong> ................................... 1-11<br />
Schematic view of the <strong>Orbitrap</strong> cell and example of a stable ion<br />
trajectory ............................................................................................. 1-13<br />
Layout of the instrument, also showing the applied voltages ................ 1-14<br />
Principle of electrodynamic squeezing of ions in the <strong>Orbitrap</strong> as the field<br />
strength is increased ............................................................................ 1-15<br />
Approximate shape of ion packets of different m/q after stabilization of<br />
voltages ............................................................................................... 1-16<br />
HCD collision cell and C-Trap ........................................................... 1-18<br />
Schematical view of vacuum system (CLT compartment not shown) .. 1-19<br />
Vacuum components on the left instrument side ................................ 1-20<br />
Vacuum components on the right instrument side .............................. 1-20<br />
Forepumps cabinet .............................................................................. 1-21<br />
Schematical view of the gas supply ...................................................... 1-25<br />
Valve for HCD collision gas ................................................................ 1-26<br />
Nitrogen pressure regulator and gas flow divider ................................. 1-27<br />
Schematical view of cooling water circuit ............................................ 1-28<br />
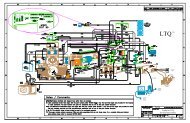
Electronic connections to linear trap (covers removed) ........................ 1-31<br />
Electronic boards on the right side of the instrument .......................... 1-32<br />
Preamplifier board ............................................................................... 1-33<br />
Data Acquisition unit (covers removed) .............................................. 1-34<br />
Data Acquisition Digital PCI board .................................................... 1-35<br />
Data Acquisition Analog board ........................................................... 1-36<br />
Instrument Control board ................................................................... 1-38<br />
Power Distribution board ................................................................... 1-39<br />
Power Supply 1 board ......................................................................... 1-44<br />
Electronic boards on the left side of the instrument ............................. 1-45<br />
Ion Optic Supply board ...................................................................... 1-46<br />
Central Electrode Pulser board ............................................................ 1-47<br />
Temperature Controller board ............................................................ 1-49<br />
CLT RF unit (cover removed) ............................................................. 1-51<br />
Central Electrode Power Supply board ................................................ 1-52<br />
High Voltage Power Supply board (cover removed) ............................ 1-54<br />
High Voltage Power Supply board with SPI Bus Termination board .. 1-55<br />
Main power switch in Off position ....................................................... 2-2<br />
Thermo Fisher Scientific <strong>LTQ</strong> <strong>Orbitrap</strong> <strong>XL</strong> <strong>Hardware</strong> <strong>Manual</strong> xiii