- Page 2 and 3: Adobe, the Adobe logo, Acrobat, Acr
- Page 4: DocuPrint C2120 Features• Easy-to
- Page 8 and 9: ManualsManuals included with the pr
- Page 10 and 11: 4. Orientation of paper is describe
- Page 12: Electrical SafetyThis product shall
- Page 16 and 17: Warning and Caution LabelsBe sure t
- Page 18 and 19: About LicenceThis product includes
- Page 20 and 21: 1 Printer Environment SettingsThis
- Page 23: Example of the [Printer Settings] l
- Page 27 and 28: 4. From the menu on the left, selec
- Page 29 and 30: Configuring the Printer Using Centr
- Page 31 and 32: CentreWare Internet Services Tabs a
- Page 33 and 34: 1.3 Installing a Print DriverTo pri
- Page 35 and 36: Rear ViewNo. Name Description1 Vent
- Page 37 and 38: Control Panel1 2 3 48765No. Name De
- Page 39 and 40: 2.2 Turning On and Off the PrinterT
- Page 41 and 42: 2.4 Setting and Exiting Energy Save
- Page 43 and 44: 3 PrintThis chapter describes how t
- Page 45 and 46: 3.2 Printing on EnvelopesLoading En
- Page 47 and 48: 5. From [Paper Size], select the si
- Page 49 and 50: 1. On the Windows [Start] menu, cli
- Page 51 and 52: 6. Click the [Layout] tab, and from
- Page 53 and 54: 3The [Secure Print] dialog box appe
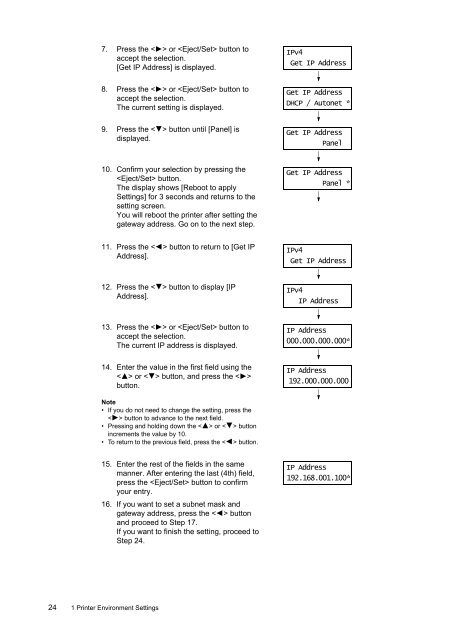
- Page 55 and 56: 8. Press the < > or button toaccep
- Page 57 and 58: 3. The [Paper / Output] tab appears
- Page 59 and 60: Note• If you selected [All Docume
- Page 61 and 62: Follow the instruction described be
- Page 63 and 64: 6. Press the < > or button toaccep
- Page 65 and 66: E-mail Environment (Printer)Set the
- Page 67 and 68: This section explains how to write
- Page 69 and 70: Precautions When Using E-mail Print
- Page 71 and 72: 4 PaperThis chapter describes the t
- Page 73 and 74: Recommended and Tested PaperThe fol
- Page 75 and 76:
Storing and Handling PaperPaper sto
- Page 77 and 78:
6. Slide the width guides until the
- Page 79 and 80:
Setting the Paper Type and Size wit
- Page 81 and 82:
Setting the Paper Size and Type in
- Page 83 and 84:
The menu comprises different levels
- Page 85 and 86:
Setting Example:Changing the Energy
- Page 87 and 88:
Meter ReadingsDisplays the number o
- Page 89 and 90:
ItemDescriptionProtocolSelect [Enab
- Page 91 and 92:
System Settings[System Settings] me
- Page 93 and 94:
RAM DiskItemDescriptionAllocates me
- Page 95 and 96:
Maintenance ModeUse this menu to in
- Page 97 and 98:
ItemOutput SizeLayoutOutput ColorDe
- Page 99 and 100:
PostScriptSpecifies the settings re
- Page 101 and 102:
Tray SettingsYou can set the paper
- Page 103 and 104:
Paper Jams in the Manual FeederFoll
- Page 105 and 106:
Paper Jams in Tray 1Follow the proc
- Page 107 and 108:
5. Close the front cover.Important
- Page 109 and 110:
4. Press the side button and open t
- Page 111 and 112:
6.3 Printing ProblemsSymptomThe in
- Page 113 and 114:
SymptomStreaks appear inside orouts
- Page 115 and 116:
Printed image or texts wear offquic
- Page 117 and 118:
6.5 Paper Feeding ProblemsSymptomPa
- Page 119 and 120:
MessageRemove & ShakeX CrtrdgXXX=Ye
- Page 121 and 122:
MessageCondition/Reason/ActionLogin
- Page 123 and 124:
6.7 Network-related ProblemsFor inf
- Page 125 and 126:
E-Mail Print/StatusMessenger Proble
- Page 127 and 128:
6.8 Non-genuine ModeWhen toner with
- Page 129 and 130:
If you inhale toner particles, move
- Page 131 and 132:
Replacing the Drum CartridgeBefore
- Page 133 and 134:
11. Turn the four screws 90 degrees
- Page 135 and 136:
5. Pinch the gray lever on the righ
- Page 137 and 138:
Replacing the Feed Roller UnitThis
- Page 139 and 140:
7.2 Printing the Reports/ListsThis
- Page 141 and 142:
7.3 Checking Printed PagesThe print
- Page 143 and 144:
7.4 Checking the Printer Status via
- Page 145 and 146:
7.6 Checking the Printer Status via
- Page 147 and 148:
Sending an E-mail to Check the Prin
- Page 149 and 150:
SSL Data Encryption for HTTP Commun
- Page 151 and 152:
Accessing CentreWare Internet Servi
- Page 153 and 154:
Controlling Data Reception by IP Ad
- Page 155 and 156:
IPsec Data EncryptionIPsec (Securit
- Page 157 and 158:
IEEE 802.1x AuthenticationThis feat
- Page 159 and 160:
7.8 Authentication and AuditronAdmi
- Page 161 and 162:
Registering Login Information on th
- Page 163 and 164:
11. On the displayed page, enter ea
- Page 165 and 166:
7.9 Adjusting the Color Registratio
- Page 167 and 168:
Entering the Adjustment ValuesSet t
- Page 169 and 170:
7.10 Adjusting the Image Transfer V
- Page 171 and 172:
7.12 Adjusting the AltitudeWhen ins
- Page 173 and 174:
Cleaning the CTD SensorWhen the err
- Page 175 and 176:
7.14 Moving the PrinterCarry out th
- Page 177 and 178:
AAppendixThis appendix provides inf
- Page 179 and 180:
ItemMemory capacityFontPage descrip
- Page 181 and 182:
A.2 Optional AccessoriesThe followi
- Page 183 and 184:
A.3 Life of ConsumablesConsumablesD
- Page 185 and 186:
A.5 Installing Additional MemoryIn
- Page 187 and 188:
5. Insert the memory card into thec
- Page 189 and 190:
A.6 Notes and RestrictionsNotes and
- Page 191 and 192:
A.7 Glossary10BASE-T:A 10 Mbps Ethe
- Page 193 and 194:
Interface cable:A cable that is use
- Page 195 and 196:
USB:An acronym for Universal Serial
- Page 197 and 198:
data reception control by IP addres
- Page 199 and 200:
Control Panel Menu TreeBasic Contro
- Page 201 and 202:
AWired NetworkEthernetAuto*, 10BASE
- Page 203 and 204:
DMaintenance ModeF/W Versionxxxxxxx
- Page 205 and 206:
HXPSAdjust Print TicketetportPaper