- Page 2 and 3: Adobe, the Adobe logo, Acrobat, Acr
- Page 4: DocuPrint C2120 Features• Easy-to
- Page 8 and 9: ManualsManuals included with the pr
- Page 10 and 11: 4. Orientation of paper is describe
- Page 12: Electrical SafetyThis product shall
- Page 16 and 17: Warning and Caution LabelsBe sure t
- Page 18 and 19: About LicenceThis product includes
- Page 20 and 21: 1 Printer Environment SettingsThis
- Page 23 and 24: Example of the [Printer Settings] l
- Page 26 and 27: Obtaining an IP Address in IPv6The
- Page 28 and 29: 1. Press the button on the control
- Page 30 and 31: • Setting up your Web Browser wit
- Page 32 and 33: Using CentreWare Internet ServicesF
- Page 34 and 35: 2 Basic OperationThis chapter descr
- Page 36 and 37: InteriorNo. Name Description1 Fuser
- Page 38 and 39: Control Panel DisplayThere are two
- Page 40 and 41: 2.3 About the Ground Fault Interrup
- Page 42 and 43: 2.5 Cancelling and Checking a Print
- Page 44 and 45: Print Options in the Properties Dia
- Page 46 and 47: The following procedure explains ho
- Page 48 and 49: 3.3 Printing on Non-standard Size P
- Page 50 and 51: Printing on Non-standard Size Paper
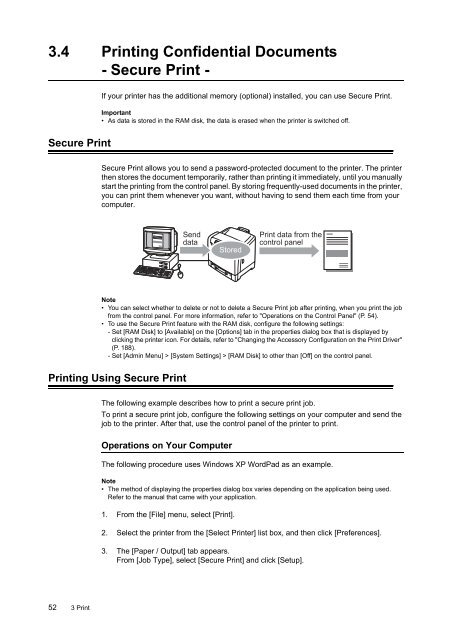
- Page 54 and 55: Operations on the Control PanelFoll
- Page 56 and 57: 3.5 Printing After Checking the Pri
- Page 58 and 59: Operations on the Control PanelFoll
- Page 60 and 61: 3.6 Printing PDF Files DirectlySome
- Page 62 and 63: 3.7 Printing XPS FilesThis printer
- Page 64 and 65: 3.8 Printing Using E-mail - E-mail
- Page 66 and 67: Sending E-mailsSupported E-mail Att
- Page 68 and 69: • To Specify Commands in the Subj
- Page 70 and 71: 3.9 AuditronAuditron contains an au
- Page 72 and 73: Paper Tray Paper Size Paper Type (G
- Page 74 and 75: Unsupported PaperDo not use the fol
- Page 76 and 77: 4.2 Loading PaperLoading Paper in a
- Page 78 and 79: Important:•Insert the paper strai
- Page 80 and 81: 8. Press the button to confirmyour
- Page 82 and 83: 5 Control Panel MenusThis chapter d
- Page 84 and 85: Changing the SettingsBasic Procedur
- Page 86 and 87: 5.2 Description of Menu ItemsThis s
- Page 88 and 89: ItemDescriptionTCP/IPSpecifies the
- Page 90 and 91: ItemAdobe ProtocolDescriptionSets t
- Page 92 and 93: ItemFault Time-outJob Time-outAuto
- Page 94 and 95: ItemDefaultPaperSizeOdd Page 2Sided
- Page 96 and 97: ItemPHD Unit RefreshPrint MeterInit
- Page 98 and 99: ItemDescription2 Sided Specifies 2
- Page 100 and 101: Panel SettingsSpecifies whether to
- Page 102 and 103:
6 TroubleshootingThis section provi
- Page 104 and 105:
5. Grasp the green part of the belt
- Page 106 and 107:
7. Insert the tray into the printer
- Page 108 and 109:
5. Raise the transfer belt unit unt
- Page 110 and 111:
6.2 Hardware Problems (Power Loss,A
- Page 112 and 113:
6.4 Print Quality ProblemsSymptomOu
- Page 114 and 115:
SymptomOutput is partially blank.Ve
- Page 116 and 117:
SymptomPhotos are blurred.Cause/Rem
- Page 118 and 119:
6.6 Error Messages (In Alphabetical
- Page 120 and 121:
MessageCondition/Reason/ActionXXX C
- Page 122 and 123:
Reload ManualFeederMessageCondition
- Page 124 and 125:
SymptomThe [Refresh] button does no
- Page 126 and 127:
IPv6 Connection ProblemsIPv6 Connec
- Page 128 and 129:
7 MaintenanceThis chapter describes
- Page 130 and 131:
5. Insert the toner cartridge into
- Page 132 and 133:
6. Open the bag containing the new
- Page 134 and 135:
Replacing the Fuser UnitThis sectio
- Page 136 and 137:
11. Close the front cover.Important
- Page 138 and 139:
5. Insert the protrusion at the bot
- Page 140 and 141:
Printing a Report/ListThe reports/l
- Page 142 and 143:
Checking the Meter Reading by Compu
- Page 144 and 145:
7.5 Monitoring and Managing the Pri
- Page 146 and 147:
Setting StatusMessengerTo use Statu
- Page 148 and 149:
7.7 Security FeaturesThis section e
- Page 150 and 151:
6. On the displayed page, select th
- Page 152 and 153:
Enabling Data EncryptionTo encrypt
- Page 154 and 155:
2. To reject printing from a specif
- Page 156 and 157:
7. For [IPSec SA Life Time], specif
- Page 158 and 159:
Important• The settings you have
- Page 160 and 161:
Auditron AdministrationWhen the Aut
- Page 162 and 163:
8. Verify that [User Account] is di
- Page 164 and 165:
Registering the Login Information o
- Page 166 and 167:
Determining the Adjustment ValuesTh
- Page 168 and 169:
12. After entering the values, pres
- Page 170 and 171:
7.11 Adjusting the Fuser Unit Tempe
- Page 172 and 173:
7.13 Cleaning the PrinterThis secti
- Page 174 and 175:
5. Return the belt unit to its orig
- Page 176 and 177:
4. Pull out the paper tray from the
- Page 178 and 179:
ItemDescriptionPaper sizeManual Fee
- Page 180 and 181:
ItemDescriptionWeightUsage environm
- Page 182 and 183:
ConsumablesThis section explains ho
- Page 184 and 185:
A.4 Obtaining the Product Informati
- Page 186 and 187:
2. Loosen the screw on the control
- Page 188 and 189:
Changing the Accessory Configuratio
- Page 190 and 191:
• You may not be able to execute
- Page 192 and 193:
DNS:An acronym for Domain Name Syst
- Page 194 and 195:
Port9100:A network communication me
- Page 196 and 197:
Index< > < > < > < > buttons . . .
- Page 198 and 199:
printing XPS files. . . . . . . . .
- Page 200 and 201:
Conventions for the Administrator M
- Page 202 and 203:
CSystem SettingsLow Power Timer2 Mi
- Page 204 and 205:
FPCLPaper TrayAuto*, Tray 1, Manual
- Page 206:
DocuPrint C2120 User GuideFuji Xero


