HP Officejet 4500 (G510) - FTP Directory Listing - Hewlett Packard
HP Officejet 4500 (G510) - FTP Directory Listing - Hewlett Packard
HP Officejet 4500 (G510) - FTP Directory Listing - Hewlett Packard

You also want an ePaper? Increase the reach of your titles
YUMPU automatically turns print PDFs into web optimized ePapers that Google loves.
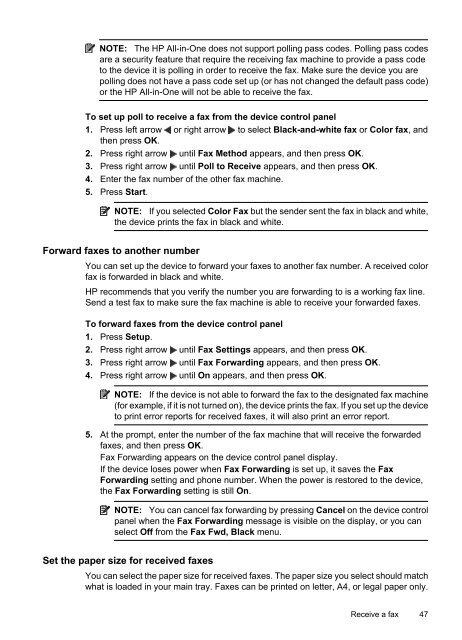
NOTE: The <strong>HP</strong> All-in-One does not support polling pass codes. Polling pass codes<br />
are a security feature that require the receiving fax machine to provide a pass code<br />
to the device it is polling in order to receive the fax. Make sure the device you are<br />
polling does not have a pass code set up (or has not changed the default pass code)<br />
or the <strong>HP</strong> All-in-One will not be able to receive the fax.<br />
To set up poll to receive a fax from the device control panel<br />
1. Press left arrow or right arrow to select Black-and-white fax or Color fax, and<br />
then press OK.<br />
2. Press right arrow until Fax Method appears, and then press OK.<br />
3. Press right arrow until Poll to Receive appears, and then press OK.<br />
4. Enter the fax number of the other fax machine.<br />
5. Press Start.<br />
NOTE: If you selected Color Fax but the sender sent the fax in black and white,<br />
the device prints the fax in black and white.<br />
Forward faxes to another number<br />
You can set up the device to forward your faxes to another fax number. A received color<br />
fax is forwarded in black and white.<br />
<strong>HP</strong> recommends that you verify the number you are forwarding to is a working fax line.<br />
Send a test fax to make sure the fax machine is able to receive your forwarded faxes.<br />
To forward faxes from the device control panel<br />
1. Press Setup.<br />
2. Press right arrow until Fax Settings appears, and then press OK.<br />
3. Press right arrow until Fax Forwarding appears, and then press OK.<br />
4. Press right arrow until On appears, and then press OK.<br />
NOTE: If the device is not able to forward the fax to the designated fax machine<br />
(for example, if it is not turned on), the device prints the fax. If you set up the device<br />
to print error reports for received faxes, it will also print an error report.<br />
5. At the prompt, enter the number of the fax machine that will receive the forwarded<br />
faxes, and then press OK.<br />
Fax Forwarding appears on the device control panel display.<br />
If the device loses power when Fax Forwarding is set up, it saves the Fax<br />
Forwarding setting and phone number. When the power is restored to the device,<br />
the Fax Forwarding setting is still On.<br />
NOTE: You can cancel fax forwarding by pressing Cancel on the device control<br />
panel when the Fax Forwarding message is visible on the display, or you can<br />
select Off from the Fax Fwd, Black menu.<br />
Set the paper size for received faxes<br />
You can select the paper size for received faxes. The paper size you select should match<br />
what is loaded in your main tray. Faxes can be printed on letter, A4, or legal paper only.<br />
Receive a fax 47