Script for Laboratory: Designing embedded ASIPs - CES
Script for Laboratory: Designing embedded ASIPs - CES
Script for Laboratory: Designing embedded ASIPs - CES

Create successful ePaper yourself
Turn your PDF publications into a flip-book with our unique Google optimized e-Paper software.
If you don’t already have a project <strong>for</strong> your current CPU, then create a new one: “File” –<br />
“New Project”. As Project Location you should choose your ASIP Meister Project Directory<br />
(e.g. ASIPMeisterProjects/dlx_basis/) and as Project Name you can choose something like<br />
ISE. This Project Name will then automatically be added as new subdirectory to your chosen<br />
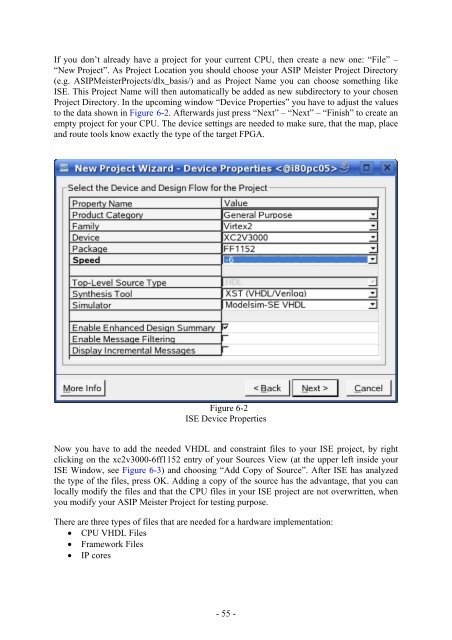
Project Directory. In the upcoming window “Device Properties” you have to adjust the values<br />
to the data shown in Figure 6-2. Afterwards just press “Next” – “Next” – “Finish” to create an<br />
empty project <strong>for</strong> your CPU. The device settings are needed to make sure, that the map, place<br />
and route tools know exactly the type of the target FPGA.<br />
Figure 6-2<br />
ISE Device Properties<br />
Now you have to add the needed VHDL and constraint files to your ISE project, by right<br />
clicking on the xc2v3000-6ff1152 entry of your Sources View (at the upper left inside your<br />
ISE Window, see Figure 6-3) and choosing “Add Copy of Source”. After ISE has analyzed<br />
the type of the files, press OK. Adding a copy of the source has the advantage, that you can<br />
locally modify the files and that the CPU files in your ISE project are not overwritten, when<br />
you modify your ASIP Meister Project <strong>for</strong> testing purpose.<br />
There are three types of files that are needed <strong>for</strong> a hardware implementation:<br />
• CPU VHDL Files<br />
• Framework Files<br />
• IP cores<br />
- 55 -