Script for Laboratory: Designing embedded ASIPs - CES
Script for Laboratory: Designing embedded ASIPs - CES
Script for Laboratory: Designing embedded ASIPs - CES

You also want an ePaper? Increase the reach of your titles
YUMPU automatically turns print PDFs into web optimized ePapers that Google loves.
After the TestData-files <strong>for</strong> your application are created (see above and Chapter 8.3) and the<br />
bitstream of your ISE project is created (see Chapter 6.1 and Chapter 6.2) you can initialize<br />
the bitstream with your application data by executing “../initMem” in your application<br />
subdirectory. This script will create two new files in your application subdirectory: DirectoryName.mem<br />
and DirectoryName.bit. The mem file contains a memory dump <strong>for</strong> data and<br />
instruction memory and is only a temporary file. The bit file is the final bitstream of your<br />
CPU with your application initialized to the BRAM.<br />
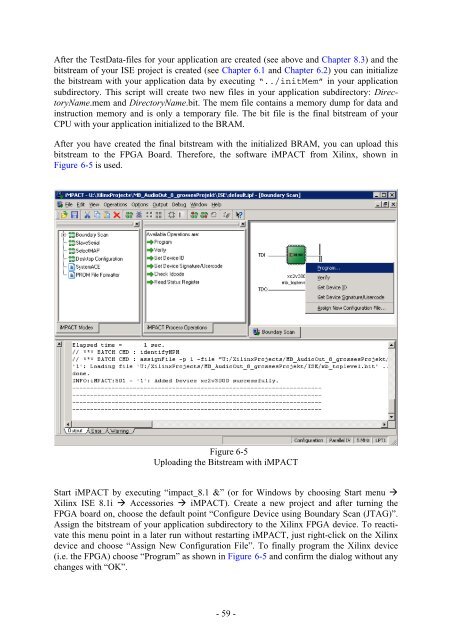
After you have created the final bitstream with the initialized BRAM, you can upload this<br />
bitstream to the FPGA Board. There<strong>for</strong>e, the software iMPACT from Xilinx, shown in<br />
Figure 6-5 is used.<br />
Figure 6-5<br />
Uploading the Bitstream with iMPACT<br />
Start iMPACT by executing “impact_8.1 &” (or <strong>for</strong> Windows by choosing Start menu <br />
Xilinx ISE 8.1i Accessories iMPACT). Create a new project and after turning the<br />
FPGA board on, choose the default point “Configure Device using Boundary Scan (JTAG)”.<br />
Assign the bitstream of your application subdirectory to the Xilinx FPGA device. To reactivate<br />
this menu point in a later run without restarting iMPACT, just right-click on the Xilinx<br />
device and choose “Assign New Configuration File”. To finally program the Xilinx device<br />
(i.e. the FPGA) choose “Program” as shown in Figure 6-5 and confirm the dialog without any<br />
changes with “OK”.<br />
- 59 -